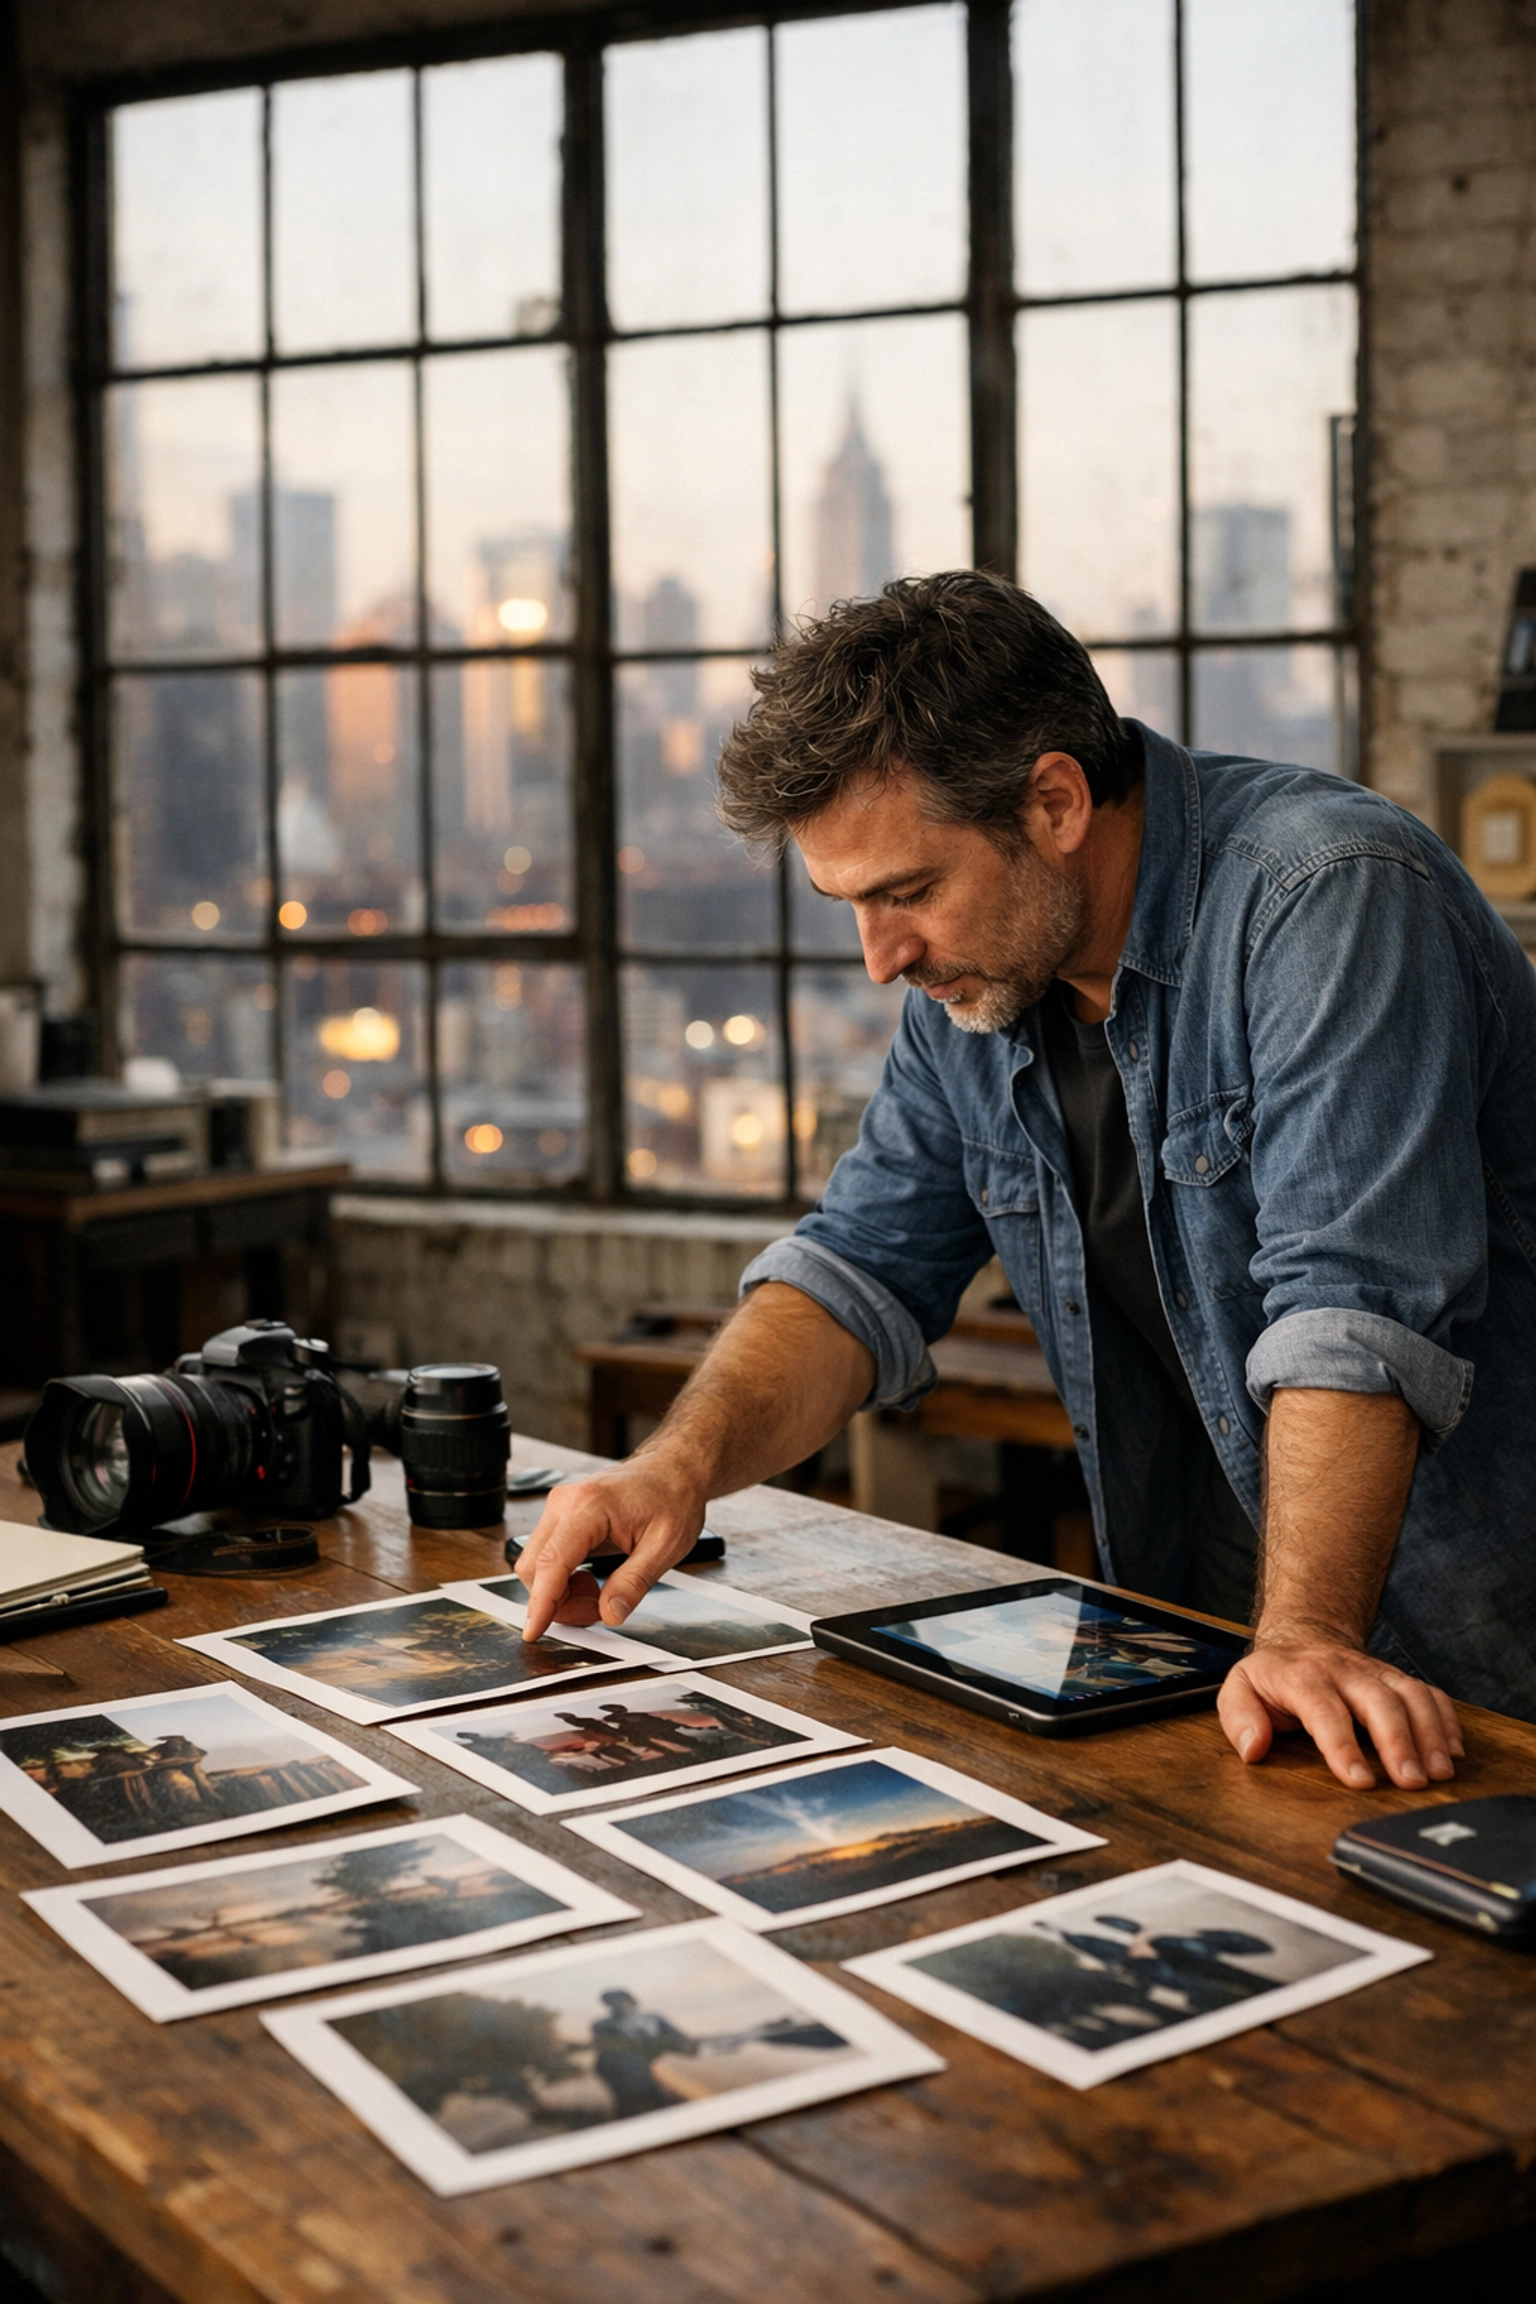
Just as the creative landscape continues to evolve, your approach to finding consistent work must adapt to stay ahead of the curve. As a professional photographer, you know that the struggle isn't just about taking the perfect shot: it's about finding the clients who value your vision and are ready to pay for it. With the launch of Proshoot.io, the game has officially changed. This platform isn't just another job board; it is a robust marketplace designed specifically to streamline how you find jobs for photographers, manage your projects, and secure your income.
Many freelancers spend more time chasing leads and sending invoices than actually behind the lens. By integrating Proshoot.io into your daily workflow, you reclaim that time, allowing the platform’s infrastructure to handle the heavy lifting of business development. Whether you are a seasoned pro or an emerging talent looking to break into the industry, understanding the nuances of this platform will be the catalyst that propels your career to the next level.
Understanding the Marketplace Ecosystem
As you step into the world of Proshoot.io, you are entering a specialized ecosystem built on transparency and efficiency. Unlike generic freelance sites where you compete against a million different skill sets, this marketplace is laser-focused on visual creators. This dedication ensures that the clients posting jobs already understand the value of professional imagery.
The core of the platform is a proactive bidding system. Instead of waiting for a client to stumble upon your website, you have the power to browse active listings and submit tailored proposals. By focusing on a time-limited bidding structure: often featuring 12, 24, or 48-hour windows: the platform creates a sense of urgency that benefits you. Clients who post on Proshoot.io are typically ready to hire, which means you won't find yourself in a weeks-long "maybe" cycle.

Building a Portfolio That Converts
Your profile is your digital storefront, and on a platform this competitive, "good enough" simply won't cut it. To truly stand out, you need to curate a portfolio that speaks directly to the needs of the clients you want to attract. When you host your work on Proshoot.io, you are providing potential clients with a seamless viewing experience that highlights your technical skill and artistic flair.
To ensure your images have that professional edge that commands higher rates, consider refining your post-processing workflow. Using tools like the Ultimate Lightroom Preset Collection can help you maintain a consistent aesthetic across your portfolio, making your brand more recognizable to scouts and art directors. This commitment to quality is what separates the hobbyists from the professionals who land the most lucrative jobs for photographers.
By organizing your work into specific categories: such as commercial, portrait, or fine art: you make it easier for clients to see your relevance to their specific project. If you need inspiration for world-class imagery, you can always browse the collections at Edin Fine Art to see how high-end photography is presented and sold.
The Art of the Winning Bid
With the time-limited bidding system on Proshoot.io, your ability to communicate your value quickly is paramount. When you see a job that fits your style, you must act with confidence. A successful bid is not just about having the lowest price; it is about demonstrating that you are the most capable solution to the client's problem.
| Feature |
Proshoot.io Advantage |
Benefit to You |
| Bidding Windows |
12, 24, or 48-hour cycles |
Reduces ghosting and accelerates the hiring process. |
| Direct Communication |
Integrated messaging dashboard |
Keeps all project details and requirements in one place. |
| Client Profiles |
Transparent client history |
Allows you to vet clients before you commit your time. |
| Project Scoping |
Detailed requirement forms |
Ensures you know exactly what is expected before you bid. |
By tailoring your message to the specific needs mentioned in the job posting, you show the client that you have actually read their brief. In a world of copy-paste responses, a personalized touch is as smooth as butter and can be the deciding factor in your favor.
Mastering the User Dashboard
Once you land a gig, the administrative side of your business needs to be just as sharp as your photography. The Proshoot.io user-friendly dashboard is designed to be your central command center. From here, you can track your active bids, communicate with clients, and manage your project timelines without ever having to leave the platform.
This centralized system reduces the friction that usually comes with managing multiple clients. Instead of juggling emails, texts, and various project management tools, you have one source of truth. This efficiency allows you to focus more on your creative output and less on the "business of being a business." For more tips on managing a successful photography brand, you can explore the educational resources at Edin Chavez Photography.
Security and Guaranteed Payments
One of the most significant hurdles in freelance photography is the risk of non-payment. We have all been there: the shoot goes great, the files are delivered, and then the client disappears. Proshoot.io eliminates this anxiety through its secure payment infrastructure. The platform acts as a protective middleman, ensuring that funds are secured before you even pick up your camera.
By using this system, you are signaling to your clients that you are a legitimate professional who values your time and work. This level of security fosters a relationship of mutual respect. When you know the payment is guaranteed, you can put 100% of your energy into the creative process, resulting in a better product for the client and a better review for you.

Networking and Scaling Your Business
While Proshoot.io is a powerhouse for finding immediate work, it is also a tool for long-term growth. Every job you complete on the platform is an opportunity to build your reputation. As you accumulate positive reviews, your profile gains authority, making it progressively easier to win higher-paying bids.
If you are looking to expand your reach into specific high-demand markets, like the vibrant scene in Florida, you might consider offering specialized services. For instance, if you're aiming to land more travel or lifestyle gigs, booking a Private Miami Photography Tour can help you build a stunning localized portfolio that appeals to Miami-based clients. This proactive approach to networking and portfolio building ensures you are always ready for the next big opportunity.
Essential Tips for Success on Proshoot.io
To maximize your success and consistently land the best jobs for photographers, you should treat your presence on the platform as a dynamic, evolving asset.
- Be Responsive: In a marketplace that moves this fast, the early bird truly does get the worm. Set up notifications so you never miss a bidding window.
- Highlight Your Niche: Don't try to be everything to everyone. Focus on what you do best, whether it's drone photography, high-fashion, or corporate headshots.
- Use High-Quality Gear and Software: Clients can tell the difference. Ensure your final deliveries are polished and professional.
- Leverage Reviews: After every successful project, politely ask your client for a review. These testimonials are the social proof that drives future sales.
- Stay Educated: The industry changes fast. Keep up with the latest trends and techniques by following the Edin Chavez Blog.
Elevating Your Professionalism
Beyond the technical skills, the way you conduct yourself on the platform defines your brand. Professionalism on Proshoot.io means meeting deadlines, communicating clearly, and exceeding client expectations. By treating every small gig with the same level of care as a major commercial shoot, you build a foundation of trust that will sustain your career for years to come.
This commitment to excellence is what Proshoot.io was built to highlight. The platform empowers you to take control of your career path, moving away from the uncertainty of traditional freelancing and toward a structured, reliable professional life.
Why Proshoot.io is the Future of Photography Jobs
As the gig economy grows, the need for specialized marketplaces becomes more critical. Proshoot.io stands out because it doesn't just provide a list of jobs; it provides a comprehensive toolkit for the modern photographer. From the secure payment protocols to the intuitive dashboard, every feature is designed to solve a specific problem you face in your daily professional life.
By choosing to build your business here, you are joining a community of like-minded creators who are raising the bar for the entire industry. This platform provides the unparalleled support you need to turn your passion for photography into a thriving, sustainable business.
Hence, the transition to a more organized and secure way of working is not just an option: it’s a necessity for any photographer serious about their craft. With Proshoot.io, you have the technology, the marketplace, and the security to finally land the gigs you deserve.
With these considerations in mind, it’s time to head over to Proshoot.io and start building the future of your photography career today. For more insights into the world of professional photography and fine art, don't forget to visit Edin Chavez Photography and explore our latest guides and galleries.
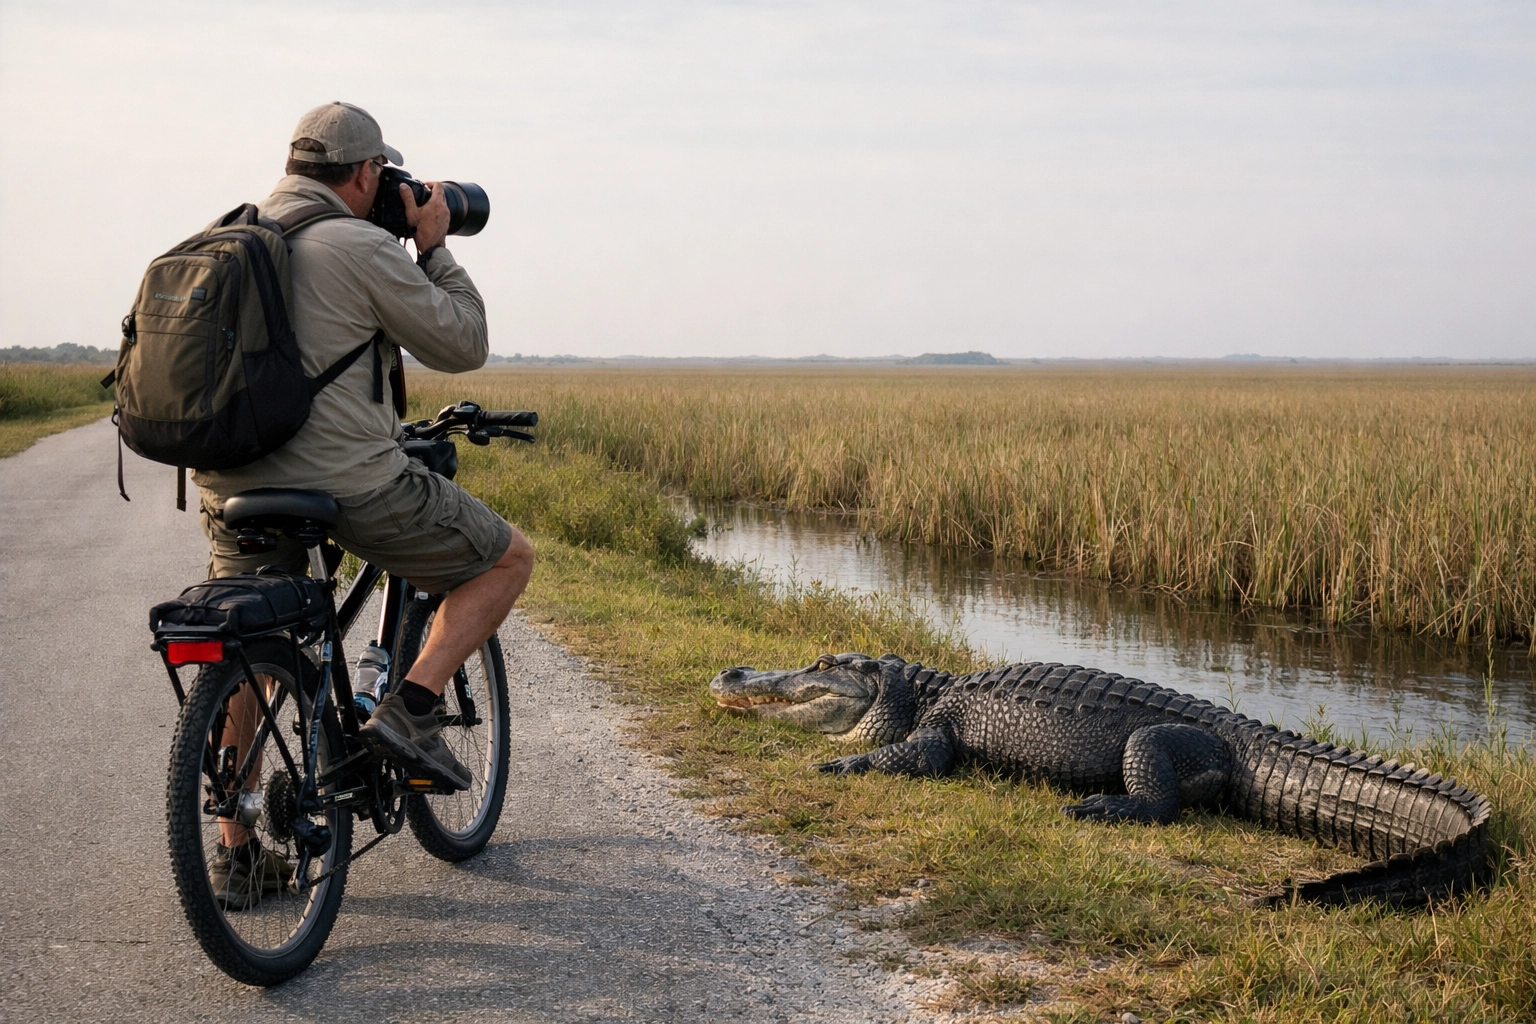
As the morning mist begins to lift off the sawgrass prairies, you realize that Shark Valley is not just another stop on the map; it is arguably the most accessible theater for wildlife photography in the Everglades. Located in the heart of the "River of Grass," this 15-mile loop offers you an unparalleled opportunity to stand inches away from prehistoric predators and elegant wading birds. Whether you are a seasoned pro or just starting your journey into landscape photography in the Everglades, understanding how to navigate Shark Valley will transform your portfolio from standard snapshots into compelling fine art.
At Edin Chavez Photography, we believe that the best images come from a combination of technical precision and an intimate understanding of the environment. Shark Valley provides the environment; this guide provides the precision. By the time you finish reading, you will know exactly where to stand, which settings to toggle, and how to capture the soul of this UNESCO World Heritage site.
Why Shark Valley Stands Out Among Everglades Photography Locations
Many Everglades photography locations require trekking through deep mud or navigating complex waterways by airboat. Shark Valley is different. The paved 15-mile loop road acts as a front-row seat to the ecosystem’s most dramatic displays. Because the road is elevated slightly above the water level, alligators and birds naturally congregate along the banks to sun themselves or hunt.
This accessibility allows you to focus less on survival and more on composition. You can explore the loop via bicycle, tram, or on foot. For the serious photographer, I always recommend a bicycle or walking the first few miles. This pace ensures you don't miss the subtle movements in the grass: a stalking Heron or a juvenile alligator hiding in the lilies. To truly elevate these captures, using my Ultimate Lightroom Preset Collection can help you recover the vibrant greens and deep shadows that define the Florida wetlands.
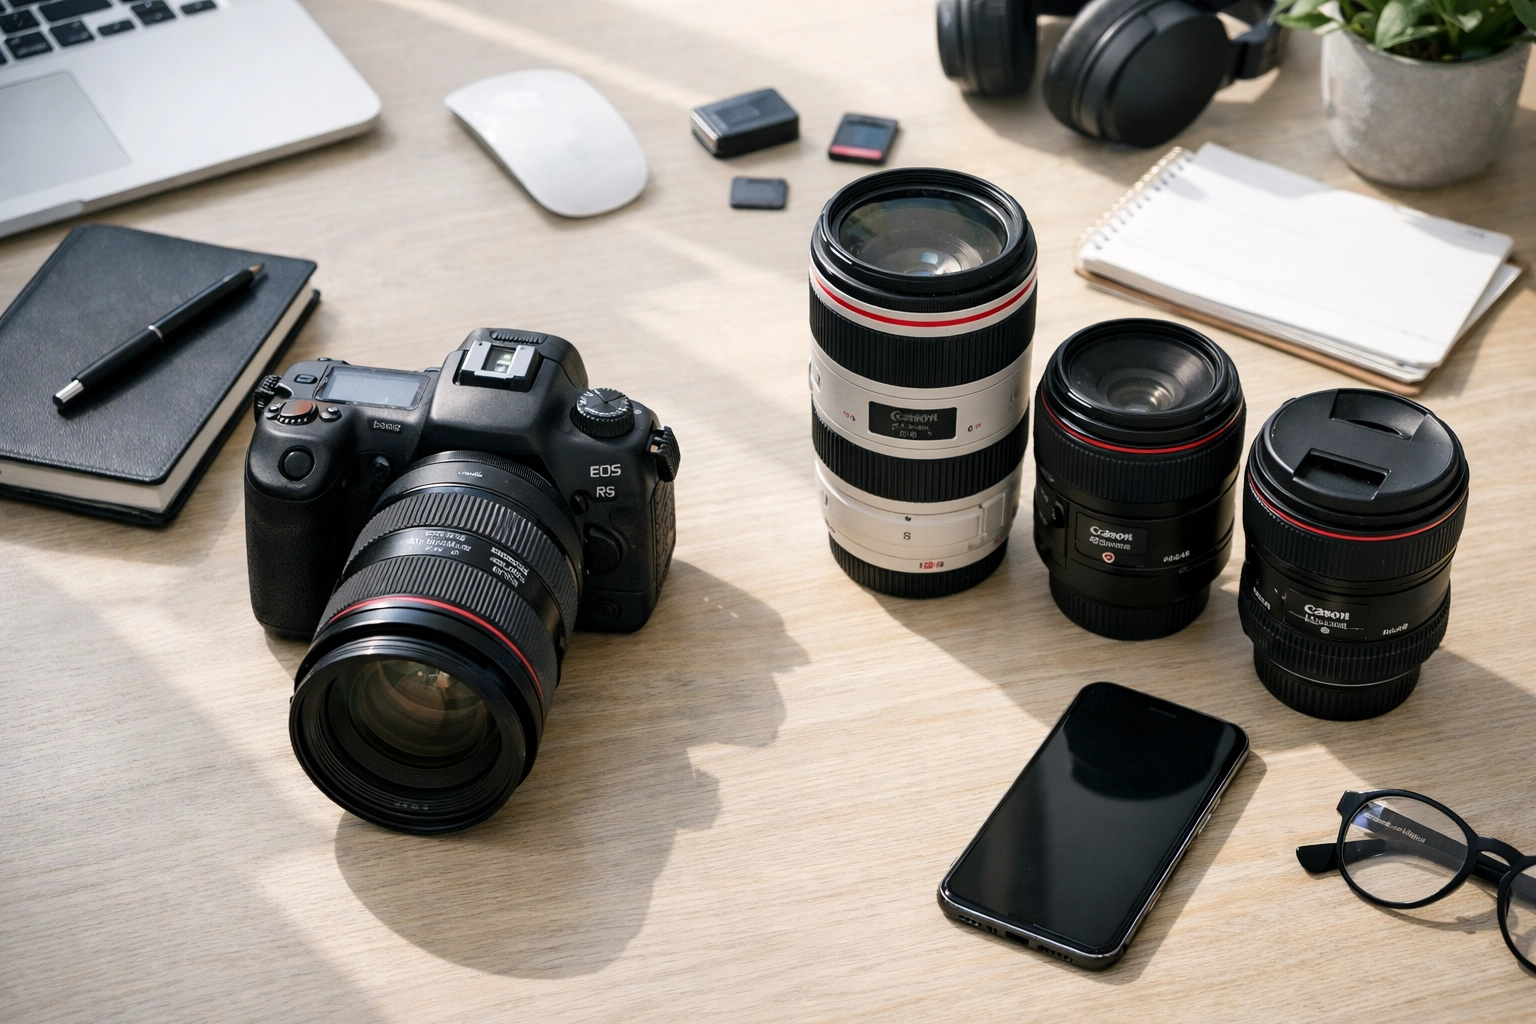
Mastering Your Gear: Lenses and Accessories
When you are shooting wildlife photography in the Everglades, your gear choice dictates your narrative. Because the wildlife at Shark Valley is often remarkably close to the path, you don't always need a 600mm lens to get the shot. In fact, carrying too much heavy glass can hinder your mobility on the 15-mile loop.
The Essential Lens Kit
- The Workhorse (70-200mm): This is your primary tool. It allows you to capture environmental portraits where the animal is contextualized by the vast landscape.
- The Reach (300mm – 500mm): Essential for tight headshots of birds or capturing action across the canal.
- The Wide-Angle (16-35mm): Don't leave this behind. When you reach the observation tower, you will want this to capture the expansive landscape photography in the Everglades.
Critical Accessories
You must use a circular polarizer. The glare off the water in the Everglades can be punishing, washing out colors and hiding the textures of the underwater flora. A polarizer cuts through this reflection, revealing the hidden world beneath the surface and saturating the deep blues of the Florida sky. Additionally, a sturdy monopod provides the stability needed for long lenses without the bulk of a full tripod.
| Feature |
Recommended Equipment |
Why You Need It |
| Primary Lens |
70-200mm f/2.8 or f/4 |
Versatility for close-range alligators and environmental shots. |
| Telephoto |
100-400mm or 500mm |
Necessary for bird-in-flight and distant subjects. |
| Filter |
Circular Polarizer |
Removes water glare and enhances sky/foliage saturation. |
| Stability |
Monopod |
Balances weight during long waits for animal movement. |
| Protection |
Rain Cover |
The Everglades weather is unpredictable; protects your investment. |
Technical Settings for Sharp Wildlife Captures
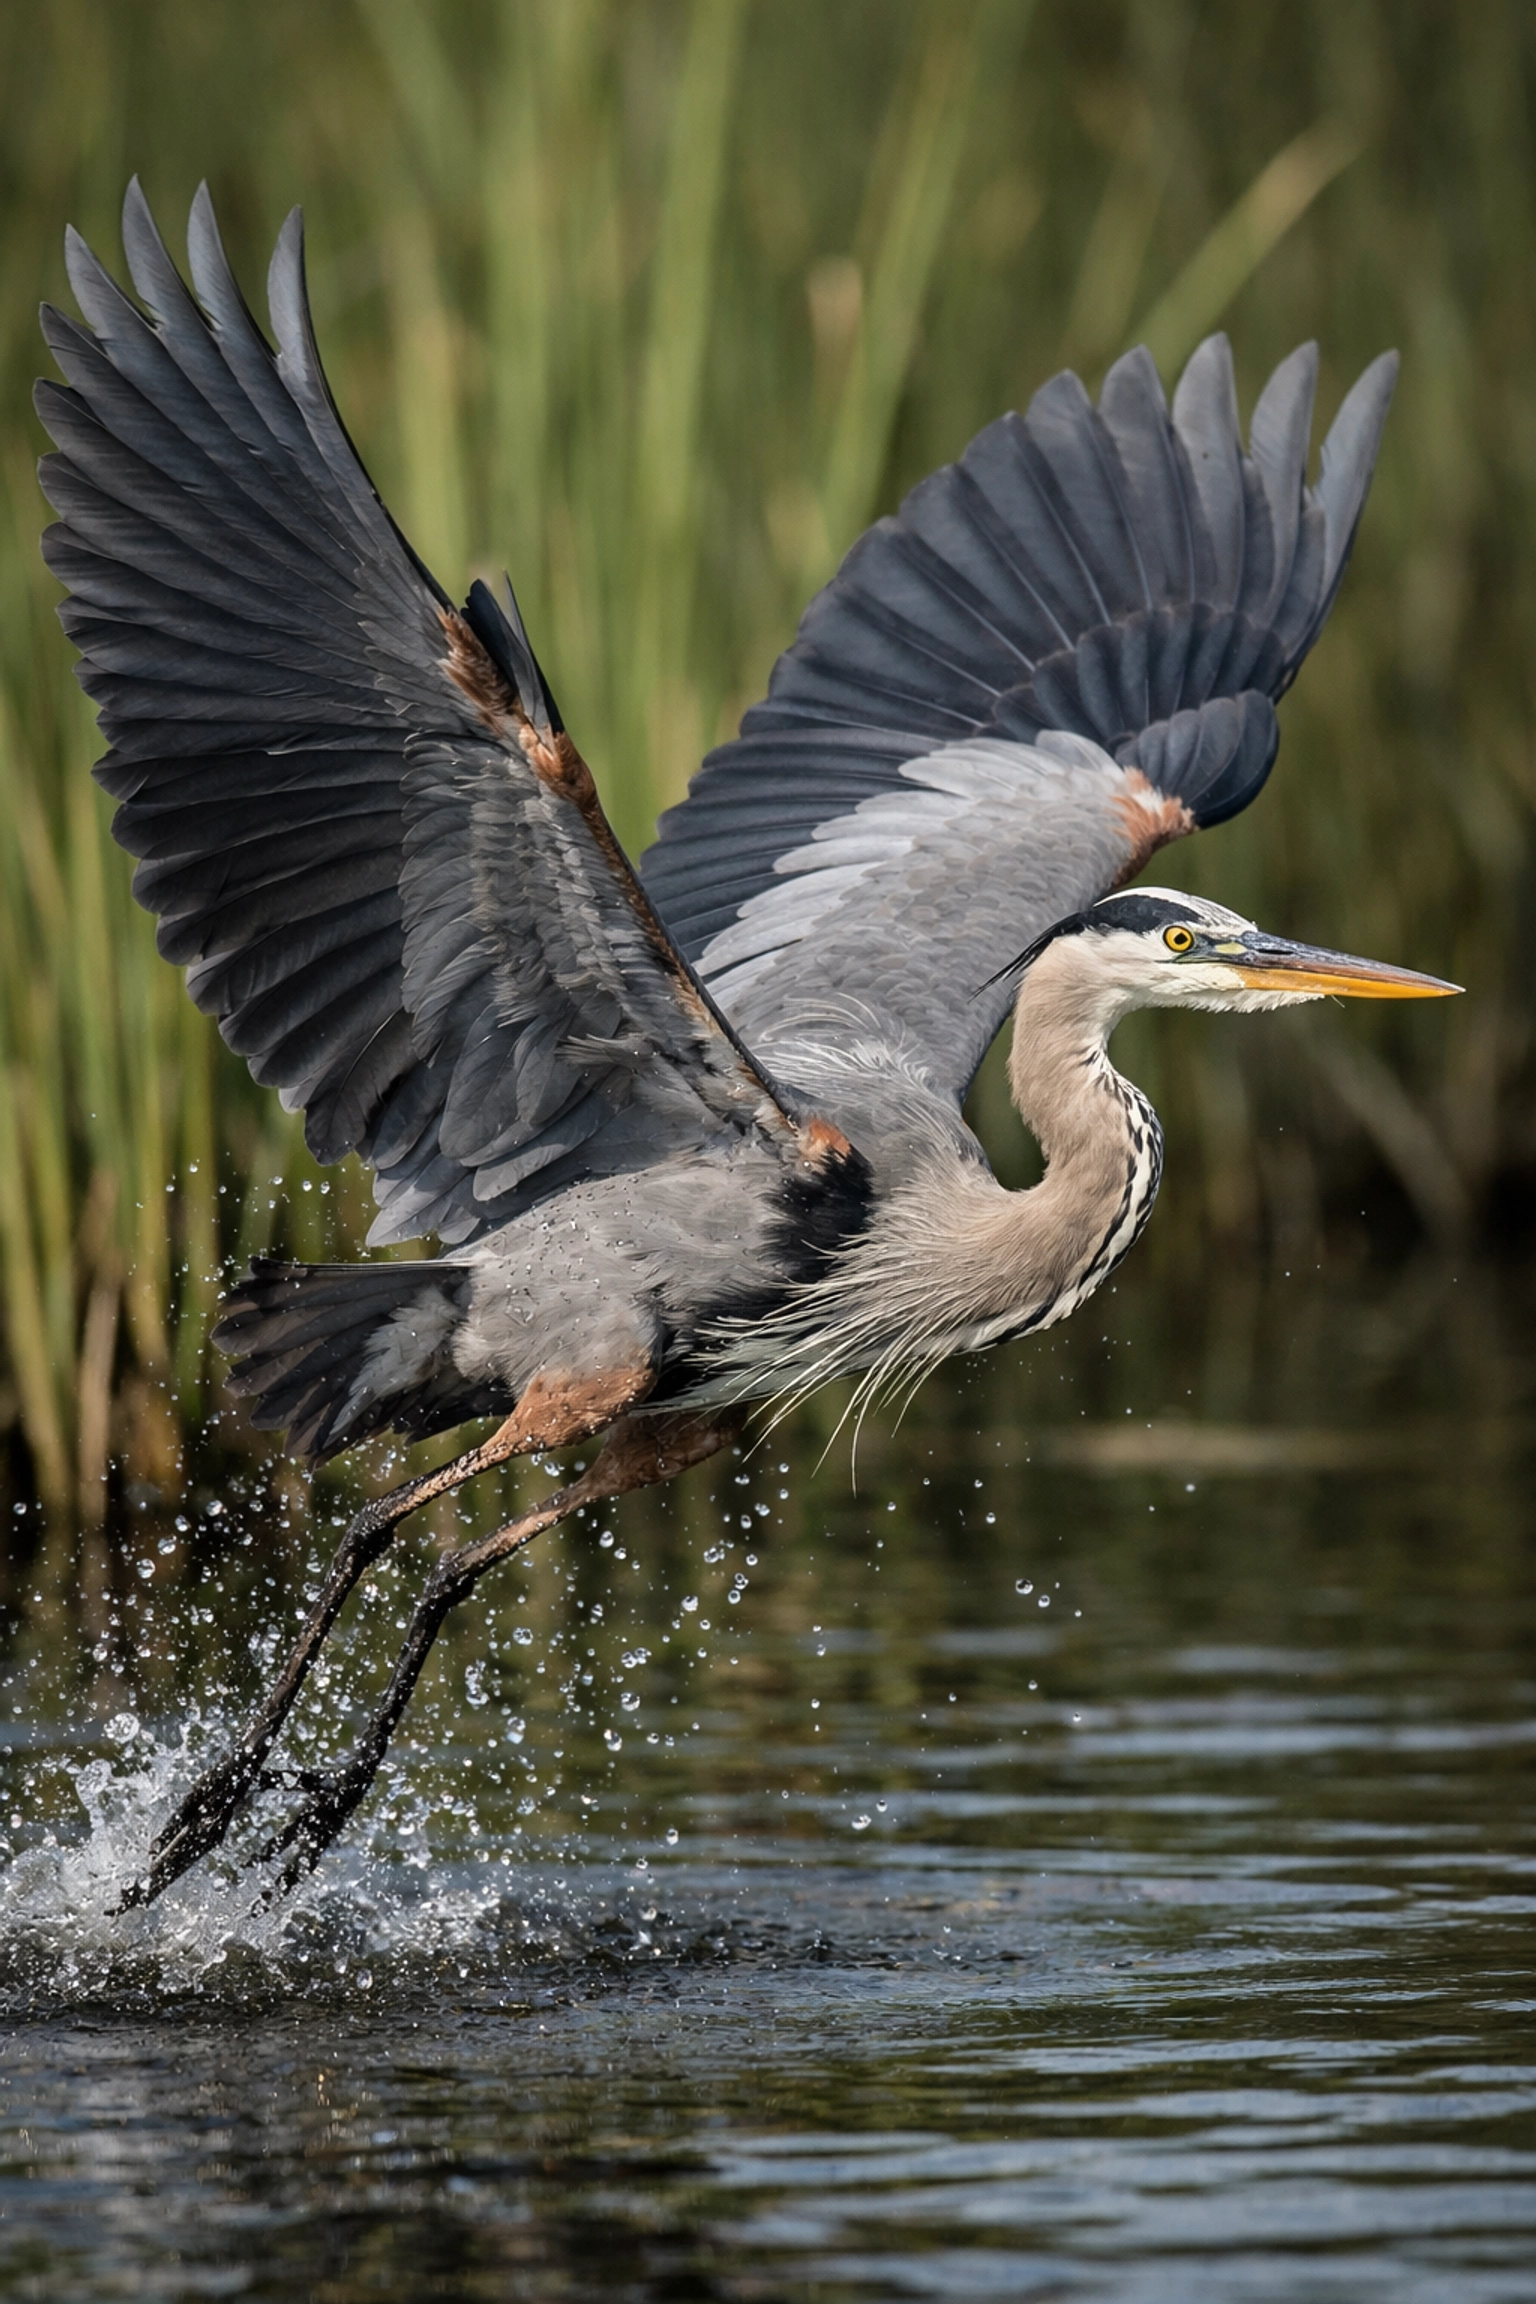
Your success in the field depends on your ability to react to sudden movements. A Great Blue Heron taking flight happens in a heartbeat. To ensure your images are tack-sharp, you need to master your shutter speed and autofocus modes.
For most wildlife encounters at Shark Valley, you should maintain a shutter speed of at least 1/1000s. If you are focusing specifically on birds in flight, push that to 1/2000s or higher. Use Continuous Autofocus (AF-C or AI Servo) to track moving subjects. I recommend using "Back Button Focus" to separate your shutter release from your focus acquisition: this gives you ultimate control when an alligator is stationary but might lunge at any moment.
Where to Stand: Navigating the 15-Mile Loop
Knowing where to position yourself is the difference between a cluttered shot and a masterpiece. Shark Valley's layout offers three distinct zones for your photography.
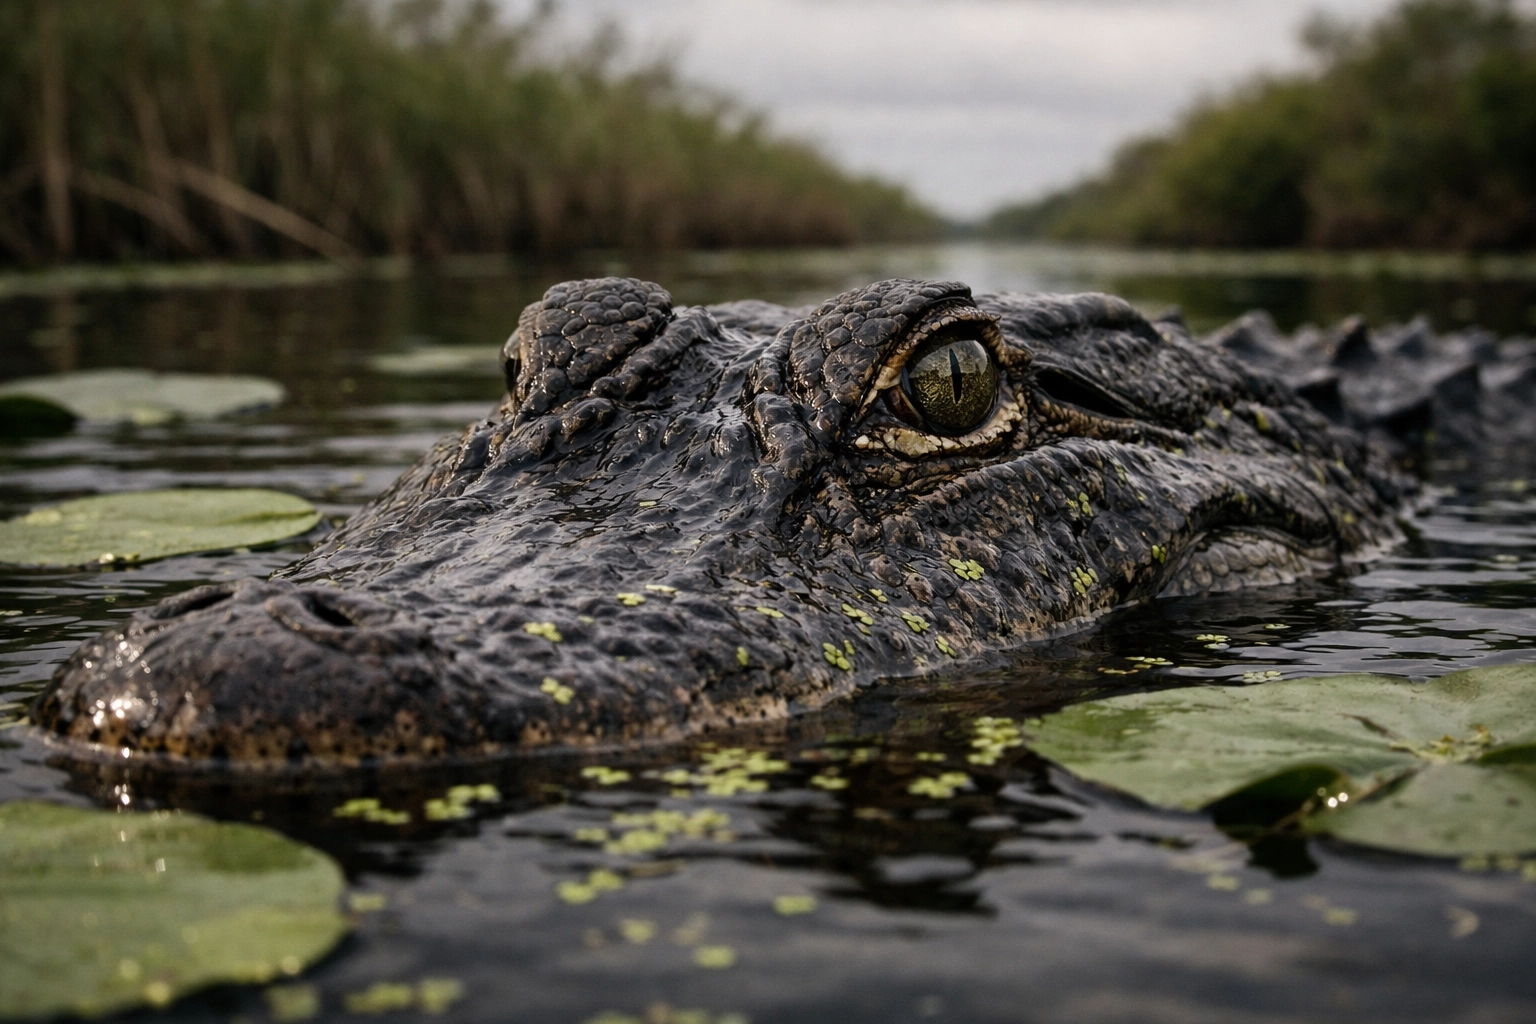
1. The First Mile (The "Gator Hole")
Most visitors crowd the entrance, but as a photographer, you should use the first mile to look for intimate details. The canals here are deep, and alligators often lounge right on the pavement. Position yourself low. Getting your camera down to the alligator's eye level creates an intimate, powerful perspective that makes the viewer feel like they are in the water with the subject.
2. The Mid-Loop Prairies
As you move further into the loop, the trees thin out, opening up the vistas. This is where you focus on landscape photography in the Everglades. Look for "islands" of trees, known as hardwood hammocks, to act as focal points in your wide-angle compositions. This area is also prime for spotting Snail Kites and Northern Harriers patrolling the sawgrass.
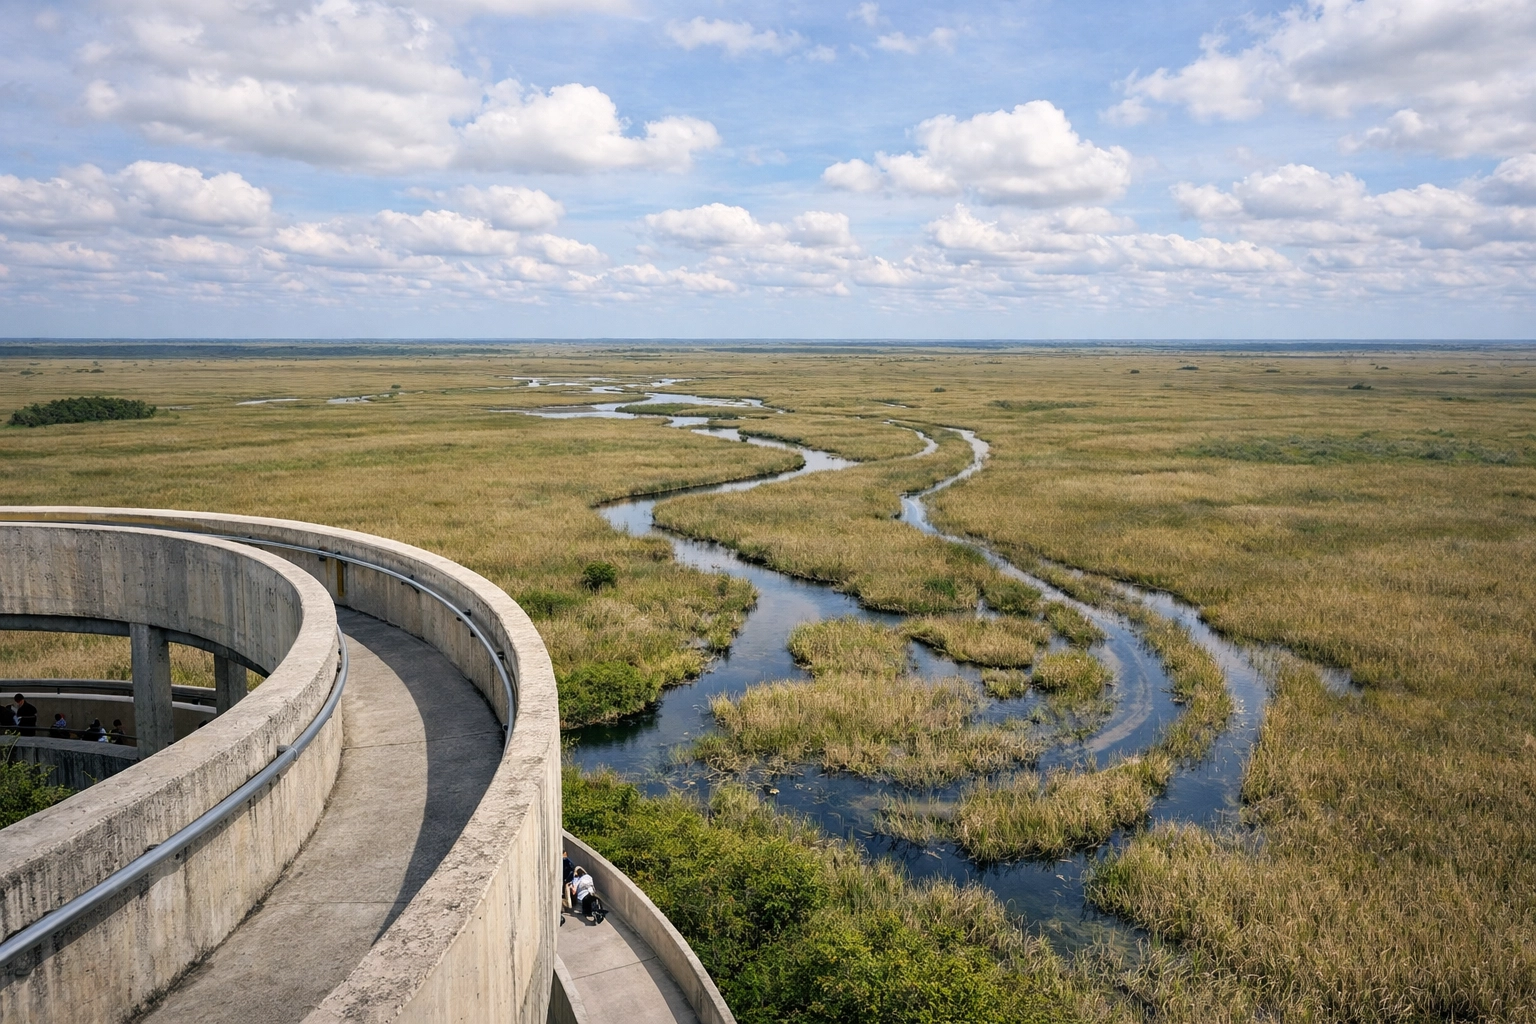
3. The Observation Tower
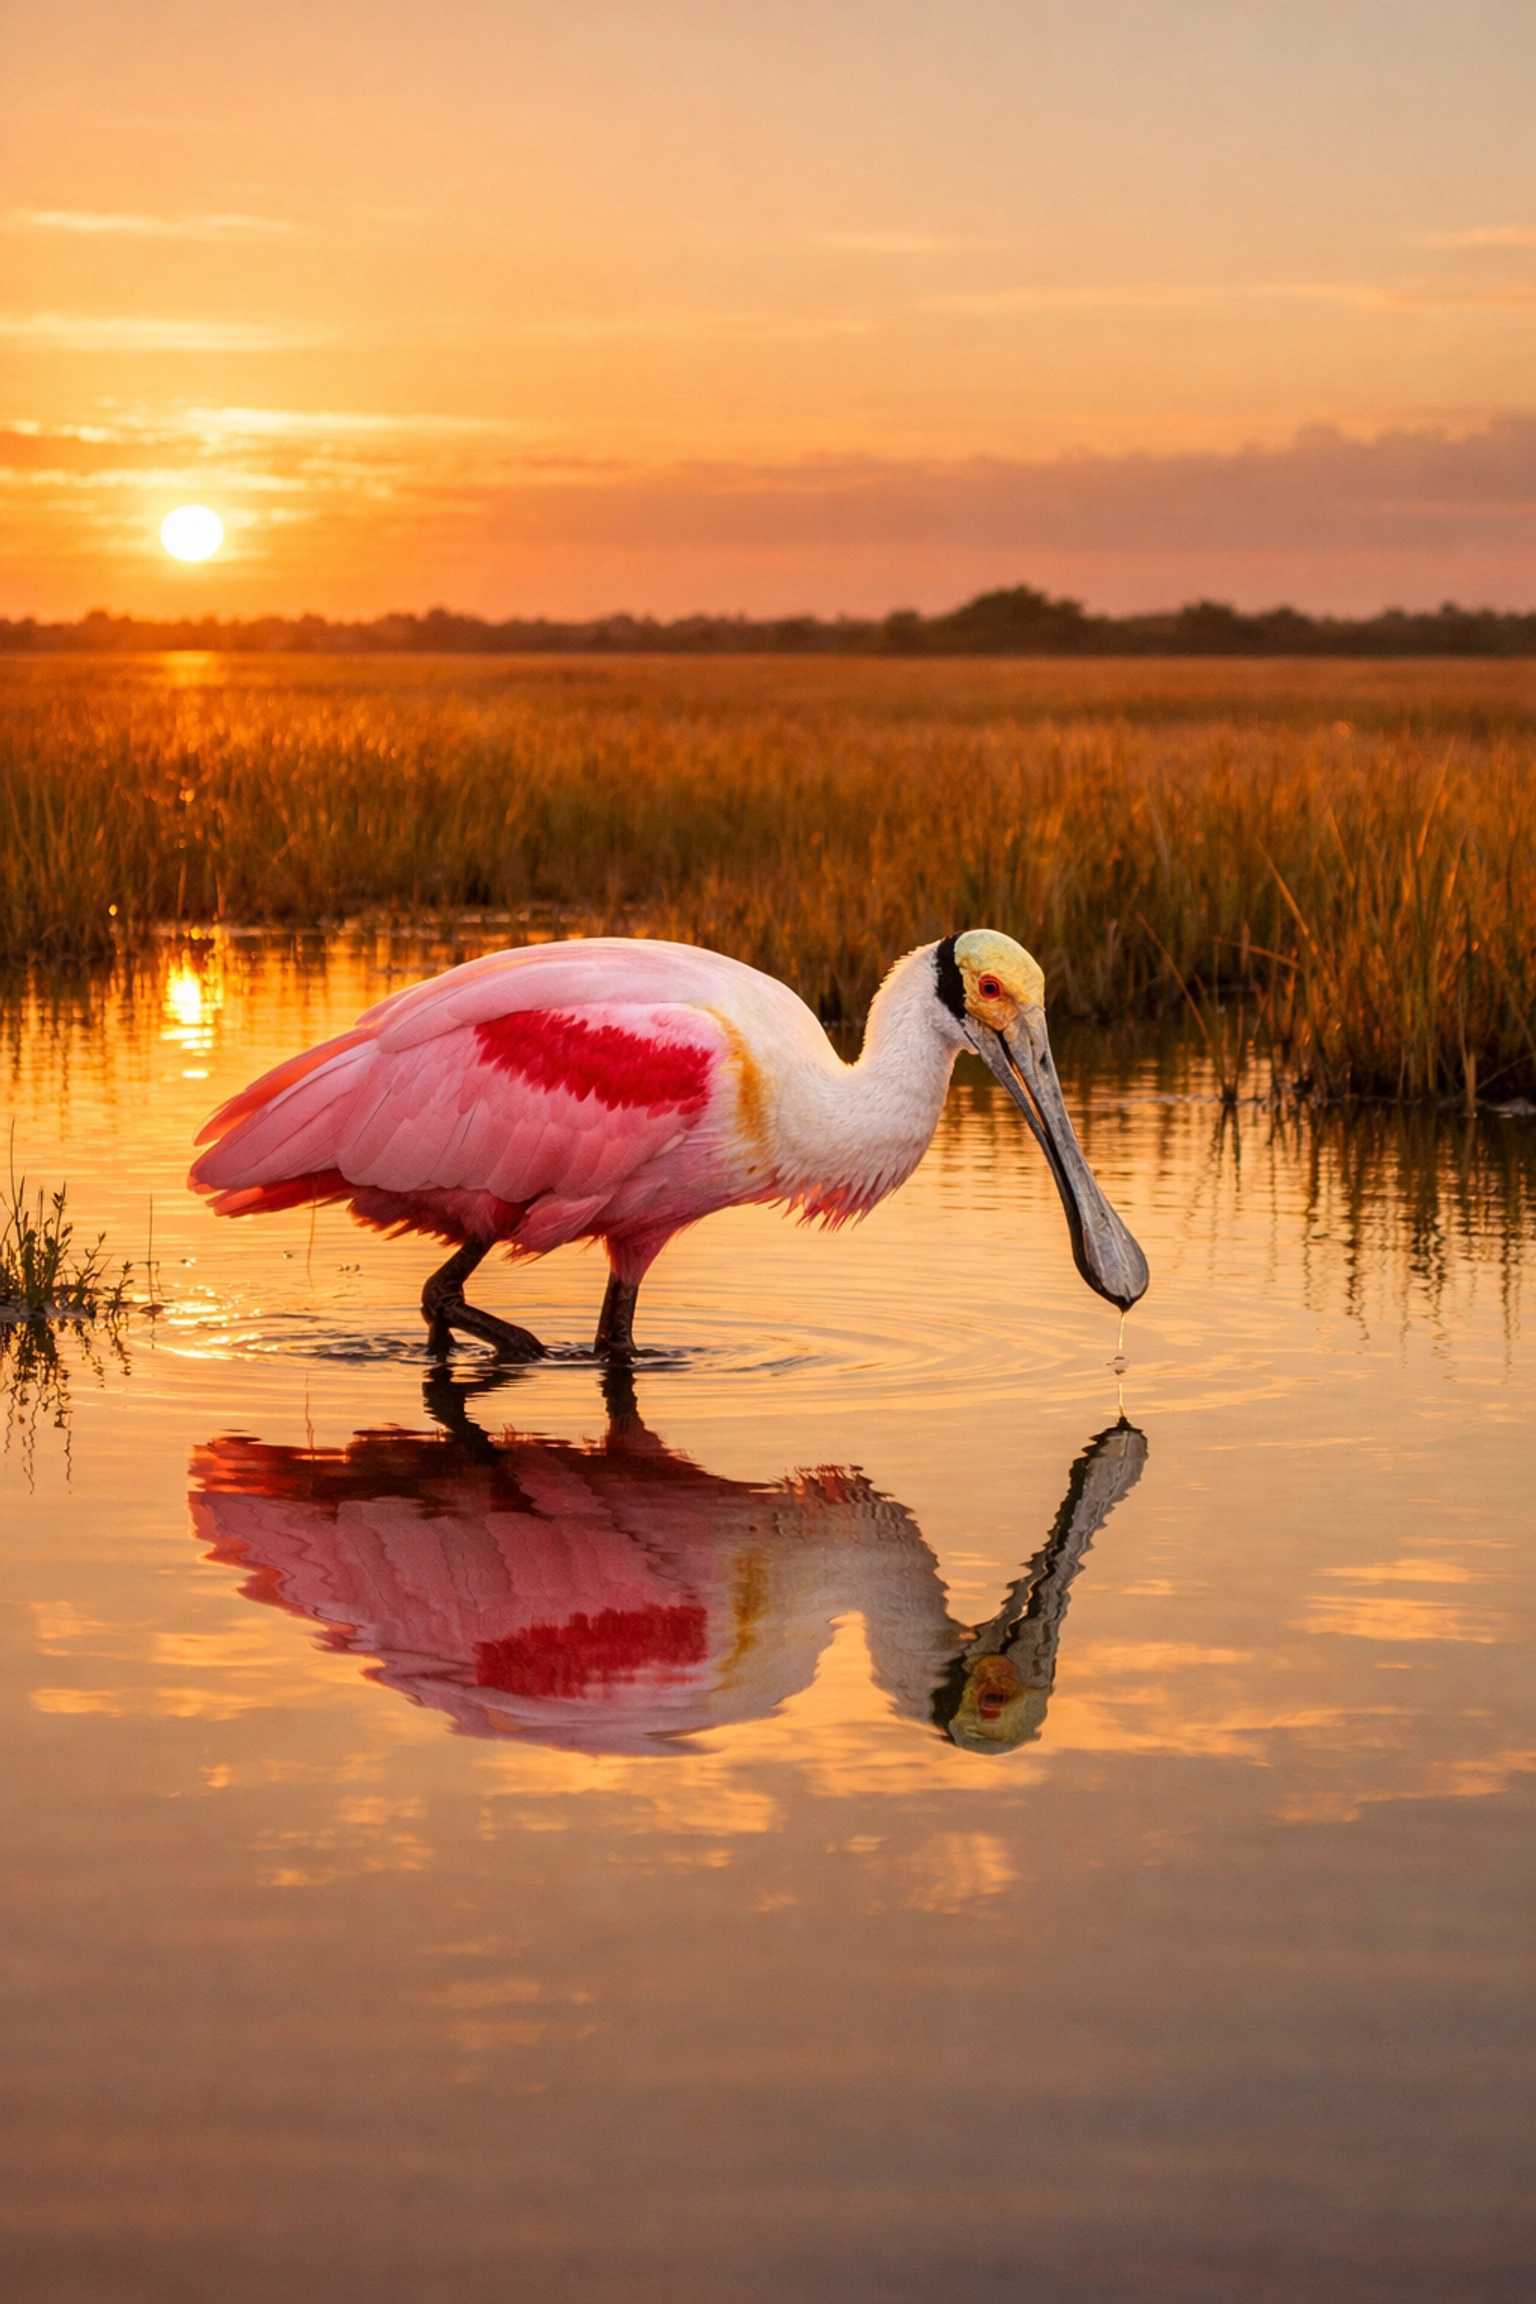
The halfway point of the loop is the famous observation tower. This is the only place in Shark Valley where you can get a true bird's-eye view. Use this elevation to photograph the winding water trails made by alligators and airboats. It’s also a fantastic spot for "Bird-in-Flight" (BIF) photography, as you are often at eye level with the birds soaring on the thermals.
Lighting and Timing: The Golden Hour Strategy
If you want your work to reflect the quality of Edin Fine Art, you must respect the light. Midday in the Everglades is harsh, flat, and unforgiving. The sun creates deep shadows under the eyes of birds and blows out the highlights on alligator scales.
The "Magic Hour": the hour after sunrise and the hour before sunset: is when Shark Valley truly comes alive. During the dry season (November through April), the wildlife is most active during these cooler periods. The low sun angle paints the sawgrass in gold and creates long, dramatic shadows that add depth to your landscapes. If you're serious about mastering these conditions, my Everglades Photography Guide provides specific GPS coordinates for the best sunrise and sunset spots.
Ethical Wildlife Photography
Your presence should never change the behavior of the animal. In Shark Valley, it is tempting to get closer than the recommended 15 feet because the animals seem "used to" people. However, as a professional, you have a responsibility to maintain a respectful distance. Use your telephoto lens to bridge the gap. Not only is this safer, but it also allows you to capture natural behaviors: hunting, nesting, and resting: that the animal would stop doing if it felt threatened by your proximity.
Refine Your Vision with Expert Guidance
Photographing the Everglades is a rewarding but challenging endeavor. The humidity, the vastness, and the nuances of the wildlife require more than just a good camera; they require a strategy. By following the tips in this guide, you are already ahead of 90% of the tourists visiting the park.
However, if you want to bypass the trial and error and go straight to capturing gallery-quality images, you need the right roadmap. My comprehensive Everglades Photography Guide is designed to be your digital mentor. It covers every major trail, including Anhinga and Flamingo, with detailed advice on timing, gear, and hidden gems that only locals know.
For those looking to expand their skills beyond the wetlands, explore our other resources at Edin Studios or check out our latest tips on the Edin Chavez Blog.
Final Thoughts for Your Shark Valley Adventure
Shark Valley is a place of raw, prehistoric beauty. When you stand on that loop road, you are witnessing an ecosystem that has remained largely unchanged for millennia. Your job as a photographer is to translate that timelessness into a single frame. Focus on the eyes of the alligator, the flight of the Roseate Spoonbill, and the endless horizon of the sawgrass.
With these techniques and the right mindset, your trip to Shark Valley will result in more than just photos: it will result in art.
Ready to capture the Everglades like a pro?
Purchase the Ultimate Everglades Photography Guide Here!
As the first light of dawn breaks over the Atlantic, you realize that Miami is not just a city; it is a sprawling, living canvas waiting for your lens. Whether you are a seasoned professional or an enthusiast looking to capture that perfect vacation shot, the Magic City offers a visual diversity that is simply unmatched. However, navigating this neon-soaked landscape requires more than just a camera: it requires a plan.
To truly elevate your portfolio, you need to know where to stand, when the light hits just right, and how to avoid the swarms of tourists that can clutter your frame. This guide is designed to prepare you for the experience of a lifetime on your Private Miami Photography Tour, ensuring you walk away with world-class images that reflect the soul of South Florida.
The Magic of the Shoreline: Beach and Waterfront Locations
When you think of Miami, you likely envision turquoise waters and swaying palms. But for a photographer, the beach is about texture, shadow, and the interplay of man-made structures with the natural world. Your journey into the heart of Miami’s coastal beauty begins where the land ends.
South Pointe Park
Located at the southernmost tip of Miami Beach, South Pointe Park stands out as the crown jewel of local photography. It provides you with a 360-degree palette: the jagged rocks of the pier, the lush greenery of the park, and the panoramic views of the Fisher Island skyline.
If you arrive at sunrise, the light is as smooth as butter, casting long, dramatic shadows across the walking paths. The pier itself serves as a perfect leading line, drawing the viewer's eye straight into the rising sun. During our Private Miami Photography Tour, we often start here to capture the "blue hour" before the city wakes up.
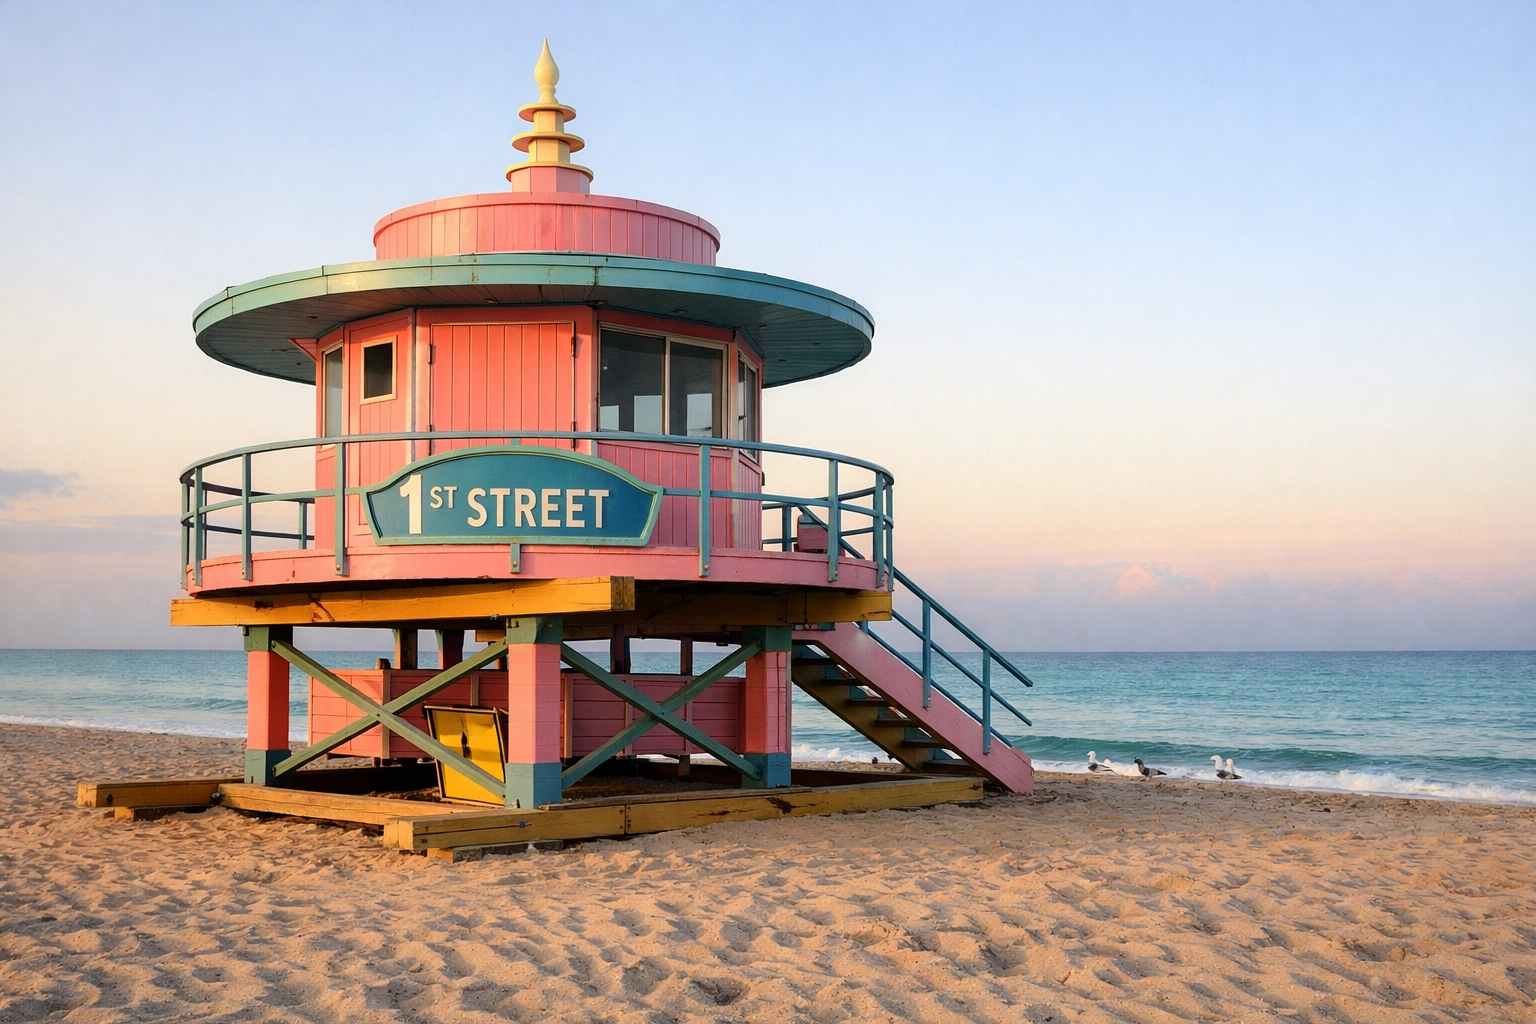
The Iconic Lifeguard Towers
Stretching from 1st to 87th Street, these colorful beacons are the quintessential "miami photo spots." Each tower features a unique Art Deco-inspired design and a distinct color palette. To make your shots pop, you should focus on the contrast between the vibrant paint and the soft pastels of the morning sky. If you’re looking for a more comprehensive way to explore these at your own pace, my Miami Self-Driving Photography Guide offers the exact coordinates for the most photogenic towers.
Architectural Icons and Neon Dreams
Miami’s architecture is a fusion of vintage glamour and futuristic ambition. From the pastel-hued buildings of the 1930s to the brutalist parking structures that look like modern cathedrals, your architectural photography will reach new heights here.
Ocean Drive and the Art Deco District
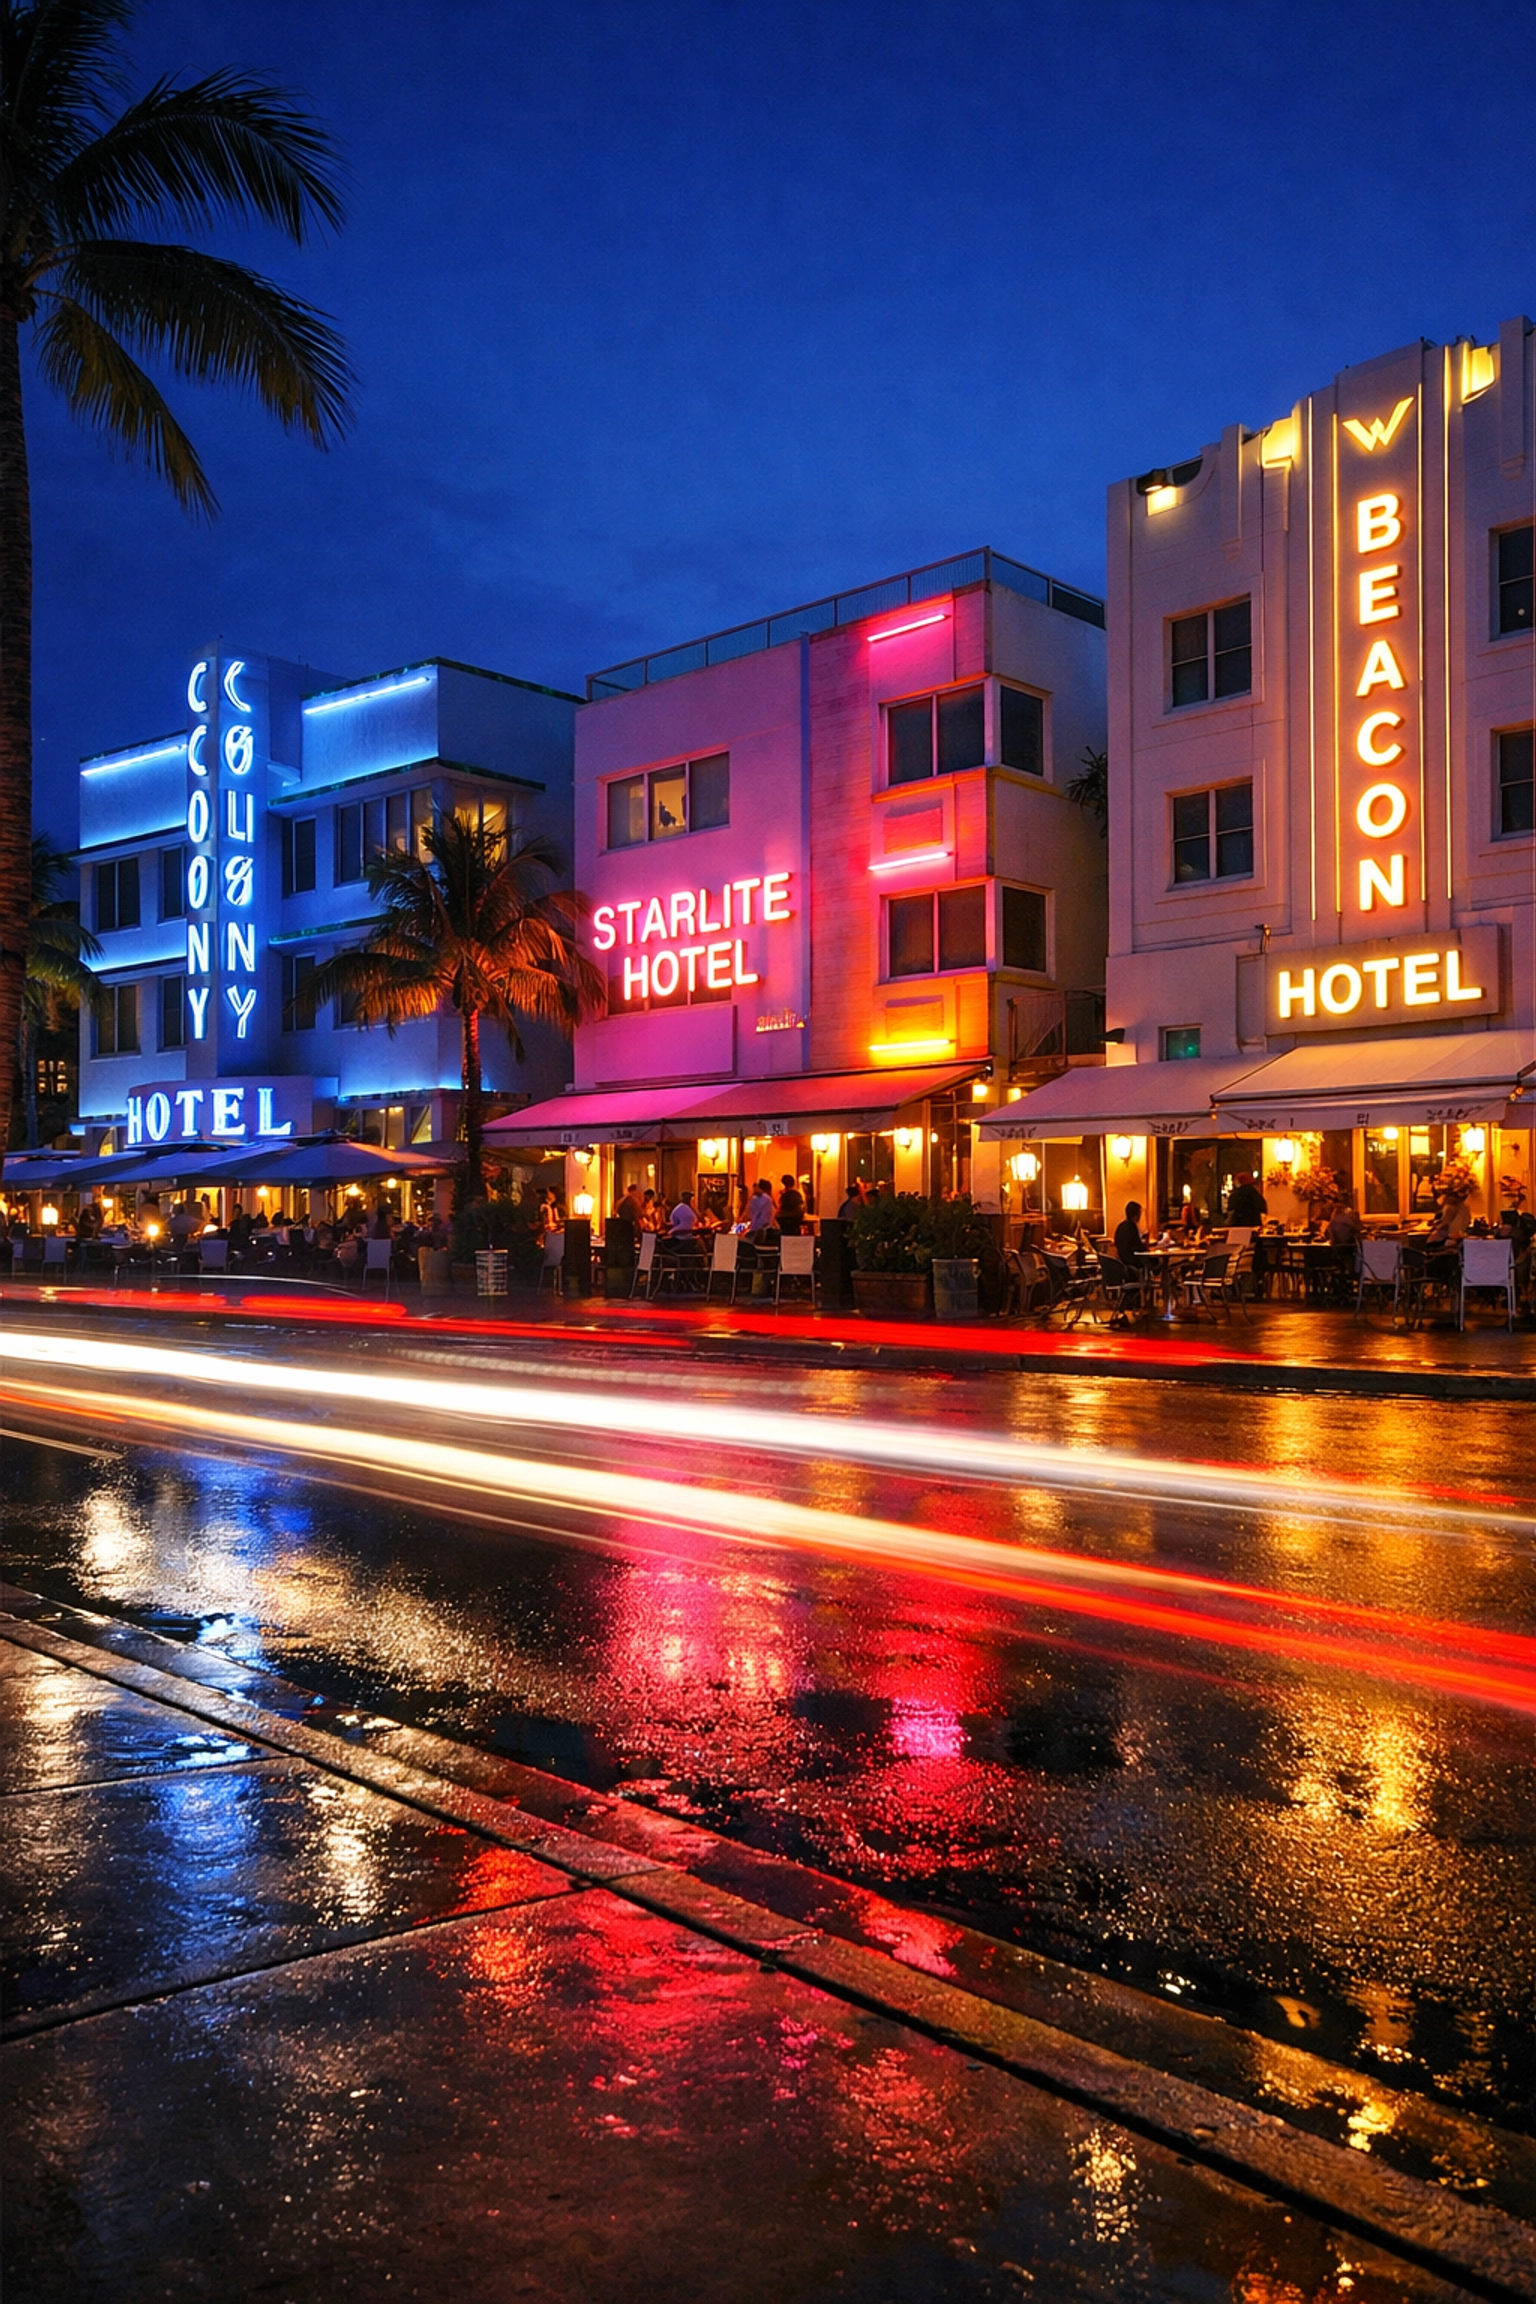
As dusk falls, Ocean Drive transforms into a neon wonderland. This is where you practice your long-exposure techniques to capture the light trails of passing cars against the glowing facades of the Colony or the Beacon Hotel. Standing in front of the Versace Mansion, you feel the history of the city. The intricate mosaic tiles and 24-karat gold accents of the pool area (if you have access) are a masterclass in opulence.
1111 Lincoln Road
It might seem strange to photograph a parking garage, but 1111 Lincoln Road is a masterpiece designed by Herzog & de Meuron. This "house of cards" structure offers open-air levels with stunning urban views of the city. It’s an ideal spot for capturing geometric patterns and minimalist compositions. Your ability to see beauty in the mundane is what sets your work apart at Edin Chavez Photography.
The Artistic Soul: Wynwood and the Design District
If your style leans more toward the edgy and avant-garde, you will find your sanctuary in the northern reaches of the city. Here, the walls talk, and every corner offers a new perspective on contemporary culture.
Miami Design District
This is where luxury meets high art. The Miami Design District is a meticulously curated neighborhood filled with funky walls, graffiti, and architectural installations like the "Fly's Eye Dome." The Betsy Orb: a massive, white sphere wedged between two buildings: is a must-see for anyone looking to add a surreal touch to their Instagram feed.
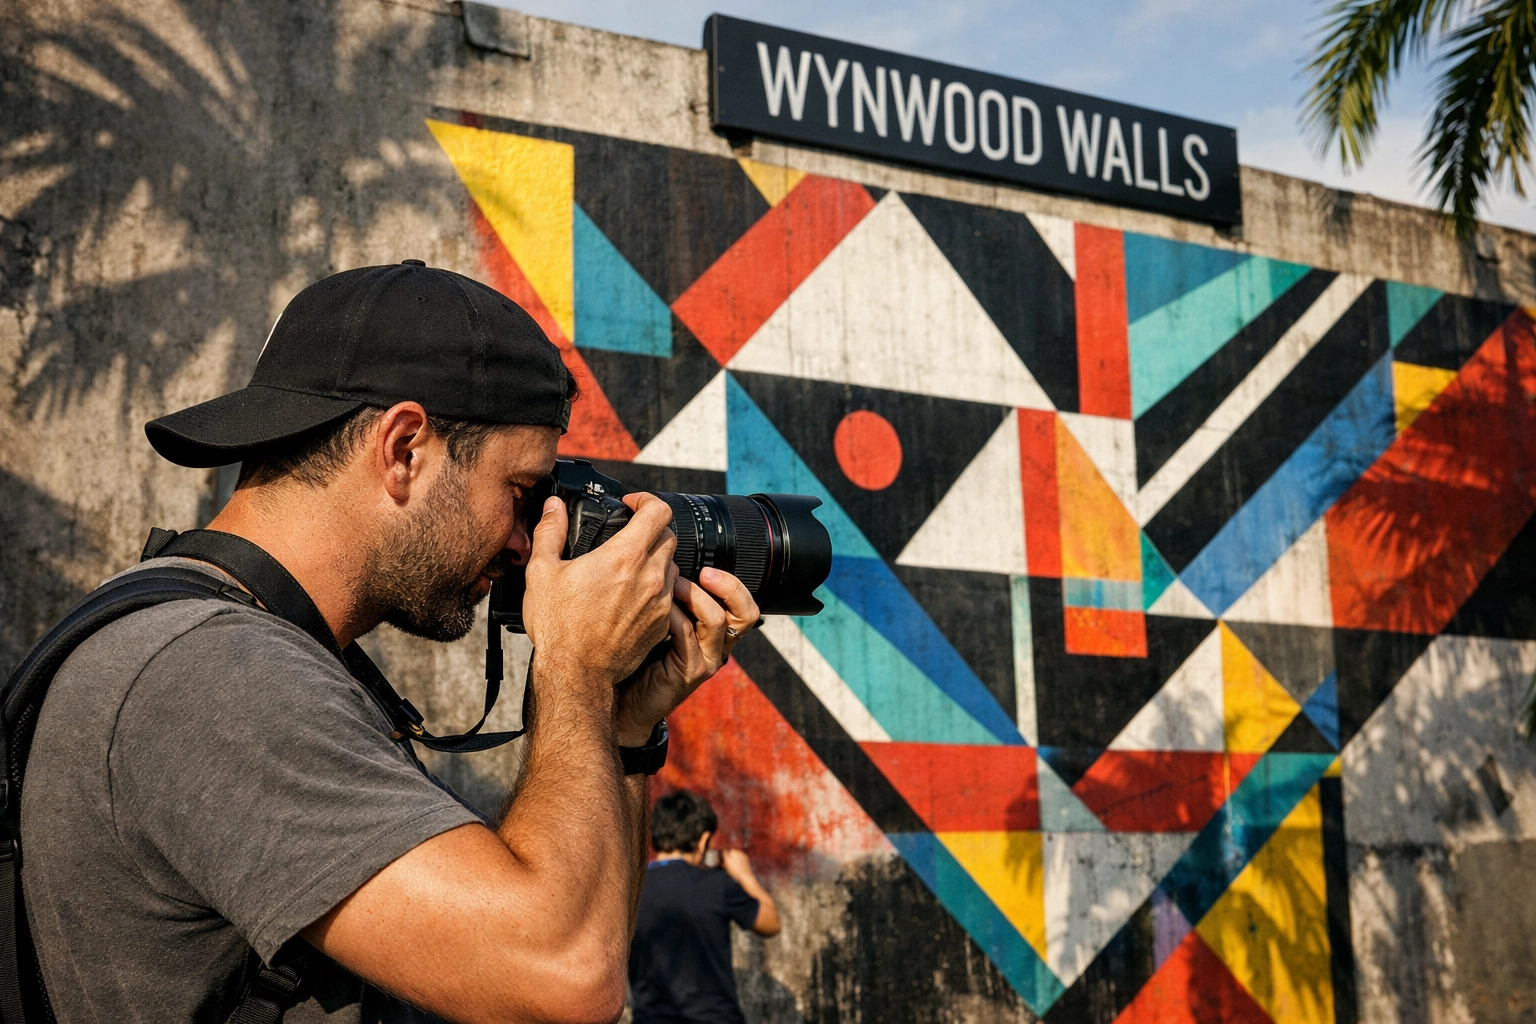
Wynwood Walls
While often crowded, the Wynwood Walls remains one of the best places to take pictures in Miami. The sheer scale of the murals is breathtaking. To get the best results, you need to work with the light to ensure the colors of the street art remain vibrant without being washed out by the harsh midday sun.
Lush Sanctuaries: Gardens and Nature
Beyond the concrete and neon lies a tropical paradise that feels worlds away from the hustle of South Beach. These locations require a bit more planning, particularly regarding permits, but the results are worth every effort.
Vizcaya Museum and Gardens
Stepping into Vizcaya is like being transported to an Italian villa on the Mediterranean. The European-style gardens, stone barges, and intricate fountains provide a level of elegance that is unparalleled in Florida. This is a premier spot for portraits and fine art photography. Keep in mind that Vizcaya requires a photo permit, which we handle as part of the logistics for our Private Miami Photography Tour.
Matheson Hammock Park
For those who love the "Old Florida" aesthetic, Matheson Hammock Park offers winding roads draped in Spanish moss and a man-made atoll pool that mirrors the sky. It is one of the most serene miami photography locations, especially during the golden hour when the sun dips behind the mangroves.
| Location |
Best Time to Shoot |
Vibe |
Permit Required? |
| South Pointe Park |
Sunrise |
Coastal/Modern |
No |
| Ocean Drive |
Night / Blue Hour |
Neon / Vintage |
No (Street) |
| Vizcaya Gardens |
Morning |
European / Elegant |
Yes |
| Design District |
Late Afternoon |
High-Fashion / Urban |
No |
| 1111 Lincoln Rd |
Sunset / Night |
Architectural / Minimalist |
No |
Mastering the Technicals: Post-Processing Your Miami Shots
Capturing the image is only half the battle. To truly make your Miami photos sing, you need a post-processing workflow that enhances the unique light of the subtropics. The vibrant teals of the ocean and the warm oranges of the sunset can be tricky to balance.
To achieve a consistent, professional look across your entire portfolio, I recommend using the Ultimate Lightroom Preset Collection. These presets are specifically calibrated to handle the high dynamic range often found in coastal environments, ensuring your blues are crisp and your skin tones remain natural. Whether you are editing a fine art piece for Edin Fine Art or a quick social media post, these tools empower you to deliver excellence.
Why a Private Tour is Your Best Investment
You could spend days researching maps and reading blogs on blog.edinchavez.com, or you could maximize your time and talent by booking a Private Miami Photography Tour.
When you book a tour with us, you aren't just getting a guide; you are getting an insider’s access to the city. I ensure you are at the right spot at the exact moment the light is perfect. We bypass the guesswork and go straight to the locations that match your specific style and goals.
By choosing a private experience, you receive:
- One-on-One Instruction: Tailored to your skill level, from basic composition to advanced long-exposure techniques.
- Scouting Expertise: We know which spots are under construction and where the new "hidden gems" are located.
- Logistical Ease: No worrying about parking or navigation. We handle the heavy lifting so you can focus on your art.
If you prefer to explore on your own but still want the expert "cheat sheet," our Miami Self-Driving Photography Guide is the perfect middle ground, providing the structure you need with the freedom you crave.
Planning Your Session: Timing and Gear
To ensure your success, you must respect the Miami sun. The light here is intense. Between 11:00 AM and 3:00 PM, the shadows are harsh and the heat can be draining.
- Sunrise (Golden Hour): Focus on the beaches and South Pointe.
- Midday: Head to the shaded corridors of the Design District or capture the interior details of the Art Deco hotels.
- Sunset: Key Biscayne and the Rickenbacker Causeway offer the best views of the skyline as the sun sets behind the buildings.
- Night: This is the time for Ocean Drive and the downtown skyline.
For gear, a versatile 24-70mm lens will be your workhorse, but don't forget a wide-angle lens for those soaring architectural shots. A sturdy tripod is non-negotiable for the night sessions we cover in our tours.

Final Thoughts for Your Miami Adventure
Miami is a city of constant evolution. What was a hidden alleyway yesterday might be a world-famous mural tomorrow. By immersing yourself in these miami photography locations, you are doing more than taking pictures; you are capturing the energy of a global crossroads.
Whether you are looking to create a stunning piece for your home from Edin Fine Art or simply want to improve your craft, the opportunities here are endless. Check out Edin Studios for more inspiration on how we bring these locations to life through high-end production.
With these considerations in mind, you are ready to step behind the lens and see Miami through a new perspective. Don't leave your memories to chance: secure your spot on our next Private Miami Photography Tour and let’s create something legendary together. For more guides and tips, visit the main blog page to stay updated on the latest in the world of fine art photography.
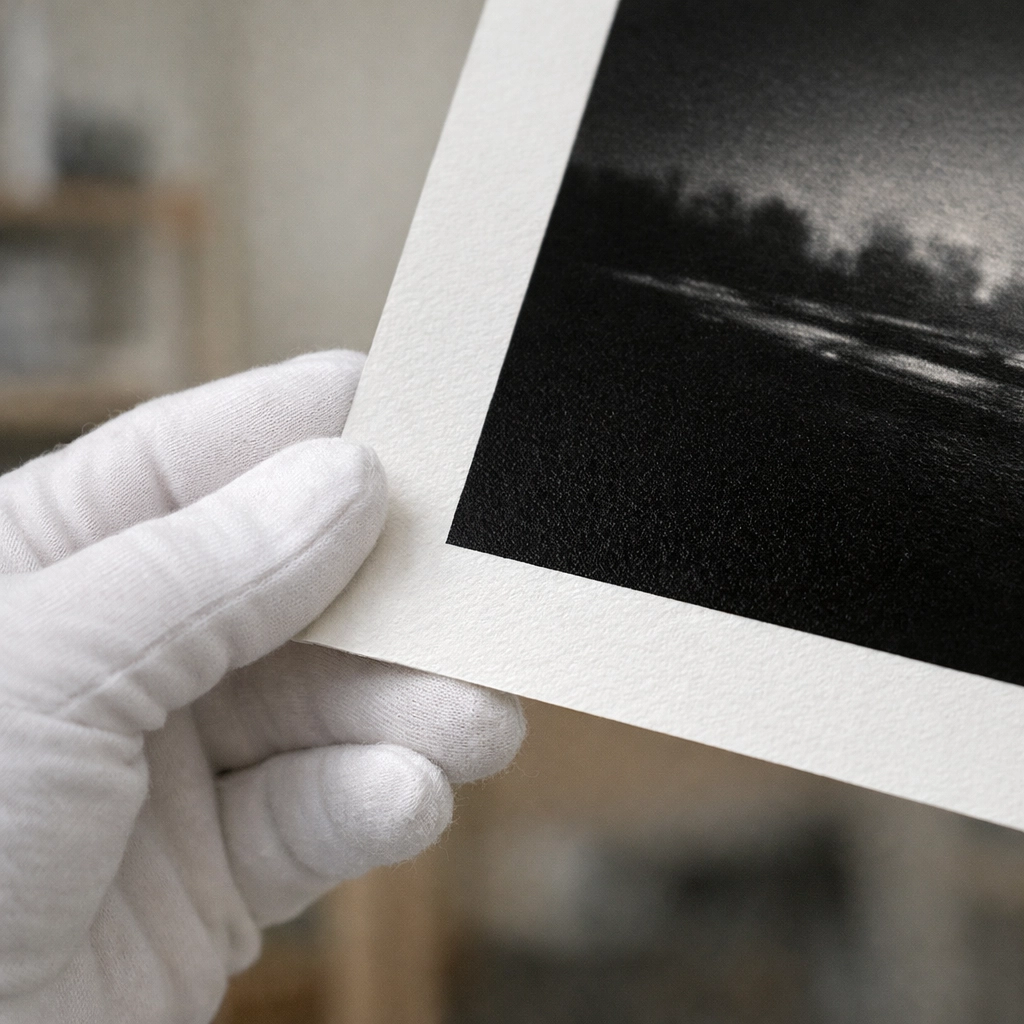
As you step into the world of fine art collecting, you quickly realize that not all art is created equal. You might find a stunning image, but if it’s printed on standard poster paper with cheap ink, that "masterpiece" will begin to fade before you even decide where to hang it. When you are looking to invest in pieces that hold their value and beauty for a lifetime, you need to understand the gold standard: museum quality prints.
Building a collection is more than just buying what looks good; it’s about ensuring the longevity and integrity of the work. Whether you are browsing Edin Chavez Photography for your next big acquisition or looking to refine your current gallery, this guide empowers you with the insider knowledge to distinguish true archival art from temporary decor.
What Exactly Defines Museum Quality?
Just as a luxury watch is defined by its movement and materials, museum quality prints are defined by their archival stability, color fidelity, and material excellence. When you hear the term "museum quality," it means the print is engineered to resist the common enemies of art: light, humidity, and atmospheric pollutants. These prints don’t just look better; they are built to last over 100 years without yellowing, cracking, or fading.
The foundation of this quality is the archival prints process. Unlike standard commercial printing that uses dye-based inks, museum-grade work utilizes pigment-based inks. These pigments are tiny particles of color that bond to the surface of the paper, offering a depth and richness that dye simply cannot match. When you view a high-end print, you aren't just seeing color; you are seeing a sophisticated layering of light and texture that remains stable for generations.
The Three Pillars of Archival Excellence
To succeed as a collector, you must look for three specific elements in every piece you consider. This commitment to quality is what separates a casual buyer from a serious curator.
1. Pigment-Based Inks vs. Dye
Most home printers and budget shops use dye-based inks. While they can look vibrant initially, they are highly susceptible to UV damage. As a collector, you should only accept prints made with high-end pigment inks. These inks offer a wider color gamut and exceptional permanence. This is the tech that ensures your investment looks exactly the same fifty years from now as it does today.
2. Acid-Free, Lignin-Free Paper
The paper (or substrate) is just as critical as the ink. Standard papers contain acid and lignin, which cause the paper to turn yellow and brittle over time. To ensure your collection stands the test of time, you must verify that the artist uses acid-free, 100% cotton rag or alpha-cellulose papers. Brands like Hahnemühle and Canson Infinity are the industry benchmarks you should look for.
3. The Giclée Process
You’ve likely heard the term "Giclée." This is a sophisticated inkjet printing process that allows for incredible precision. By using high-resolution files (typically 300 DPI or higher) and professional-grade printers, artists can capture the subtle transitions in a sunset or the fine textures of a landscape. When you buy a Giclée print, you are buying the most accurate representation of the artist's original vision.
| Feature |
Standard Print |
Museum Quality Print |
| Ink Type |
Dye-based |
Pigment-based |
| Paper |
Wood pulp/Acidic |
Acid-free Cotton Rag |
| Longevity |
5-10 years |
100+ years |
| Color Fidelity |
Prone to shifting |
Extremely accurate |
| Texture |
Flat/Glossy |
Rich, tactile variety |
The Power of Limited Edition Photography Prints
In the world of art, scarcity drives value. While "open edition" prints are produced indefinitely, limited edition photography prints are restricted to a specific number of copies. Once that edition is sold out, no more will ever be produced in that format.
As a collector, limited editions offer you a sense of exclusivity. When you own a "1 of 10" print, you own a piece of a very small, elite circle. This scarcity is a primary factor in how art appreciates over time. If you are looking to enhance your own digital workflow to match this level of professional output, using the Ultimate Lightroom Preset Collection can help you achieve that signature look before you even hit the "print" button.
Protecting Your Investment: The Certificate of Authenticity
Never buy a high-value art print without a certificate of authenticity for art prints (COA). This document is your proof of provenance. It links the physical artwork to the artist and the specific edition number. A proper COA should include:
- The artist's name and signature.
- The title of the work.
- The date of production.
- The edition number (e.g., 5/20).
- Details on the materials used (ink and paper brand).
Without this document, the resale value of your piece drops significantly. If you ever decide to move your collection, the COA is the first thing a serious buyer or gallery will ask for. It provides the legal and professional "DNA" of your artwork.
How to Sell Fine Art Photography Prints
Perhaps you are an artist yourself, or a collector looking to rotate your gallery. Understanding how to sell fine art photography prints requires a shift in mindset from "selling a picture" to "selling an asset."
To sell successfully, you must emphasize the archival nature of the work. Buyers need to know they aren't just paying for the image, but for the craftsmanship and the materials. High-resolution photography, professional framing, and a clear provenance through a COA are your best tools. You can explore more about the professional side of the industry at Edin Chavez’s blog, where we dive deep into the business of art.
If you are looking for secondary market success, focus on:
- Condition: Keep your prints in UV-protected glass.
- Documentation: Keep every receipt and certificate.
- Curation: Build a cohesive collection that appeals to specific niches, such as landscape or urban architecture.
Display and Care: Keeping the Value Intact
Your job as a collector doesn't end once the print is delivered. Proper curation and care are what ensure your archival prints remain in pristine condition. Even the best pigment inks can struggle if you hang your art in direct, harsh sunlight for 10 hours a day.
When framing your museum quality pieces, always opt for:
- UV-Protective Glass or Acrylic: This filters out the harmful rays that cause gradual fading.
- Acid-Free Matting: Ensure the mat board touching your print is also archival. Cheap mats can "bleed" acid onto your print over time, causing a visible brown line around the edges.
- Climate Control: Avoid hanging high-value art in bathrooms or kitchens where humidity and temperature fluctuate wildly.
Why Quality Matters for Your Space
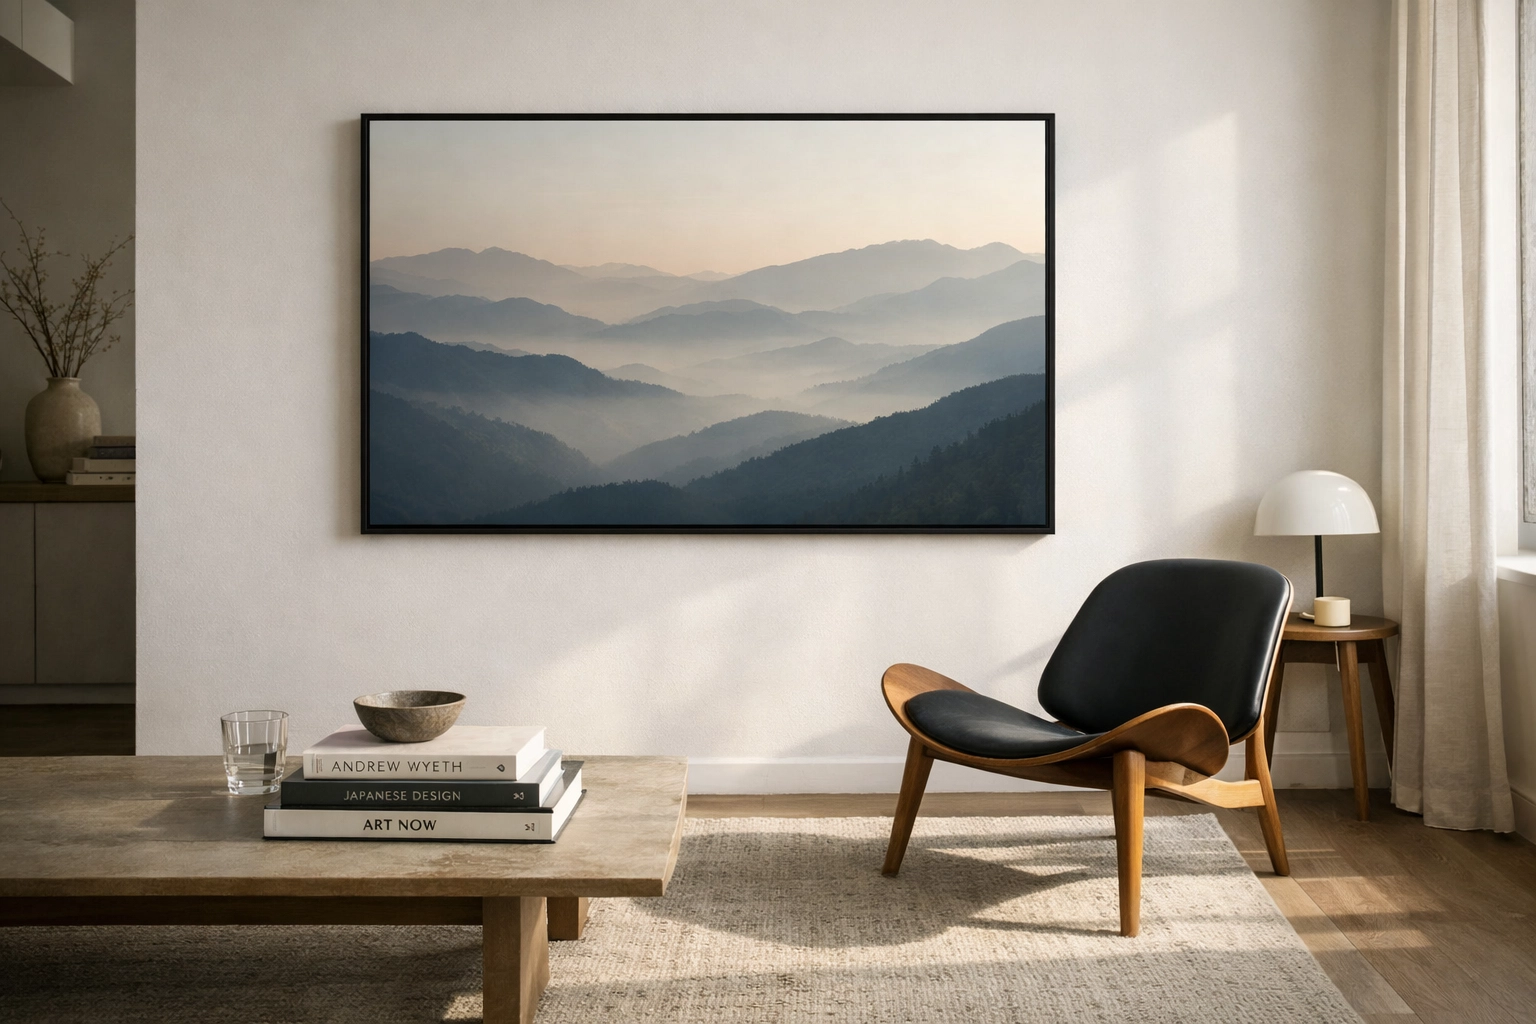
Ultimately, your collection is a reflection of your taste and your standards. When you choose Edin Chavez Fine Art, you are choosing a commitment to the highest levels of production. There is a tactile, emotional difference when you stand in front of a museum-grade piece. The blacks are deeper, the highlights are crisp, and there is a presence to the work that mass-produced posters simply lack.
Whether you are just starting out or you are a seasoned curator, focusing on museum quality prints ensures that your walls tell a story of quality, longevity, and professional excellence. By insisting on pigment inks, archival papers, and proper certification, you protect your financial investment and ensure that your love for art can be passed down to the next generation.
With these considerations in mind, you are now equipped to navigate the art market with confidence. You know what to look for, what questions to ask, and how to preserve the beauty of your collection for a lifetime. Happy collecting!


