Many photographers can make a sharp photo, but fine art photography demands something bigger: you translate a feeling, a story, or a point of view into an image that holds attention like a well-composed painting. As you refine your craft, you’ll notice the gap between “nice shot” and “collectible artwork” comes down to three things you can fully control: intentional capture, consistent style, and museum-quality presentation.
If you want a clear path, you’re in the right place. You’ll learn how to build a cohesive body of work, dial in a signature look, and finish with archival prints that stand up to collectors, galleries, and time. For ongoing education and deeper dives, keep https://blog.edinchavez.com/ bookmarked, and if you want to see how finished fine art work is presented, explore https://www.edinfineart.com/ as a reference point for museum quality display standards.
What “fine art photography” actually means (and how you keep it from becoming vague)
As soon as you stop chasing “pretty” and start chasing “purpose,” your work becomes fine art photography. You’re not documenting what’s in front of you; you’re constructing meaning with light, timing, and design choices. That’s why the strongest fine art portfolios feel consistent even when the subjects change: your voice stays steady.
To keep your process concrete, anchor every project to one of these intent types:
| Intent type |
What you’re communicating |
What you control to make it land |
| Emotion-first |
mood, solitude, tension, calm |
contrast, color temperature, negative space |
| Concept-first |
an idea (memory, decay, time, identity) |
symbolism, repetition, visual metaphors |
| Place-first |
a location with a point of view |
time of day, perspective, atmosphere, scale |
| Form-first |
shape, texture, abstraction |
light direction, geometry, cropping discipline |
When you choose your intent before you shoot, you stop collecting random good images and start building a body of work that reads like a series. Hence, you gain consistency without forcing it.
Master the technical core (so your vision stays in charge)
The fastest way to make your art feel expensive is to make it feel controlled. When your exposure, focus, and tonality are deliberate, your viewer relaxes and pays attention to the message instead of the mistakes.
1) Exposure control: your “look” starts in-camera
Because fine art photography leans heavily on atmosphere, you should treat exposure as a creative decision: not a rescue mission in post.
- Aperture controls depth and separation. If you want a painterly falloff, you use wide apertures intentionally, not automatically.
- Shutter speed controls emotion through motion. Crisp stillness feels formal; blur feels dreamlike or uneasy.
- ISO controls texture. Clean files look polished; controlled grain can look timeless when you add it on purpose.
A reliable habit: expose for the highlights you refuse to lose, then shape the shadows later to match your intent. Your files become robust, and your editing becomes smooth as butter.
2) Light mastery: mood is a lighting decision
When you’re serious about museum quality results, you stop accepting “available light” as a limitation and start treating light as your main material.
- Side light gives depth and texture: perfect for landscapes, architecture, and still-life work.
- Backlight creates glow, haze, and separation: perfect for poetic, cinematic frames.
- Overcast light flattens contrast: perfect when you want gentle tonality and soft transitions.
With these lighting choices, you’re not just recording a scene: you’re designing an emotional response.
3) Composition: you guide the viewer’s eyes like a curator
Rule of thirds, leading lines, symmetry: those are tools, not laws. What ensures your images read as fine art is intentional placement and clean edges.
Use this simple checklist before you press the shutter:
- What is the subject really (not “a tree,” but “isolation”)?
- Where does your eye land first, and is that correct?
- Are the frame edges clean, or are they leaking attention?
- Is the background supporting the subject or competing with it?
This commitment to composition translates directly into prints that feel deliberate on a wall.
Develop a distinctive visual style (without copying anyone)
Your style is your consistency across variables: subject, season, location, lens choice. To develop it faster, you need repeatable decisions: especially in color and tonality.
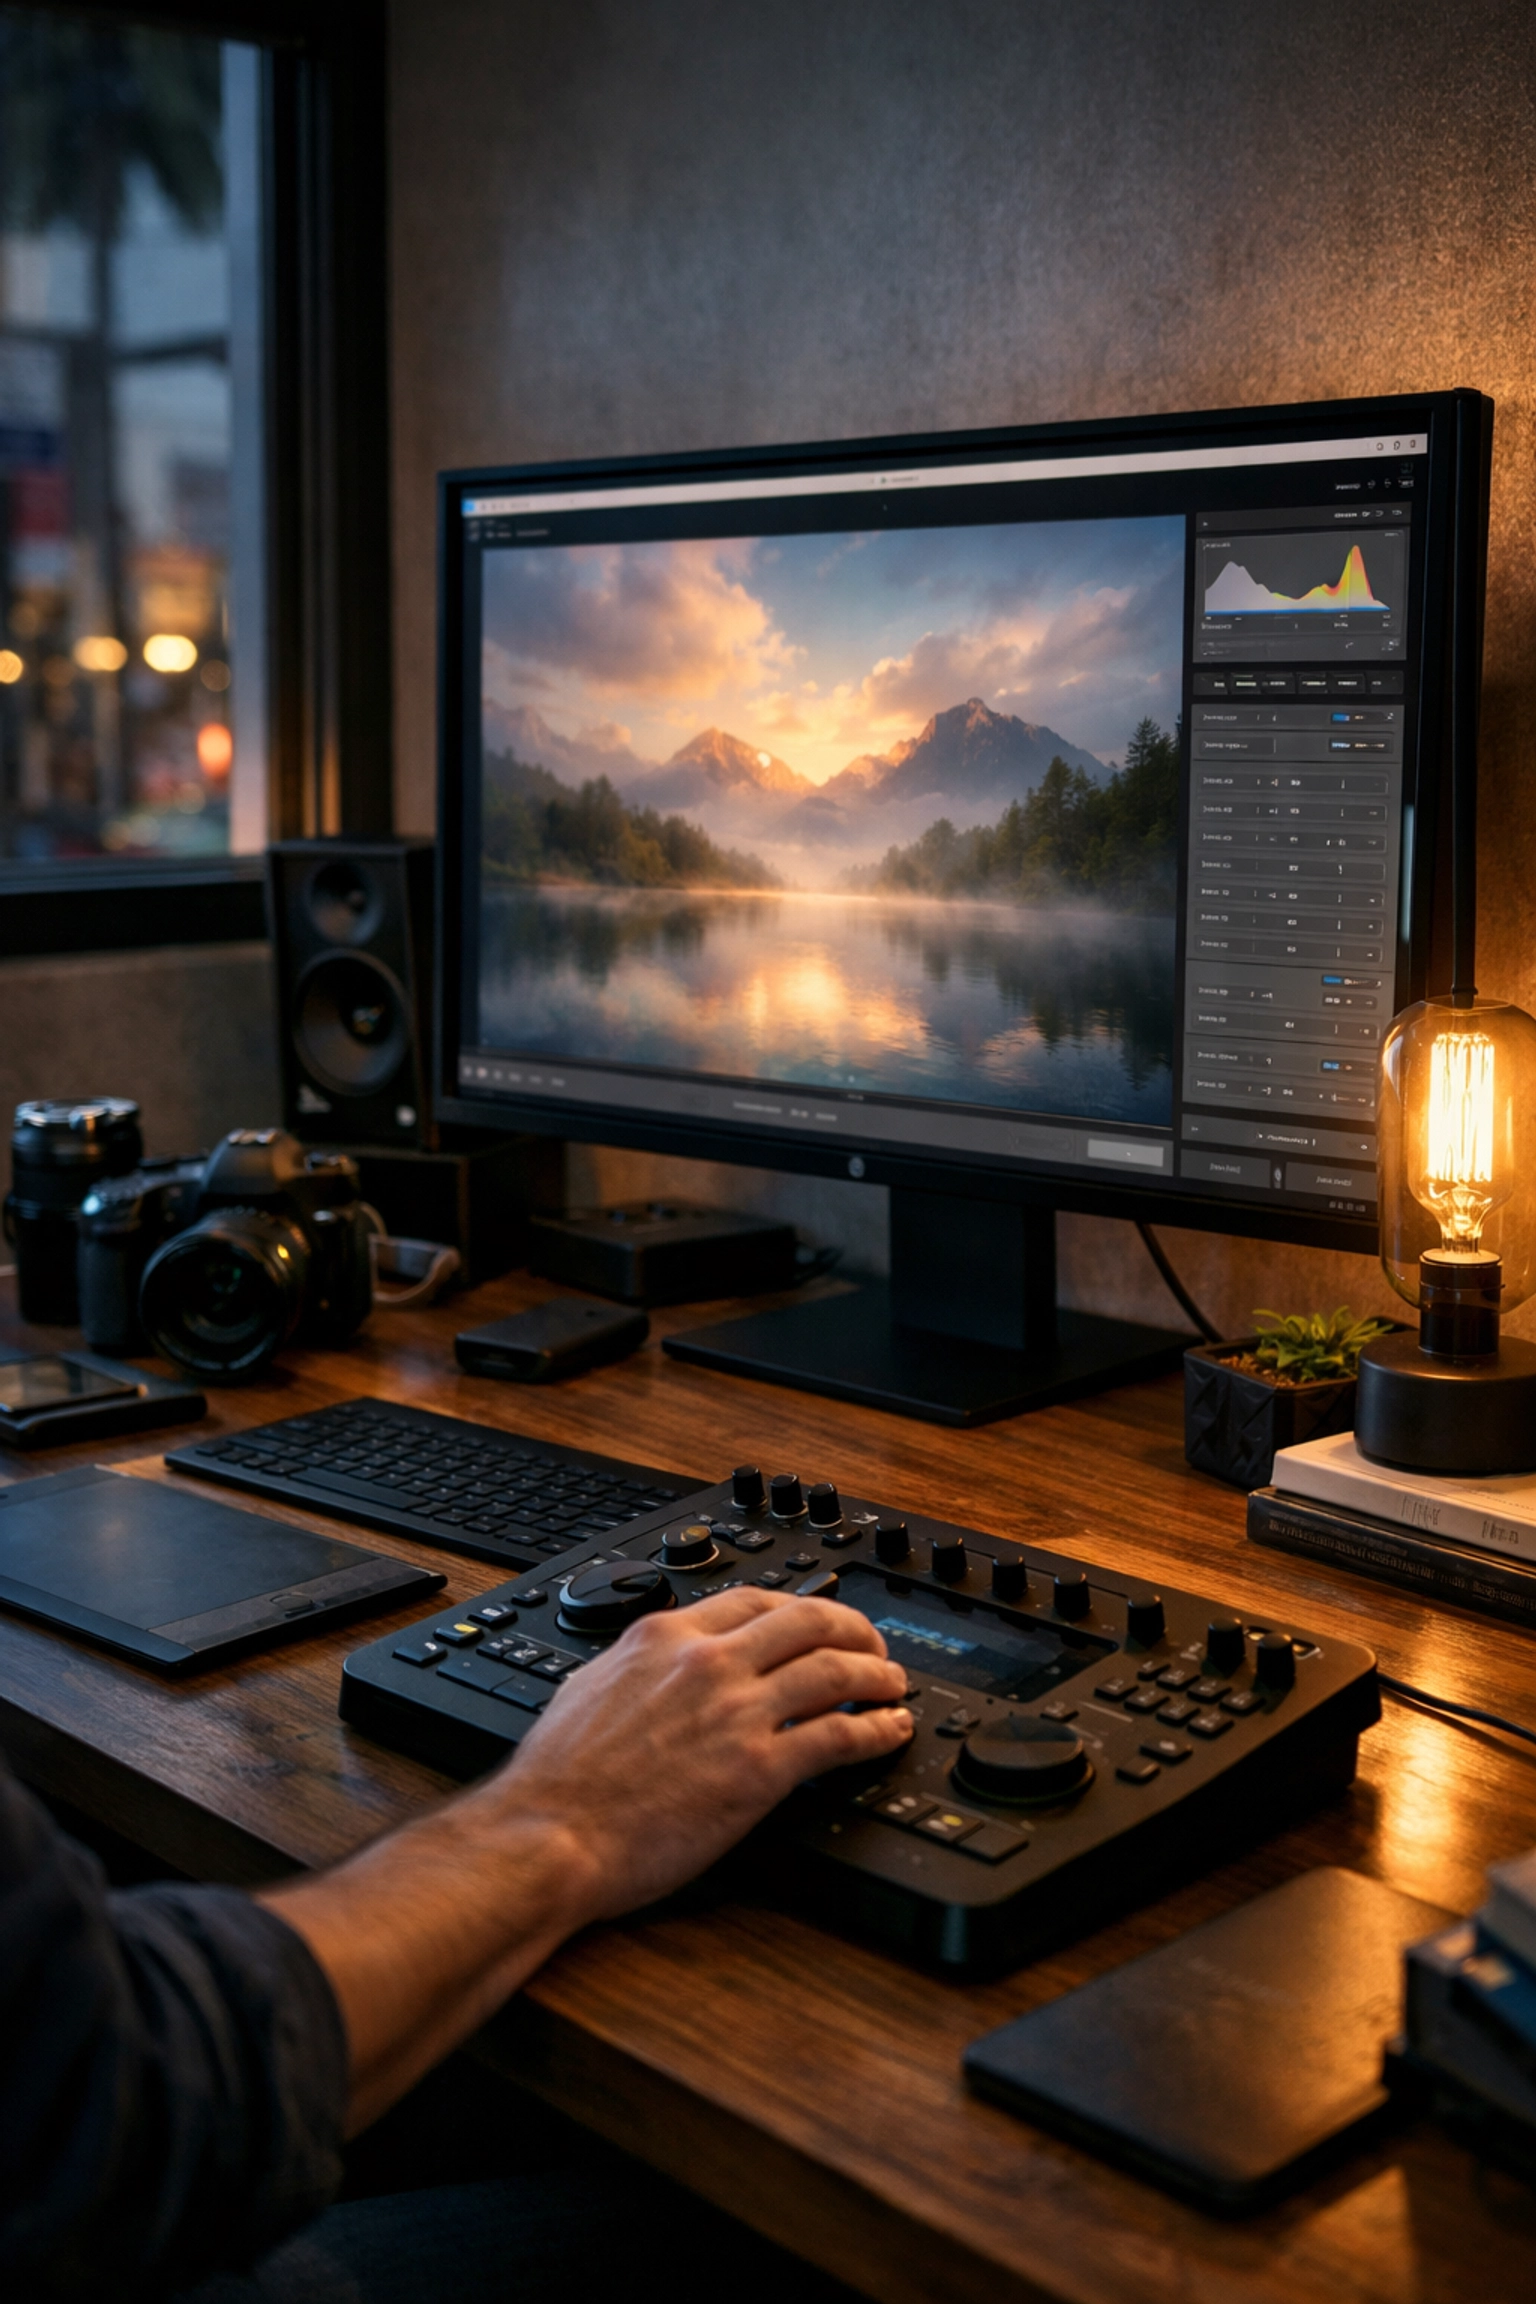
A practical way to tighten your look is to standardize your starting point in Lightroom. That’s why a curated preset workflow is so powerful: it gives you a consistent base so your creativity goes into nuance, not rebuilding your look every time. If you want a pro-grade foundation that’s designed for cohesive fine art series, use the Ultimate Lightroom Preset Collection here: https://blog.edinchavez.com/product/ultimate-lightrooom-preset-collection/.
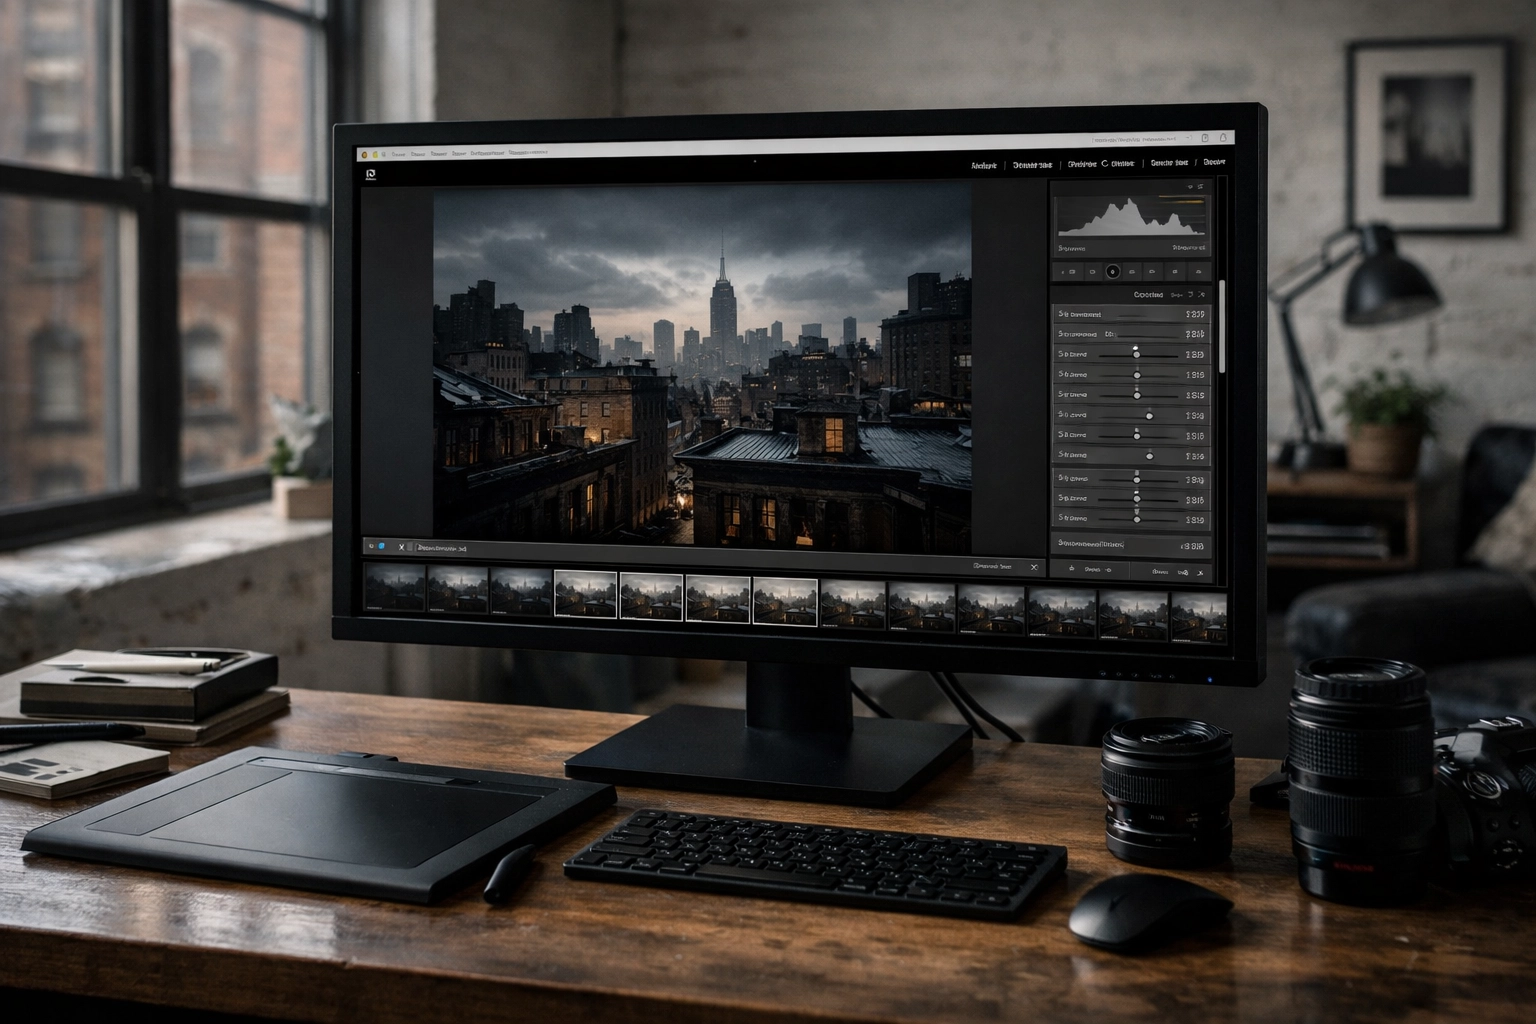
Alt text: Ultra-realistic behind-the-scenes view of a fine art photography editing setup in a New York studio, showing Adobe Lightroom with custom Lightroom presets applied to a moody cityscape; emphasizes consistent fine art photography color grading for museum quality prints.
A style-building framework you can actually follow
When you want your portfolio to look cohesive, lock these three “style anchors” for a full project:
- Tone curve direction: airy highlights vs. deep shadows
- Color bias: warm shadows/cool highlights vs. neutral vs. cinematic teal/orange
- Micro-contrast level: crisp detail vs. soft, painterly transitions
By integrating these anchors into every edit, you build a signature that viewers recognize instantly. Your work starts to feel like yours, even when you’re shooting new places.
Build a cohesive body of work (the difference between a portfolio and a collection)
A portfolio can be a greatest-hits gallery. A fine art collection is tighter: it has a theme, pacing, and visual continuity. When collectors buy, they’re often buying into a world: and your series is the doorway.
Choose a theme you can sustain
Your theme should be emotional or conceptual enough to produce variety, but focused enough to feel unified. Strong examples:
- “Quiet geometry in modern cities”
- “Coastal erosion and the shape of time”
- “Night light as a form of memory”
- “Botanical studies as abstraction”
Shoot like you’re building chapters
If you want the series to feel complete, plan for variety in your set:
- Establishing frames (wide, place-setting)
- Subject frames (the main motif)
- Detail frames (texture, pattern, abstraction)
- Transition frames (atmosphere, negative space)
With these considerations, you stop chasing single bangers and start building a story people can live with on their walls.
Advanced techniques that elevate fine art work (when used with restraint)
Just because you can do something in-camera or in post doesn’t mean it serves your intent. The best advanced techniques look invisible: they feel like the only way the image could exist.
Long exposure: make time visible
Long exposure turns movement into structure: clouds become brush strokes, water becomes glass, crowds become ghosts.
To get clean results:
- Use a solid tripod and a remote or timer
- Start at ISO 100 and tighten exposure with ND filters
- Keep highlights under control so your print doesn’t look “burned out”
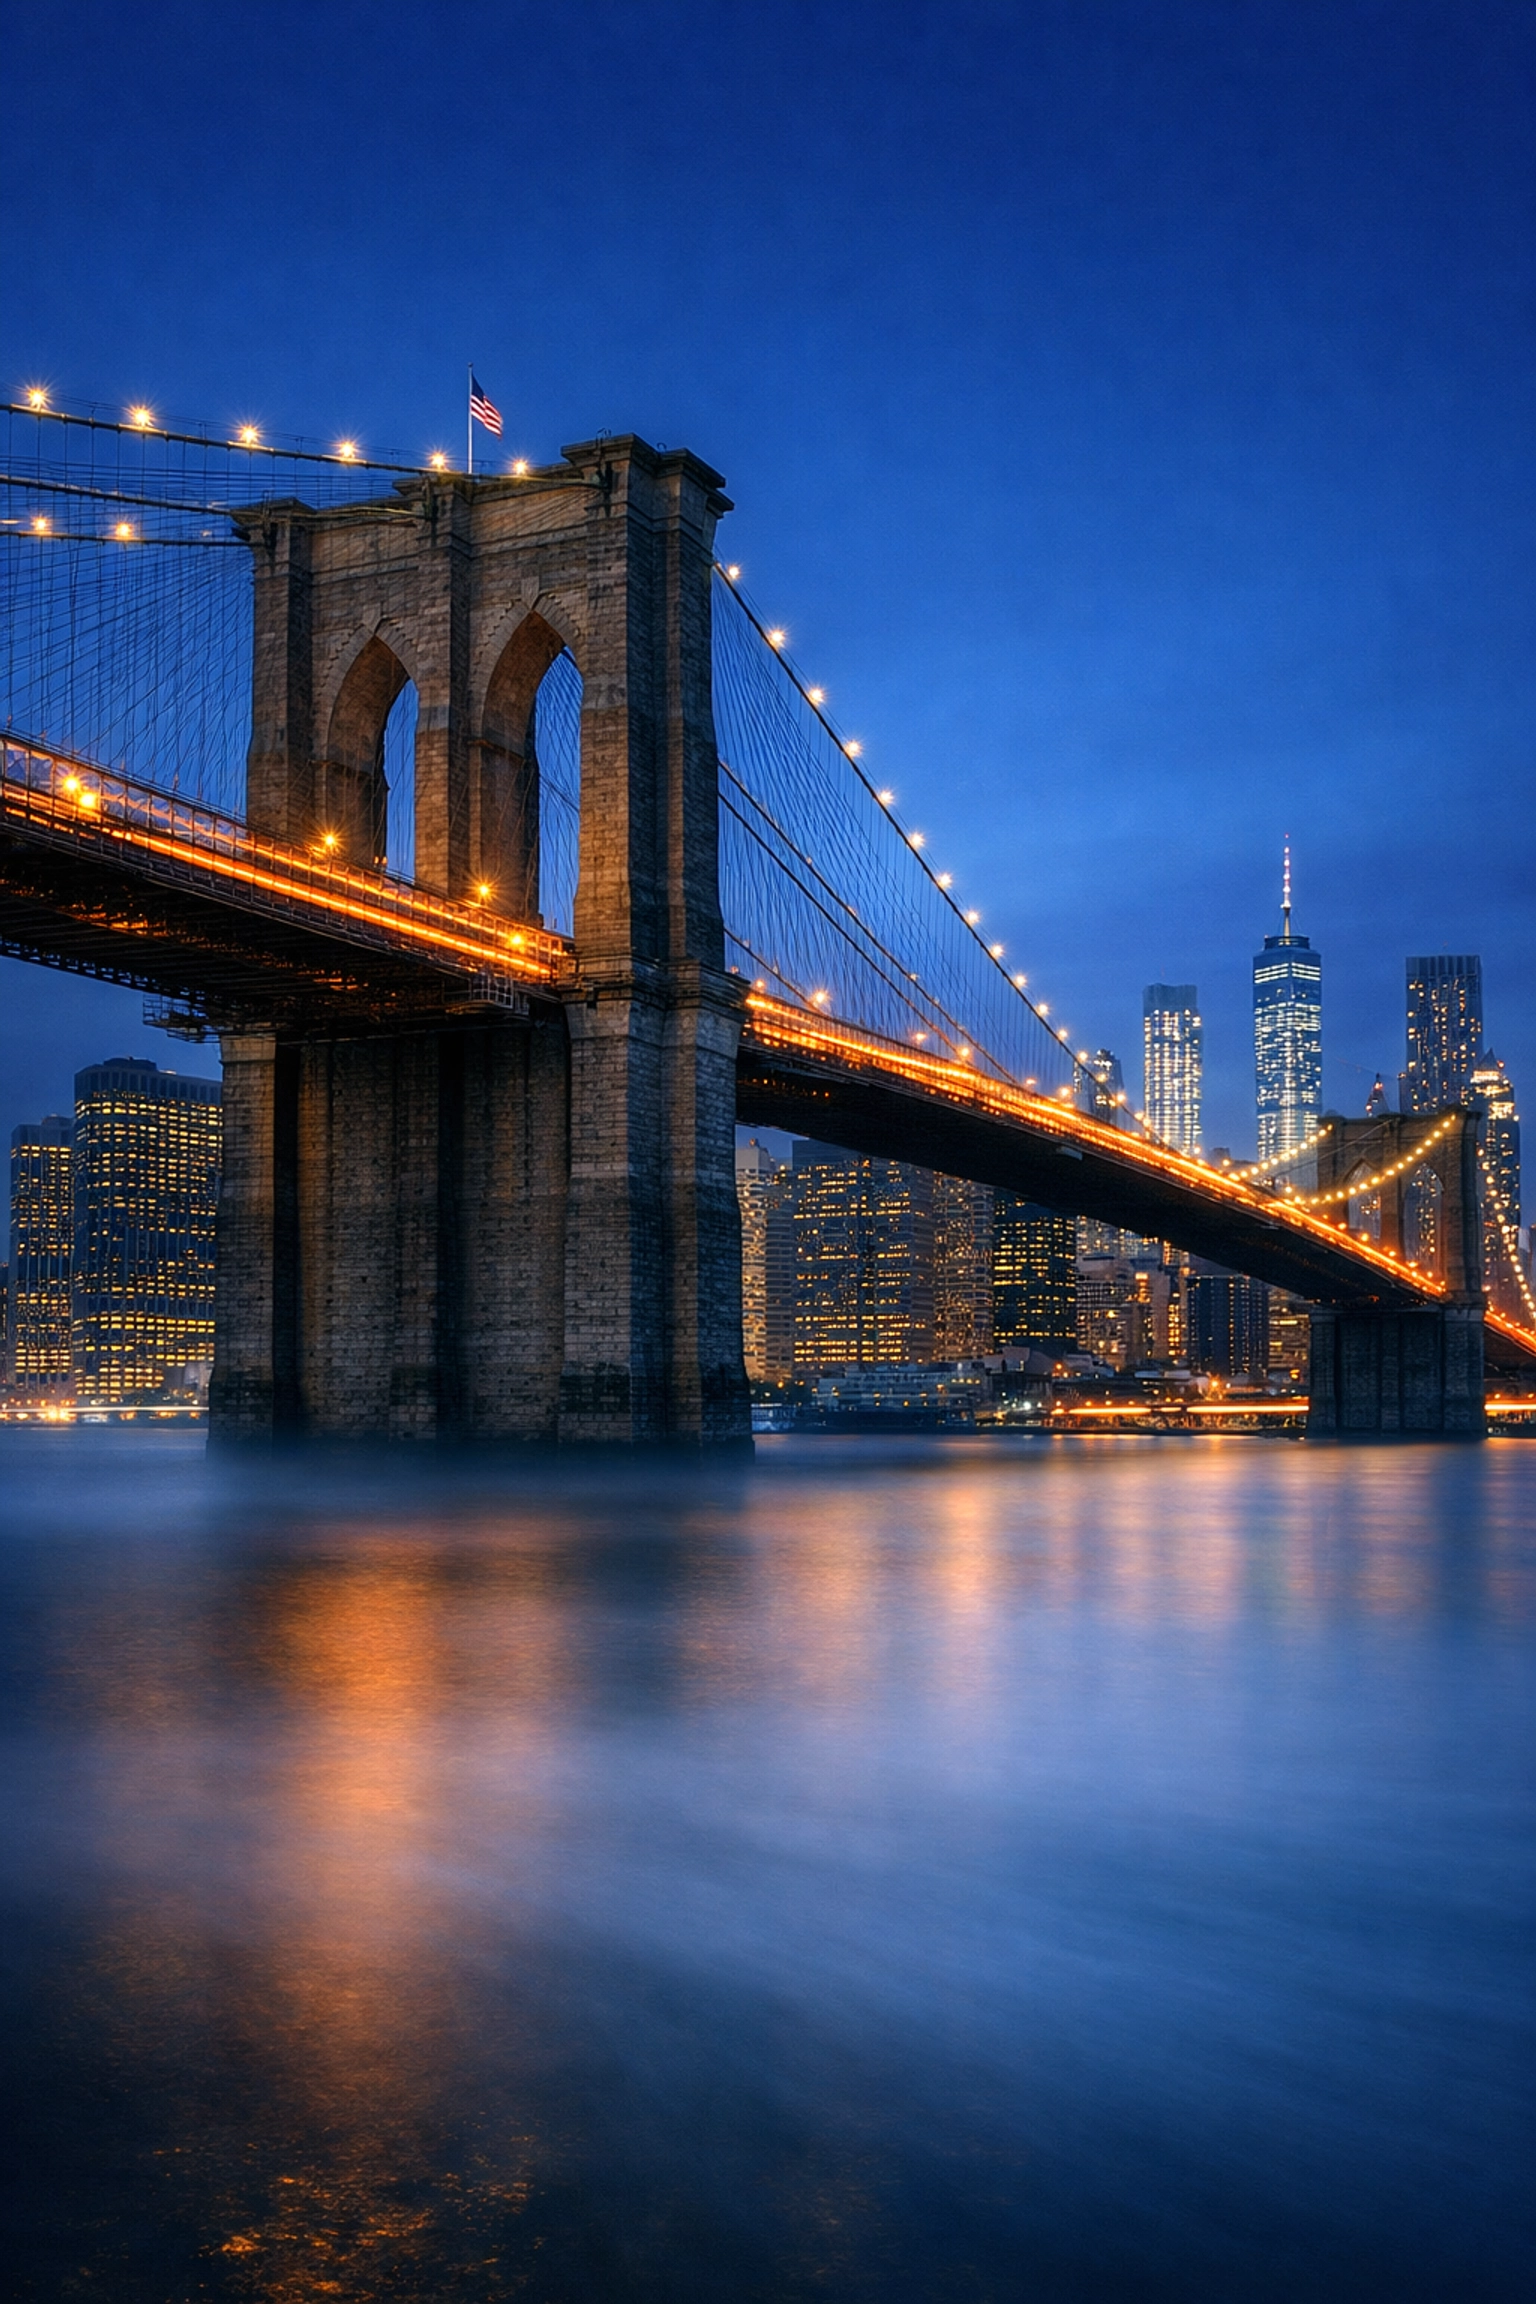
Alt text: Ultra-realistic long exposure fine art photography of the Brooklyn Bridge at blue hour in New York City, with smooth car light trails and crisp architectural detail; demonstrates fine art photography technique and museum quality tonal control.
HDR: dynamic range without the “HDR look”
HDR stands out as a tool when you use it for realism, not crunchiness. You bracket exposures to protect highlights and preserve shadow detail, then blend subtly so the scene looks natural but more readable.
Your rule: if your viewer notices the HDR, you pushed it too far.
In-camera creativity: ICM and multiple exposure
Intentional camera movement (ICM) and multiple exposure deliver painterly work when your concept supports abstraction. If your theme is memory, motion, or distortion, these techniques reinforce it and make the series feel designed.
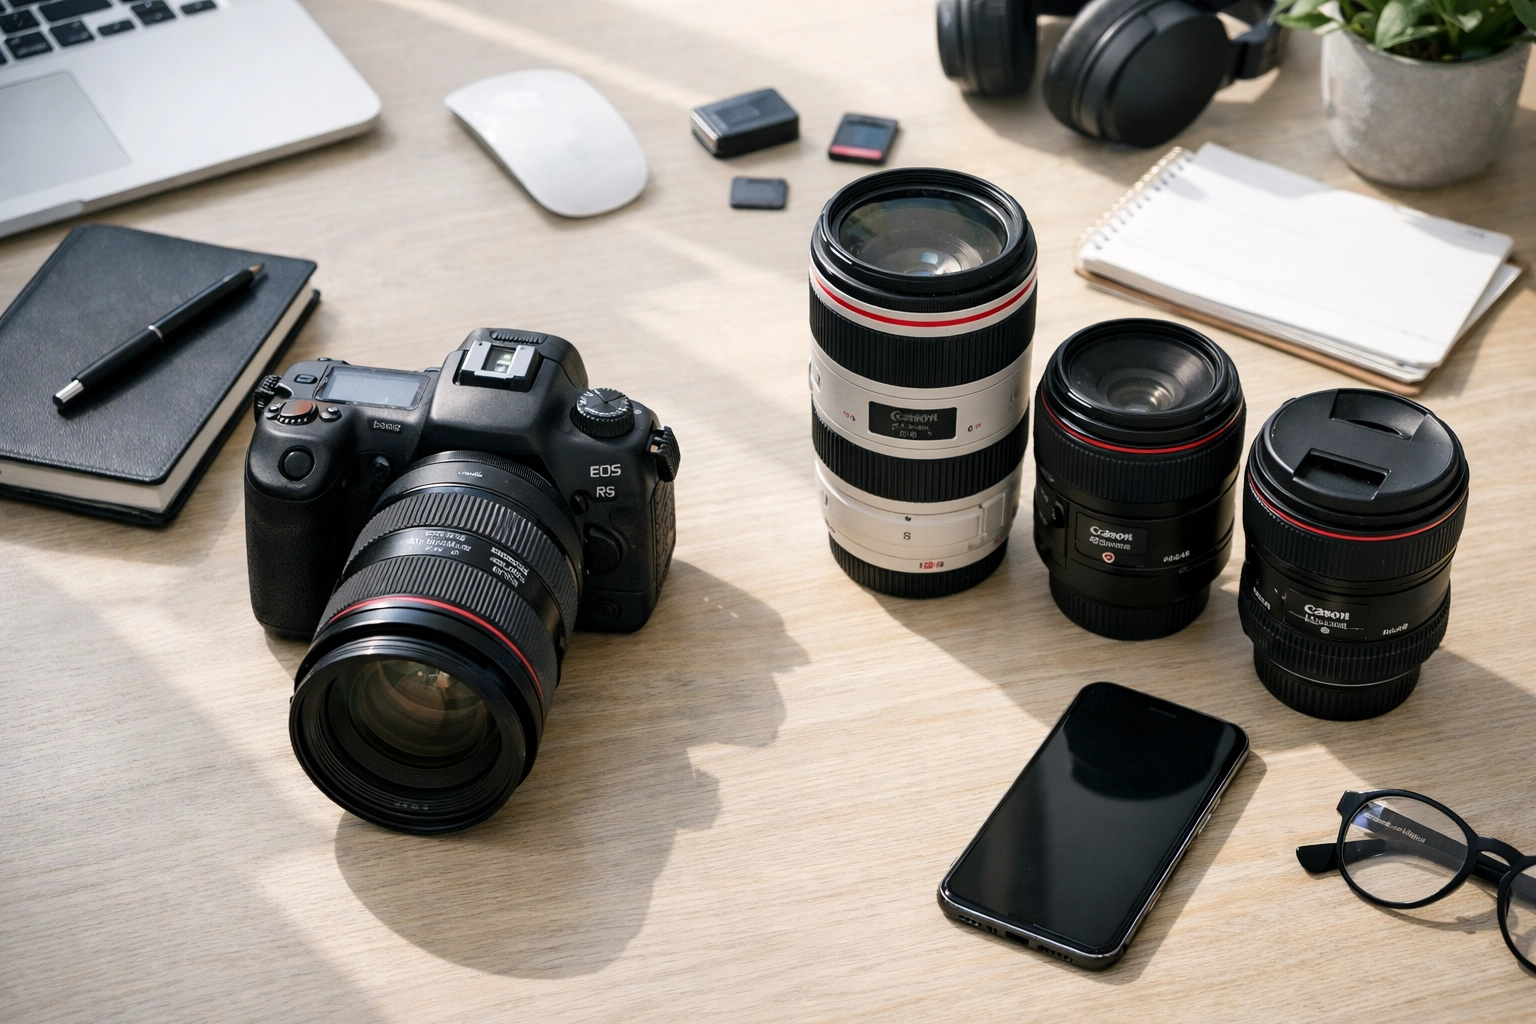
Gear that actually matters (and what to ignore)
You don’t need the most expensive camera to create fine art photography, but you do need reliable files and sharp glass that holds up in print.
Prioritize what improves your final print
- Camera: a modern mirrorless/DSLR with solid dynamic range
- Lens: a sharp prime (35mm, 50mm, 85mm) or a pro zoom you trust
- Tripod: non-negotiable if you shoot long exposures or low light
- Filters: ND for long exposure; polarizer for glare control and richer skies
- Storage + backup: redundant drives so your work is protected
A quick gear-to-benefit table
| Gear choice |
What it ensures for your art |
| High-resolution body |
larger prints with cleaner detail |
| Sharp prime lens |
micro-contrast that reads as premium in prints |
| Sturdy tripod |
precise framing and clean long exposures |
| Color-calibrated monitor |
edits that match your final archival prints |
When your gear choices are aligned to output, your workflow becomes efficient and your results become consistent.
Editing workflow for museum quality results (capture → refine → print)
If you want collectors to trust your work, your post-production has to be repeatable. You’re building a system, not gambling on “good edit days.”
A clean fine art editing pipeline
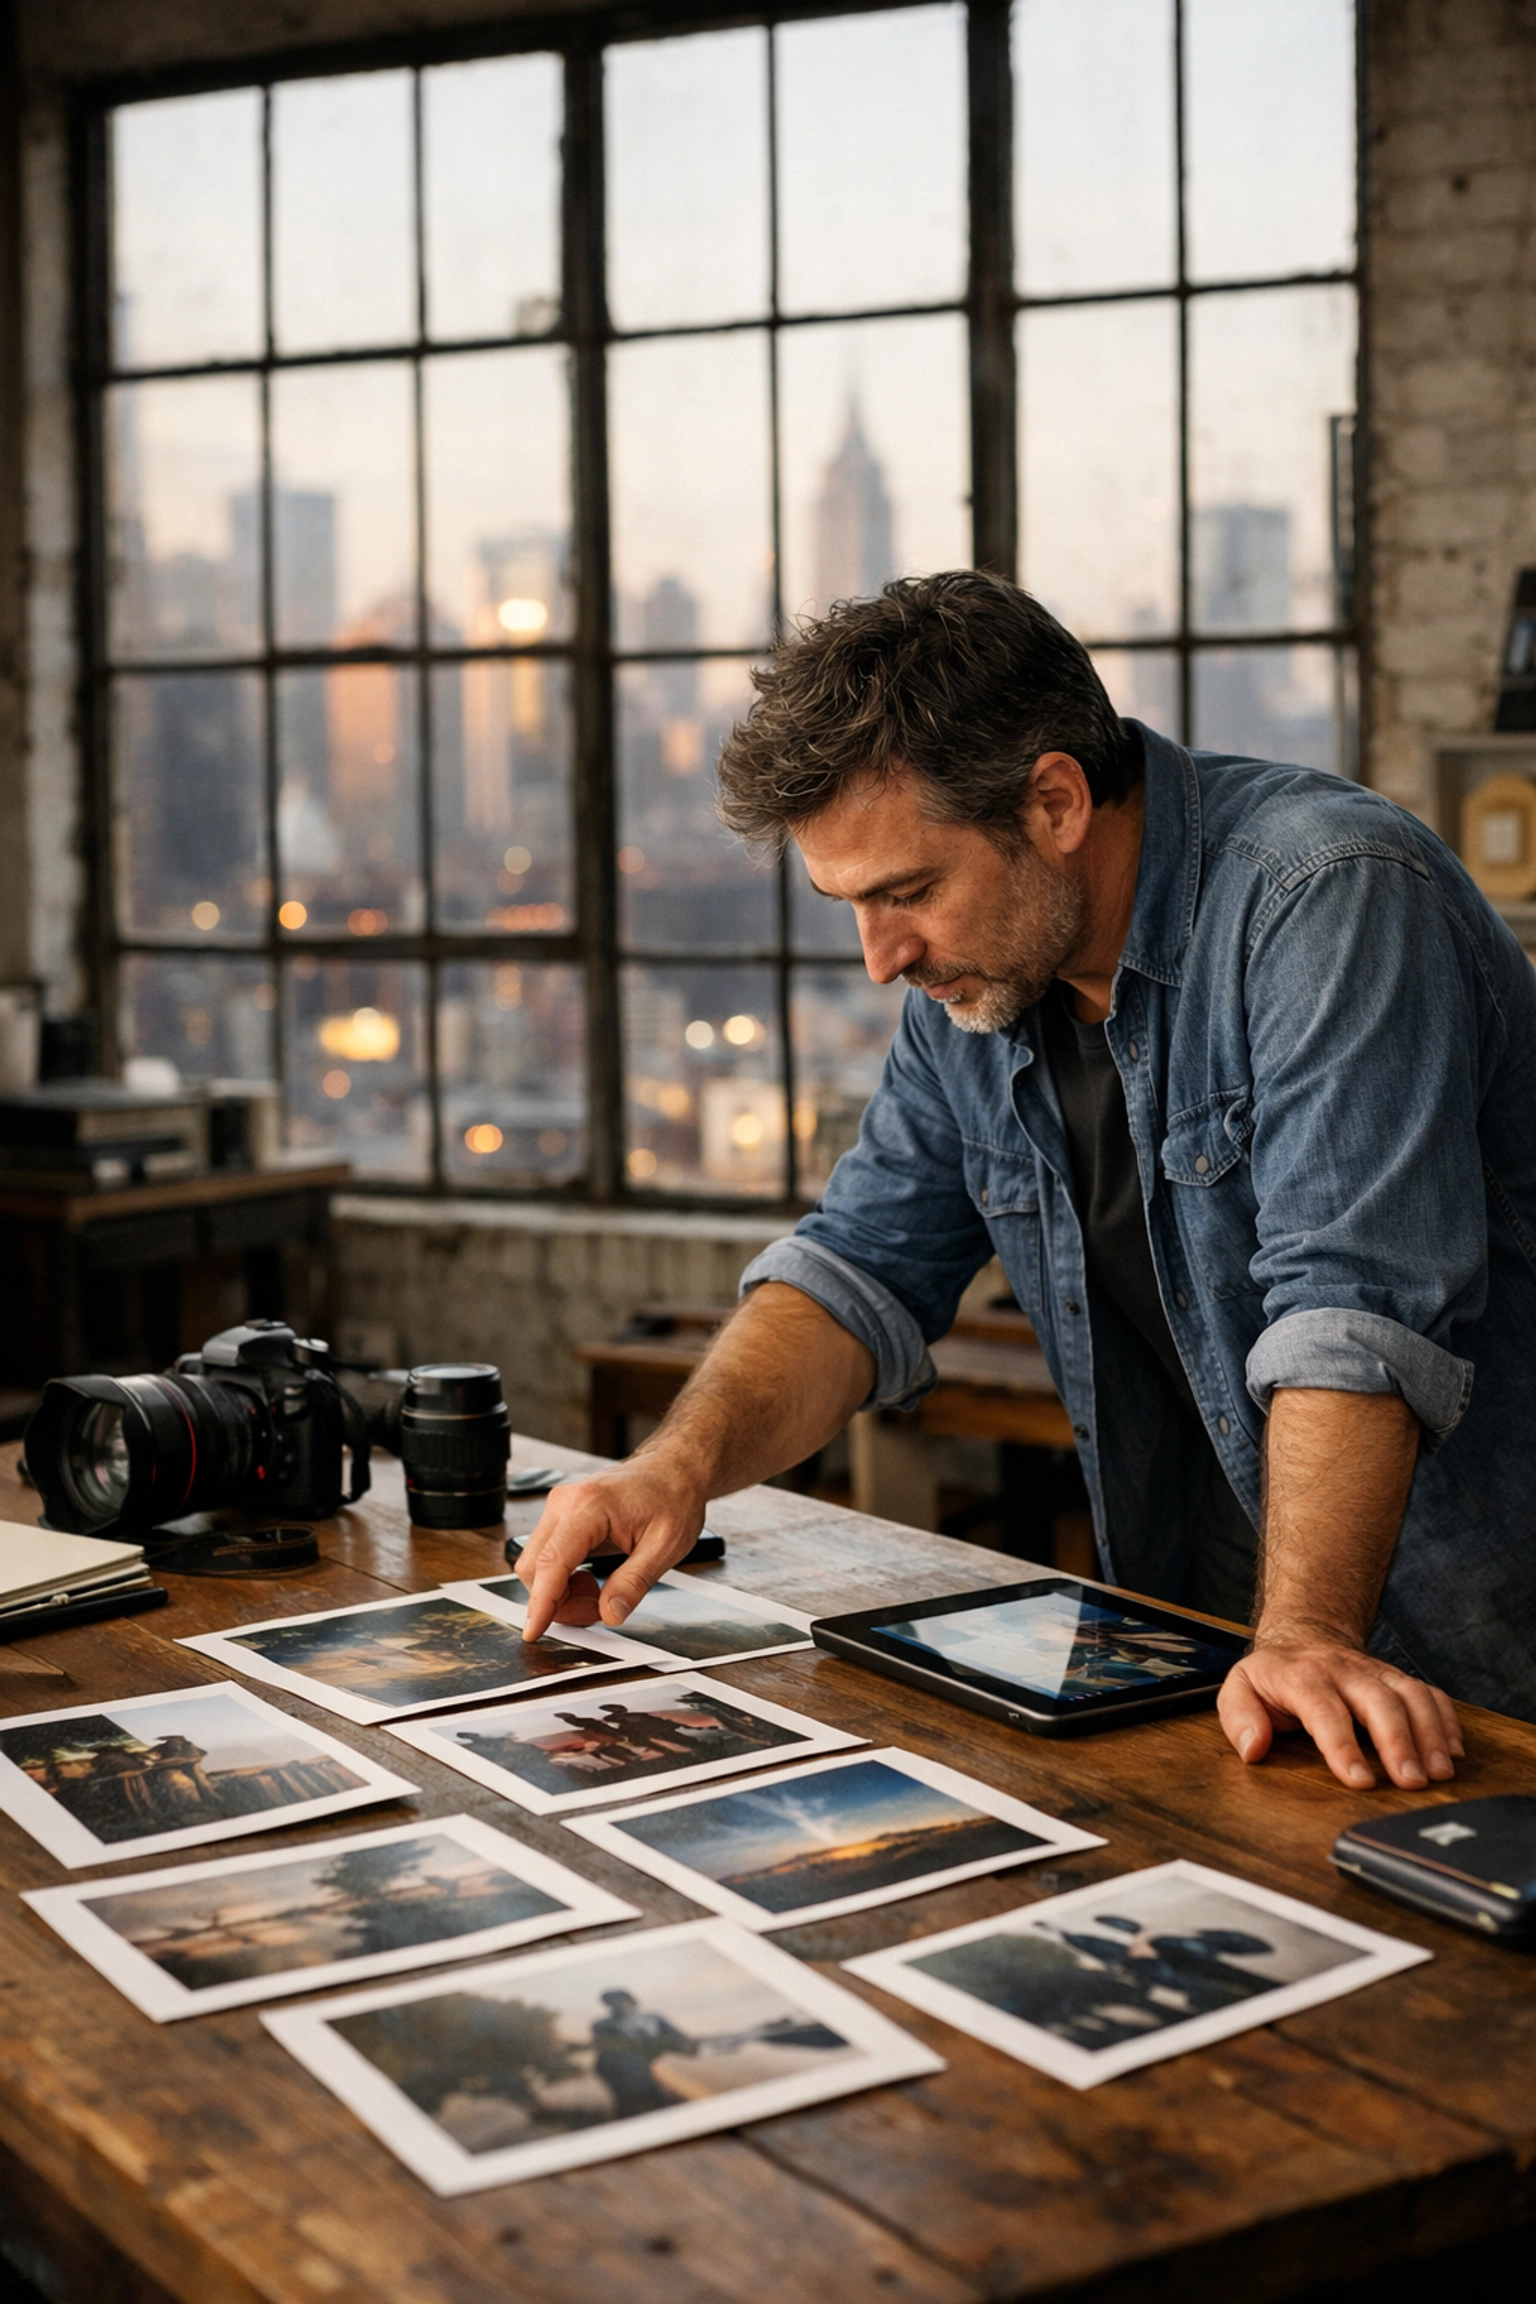
- Cull with intent: keep only images that serve your theme
- Global corrections: white balance, exposure, lens corrections
- Style pass: apply your Lightroom presets as a baseline, then refine
- Local control: dodge/burn for depth, guide the viewer’s eye
- Color management: soft proof for your paper/printer profile
- Export for print: correct resolution, output sharpening, and format
If you want your style to stay consistent across a series, use a preset baseline you trust, then customize per image. The fastest path is a professional toolkit like https://blog.edinchavez.com/product/ultimate-lightrooom-preset-collection/ because it keeps your work cohesive without flattening your creativity.
Printing like a pro: archival prints, papers, and presentation
Your image isn’t “finished” until it exists as a physical object. This is where fine art photography separates itself from content creation: your print quality becomes part of your signature.
What “archival prints” and “museum quality” mean in practice
When you present work as archival prints, you’re committing to longevity through:
- pigment-based inks
- acid-free, lignin-free papers
- controlled storage and handling
When you present work as museum quality, you’re signaling:
- excellent tonal separation (clean highlights, rich shadows)
- accurate color and skin tones (if relevant)
- professional finishing (borders, mounting, framing choices)
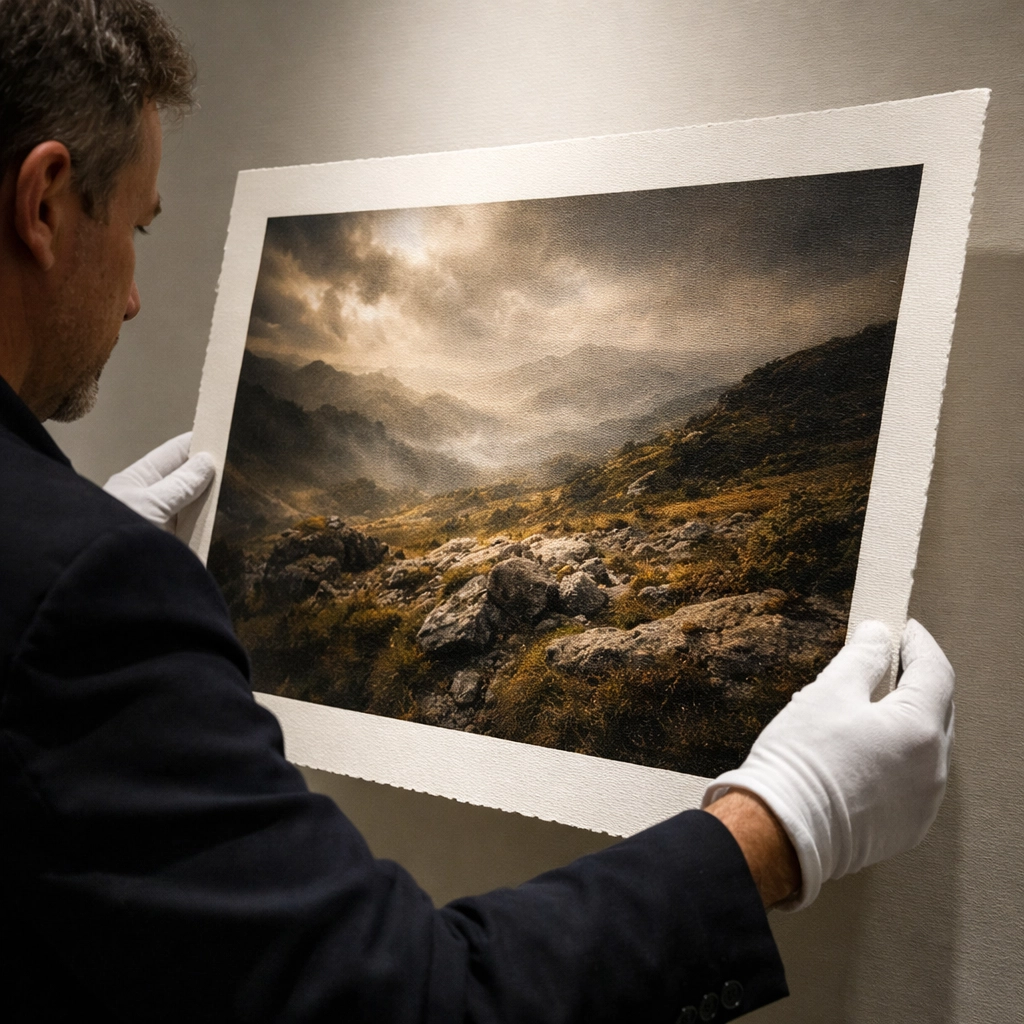
Alt text: Ultra-realistic close-up of a museum quality archival print being inspected under gallery lighting, showing fine art photography shadow detail and paper texture; highlights archival prints and professional presentation for collectors.
Paper choices that match your intent
- Matte fine art rag: soft, painterly, elegant: perfect for moody work
- Baryta/satin: deeper blacks and punch: perfect for contrast-heavy images
- Glossy: high impact but less forgiving: use when the concept demands pop
Your best move is to standardize one or two papers for a full series so your collection feels unified on the wall.
Present your work online like a collector would see it
Because most collectors meet your work on a screen first, your website presentation needs to feel clean, premium, and easy to navigate. A strong reference for professional fine art presentation is https://www.edinfineart.com/, where the emphasis stays on the artwork and the viewing experience remains seamless.
To support your brand ecosystem, keep your education hub and updates centralized at https://blog.edinchavez.com/, and if you offer services, workshops, or production support, connect that experience through https://edinstudios.com/. When your online presence feels coherent, your art feels more collectible by default.
A practical checklist: succeed in fine art photography by executing consistently
If you want a simple way to measure progress, use this checklist before you publish a new series:
- Your theme is clear in one sentence
- Your series has visual pacing (wide, medium, detail, transitions)
- Your color and contrast remain consistent across the set
- Your composition is clean at the edges in every frame
- Your edits follow a repeatable workflow (including Lightroom presets)
- Your final output is designed for archival prints and museum quality presentation
When you operate like this, you stop hoping your work stands out and start ensuring it does: through craft, consistency, and presentation that earns trust.
As you pull over to the side of the road and the crisp, pine-scented air hits your lungs, you realize that Lake Tahoe isn't just a body of water: it’s a colossal, liquid sapphire dropped into the Sierra Nevada mountains. When you are looking for the best photo spots Lake Tahoe has to offer, you aren't just looking for a quick snapshot; you are hunting for that perfect alignment of light, texture, and ancient granite that defines professional landscape photography.
At Edin Chavez Photography, we believe that your journey behind the lens should be as seamless as the water on a windless morning. Whether you are a seasoned pro or a hobbyist looking to level up your portfolio, Lake Tahoe presents a unique set of challenges and rewards. Before you pack your gear and head into the wild, there are several crucial elements you need to master to ensure your images stand out from the millions of tourists who visit every year.
1. The Magic of Emerald Bay Sunrise
Just as the first light begins to lick the peaks of the Desolation Wilderness, you need to be positioned overlooking Emerald Bay. This is arguably the most famous of all Lake Tahoe photography locations, and for good reason. From the vista points along Highway 89, you see Fannette Island sitting like a crown jewel in the center of the bay.
To capture the true essence of this spot, you must arrive at least 45 minutes before sunrise. The pre-dawn "blue hour" turns the water into a deep, velvety navy that provides a stunning contrast against the orange glow hitting the mountains. If you want to dive deeper into the technical settings for these shots, your best resource is our Lake Tahoe Photography Guide.
2. Hunting the Bonsai Rock
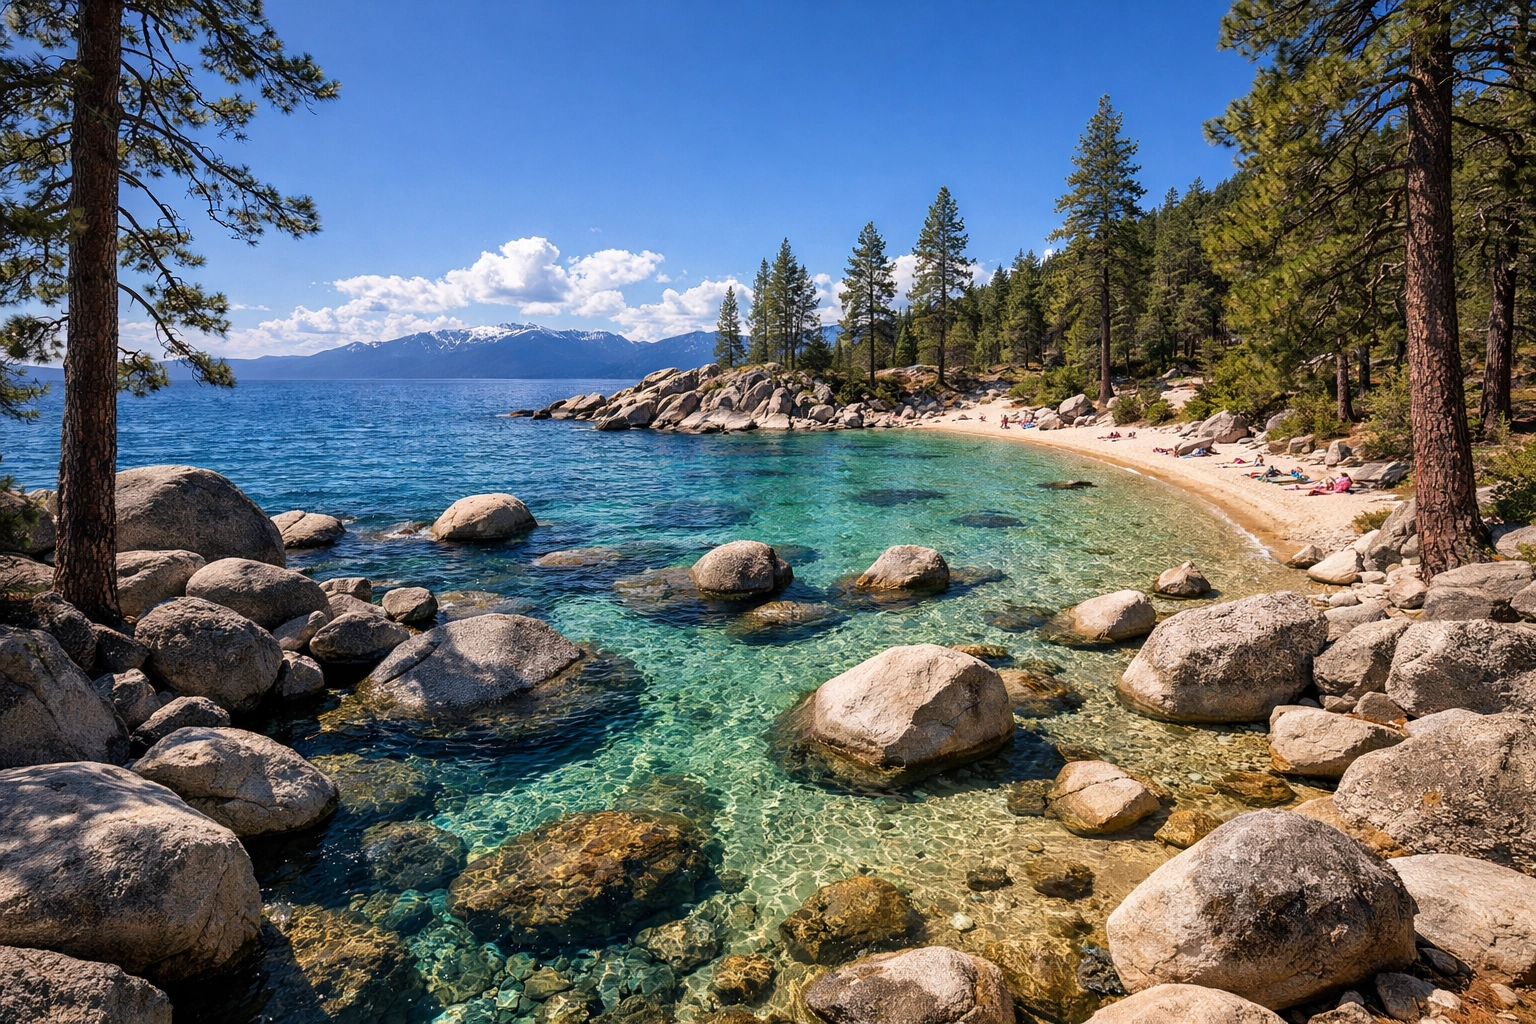
If you are looking for that ultra-realistic, surreal aesthetic, you have to find Bonsai Rock. Located on the East Shore, this iconic boulder features four small trees growing directly out of its granite surface. When you stand on the shoreline at sunset, the water here is so clear it looks like liquid glass.
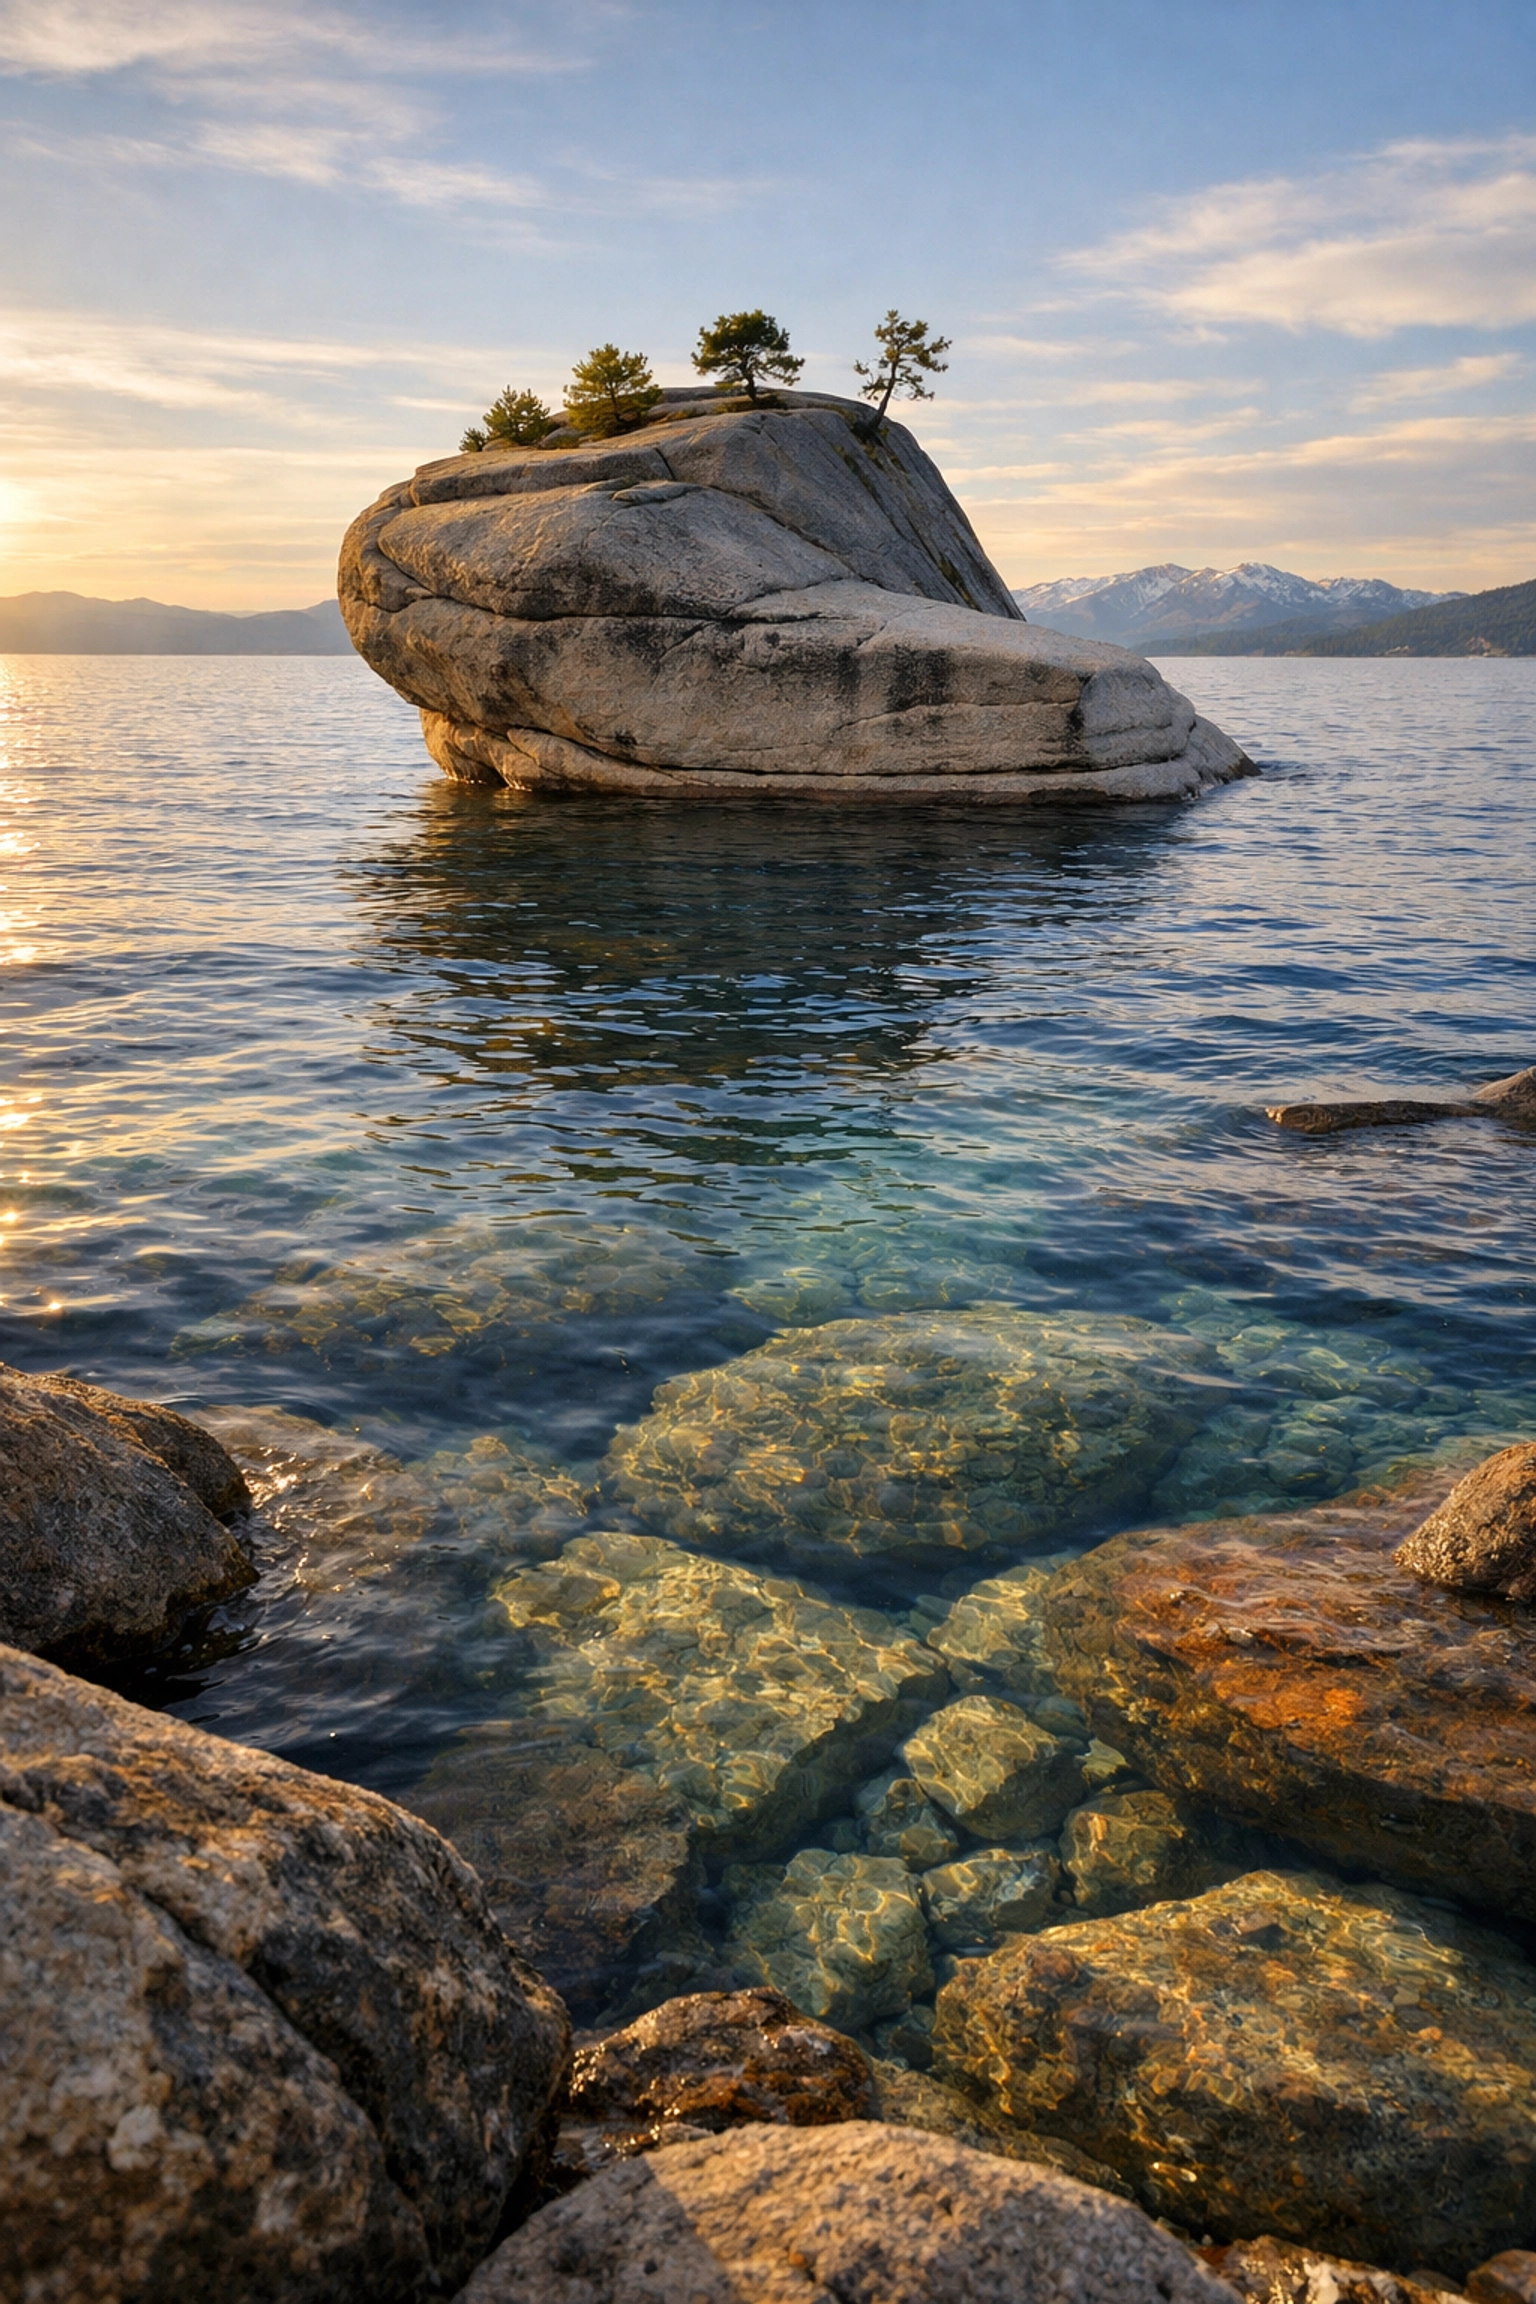
Capturing the textures of the underwater boulders while keeping the sky’s reflection requires precision. This is where your composition skills are truly tested. You’ll want to get low to the ground to emphasize the "bonsai" trees against the vastness of the lake. It’s a shot that propels your portfolio into the realm of fine art photography.
3. The Logistics of Parking and Access
Many photographers underestimate the sheer difficulty of parking in Tahoe. This isn't just about showing up; it’s about strategic planning. Most of the premier landscape photography Lake Tahoe spots, like Sand Harbor or Secret Cove, have limited parking that fills up before the sun is even fully up during peak season.
| Location |
Parking Difficulty |
Best Time to Arrive |
Hike Intensity |
| Emerald Bay |
High |
1 hour before sunrise |
Easy (Roadside) |
| Bonsai Rock |
Very High |
2 hours before sunset |
Moderate (Steep) |
| Sand Harbor |
Medium |
Early morning |
Easy |
| Monkey Rock |
Low |
Anytime |
Strenuous |
| Cave Rock |
Medium |
1 hour before sunset |
Easy/Short |
When you plan your route, always have a backup location. The Lake Tahoe Photography Guide provides you with the exact coordinates and "secret" pull-outs that only the locals know about.
4. Why You Need a Circular Polarizer
When you are shooting the turquoise waters of Sand Harbor, your greatest enemy is surface glare. To see through the water to those massive, prehistoric-looking boulders beneath the surface, a high-quality circular polarizer is non-negotiable.
This tool allows you to cut through the reflection and reveal the vibrant teals and deep cobalts that make Lake Tahoe world-renowned. It enhances the saturation of the sky and makes the granite pop. Without it, your images will look flat and hazy. This commitment to using the right gear is what separates a snapshot from a masterpiece you’d find on the Edin Chavez Photography blog.
5. Embracing the East Shore’s Secret Cove
While everyone else is crowded at the main beaches, you should be heading toward Secret Cove. This spot is a photographer’s dream because of its naturally curved shoreline and the way the light hits the boulders during the late afternoon. The water here takes on an almost tropical hue.
Be prepared for a bit of a hike. The trail down is steep and can be dusty, but the payoff is unmatched. You will find yourself surrounded by towering pines and crystal-clear water that feels like stepping into a different world. It’s the perfect place to practice your long-exposure techniques to blur the gentle ripples of the lake.
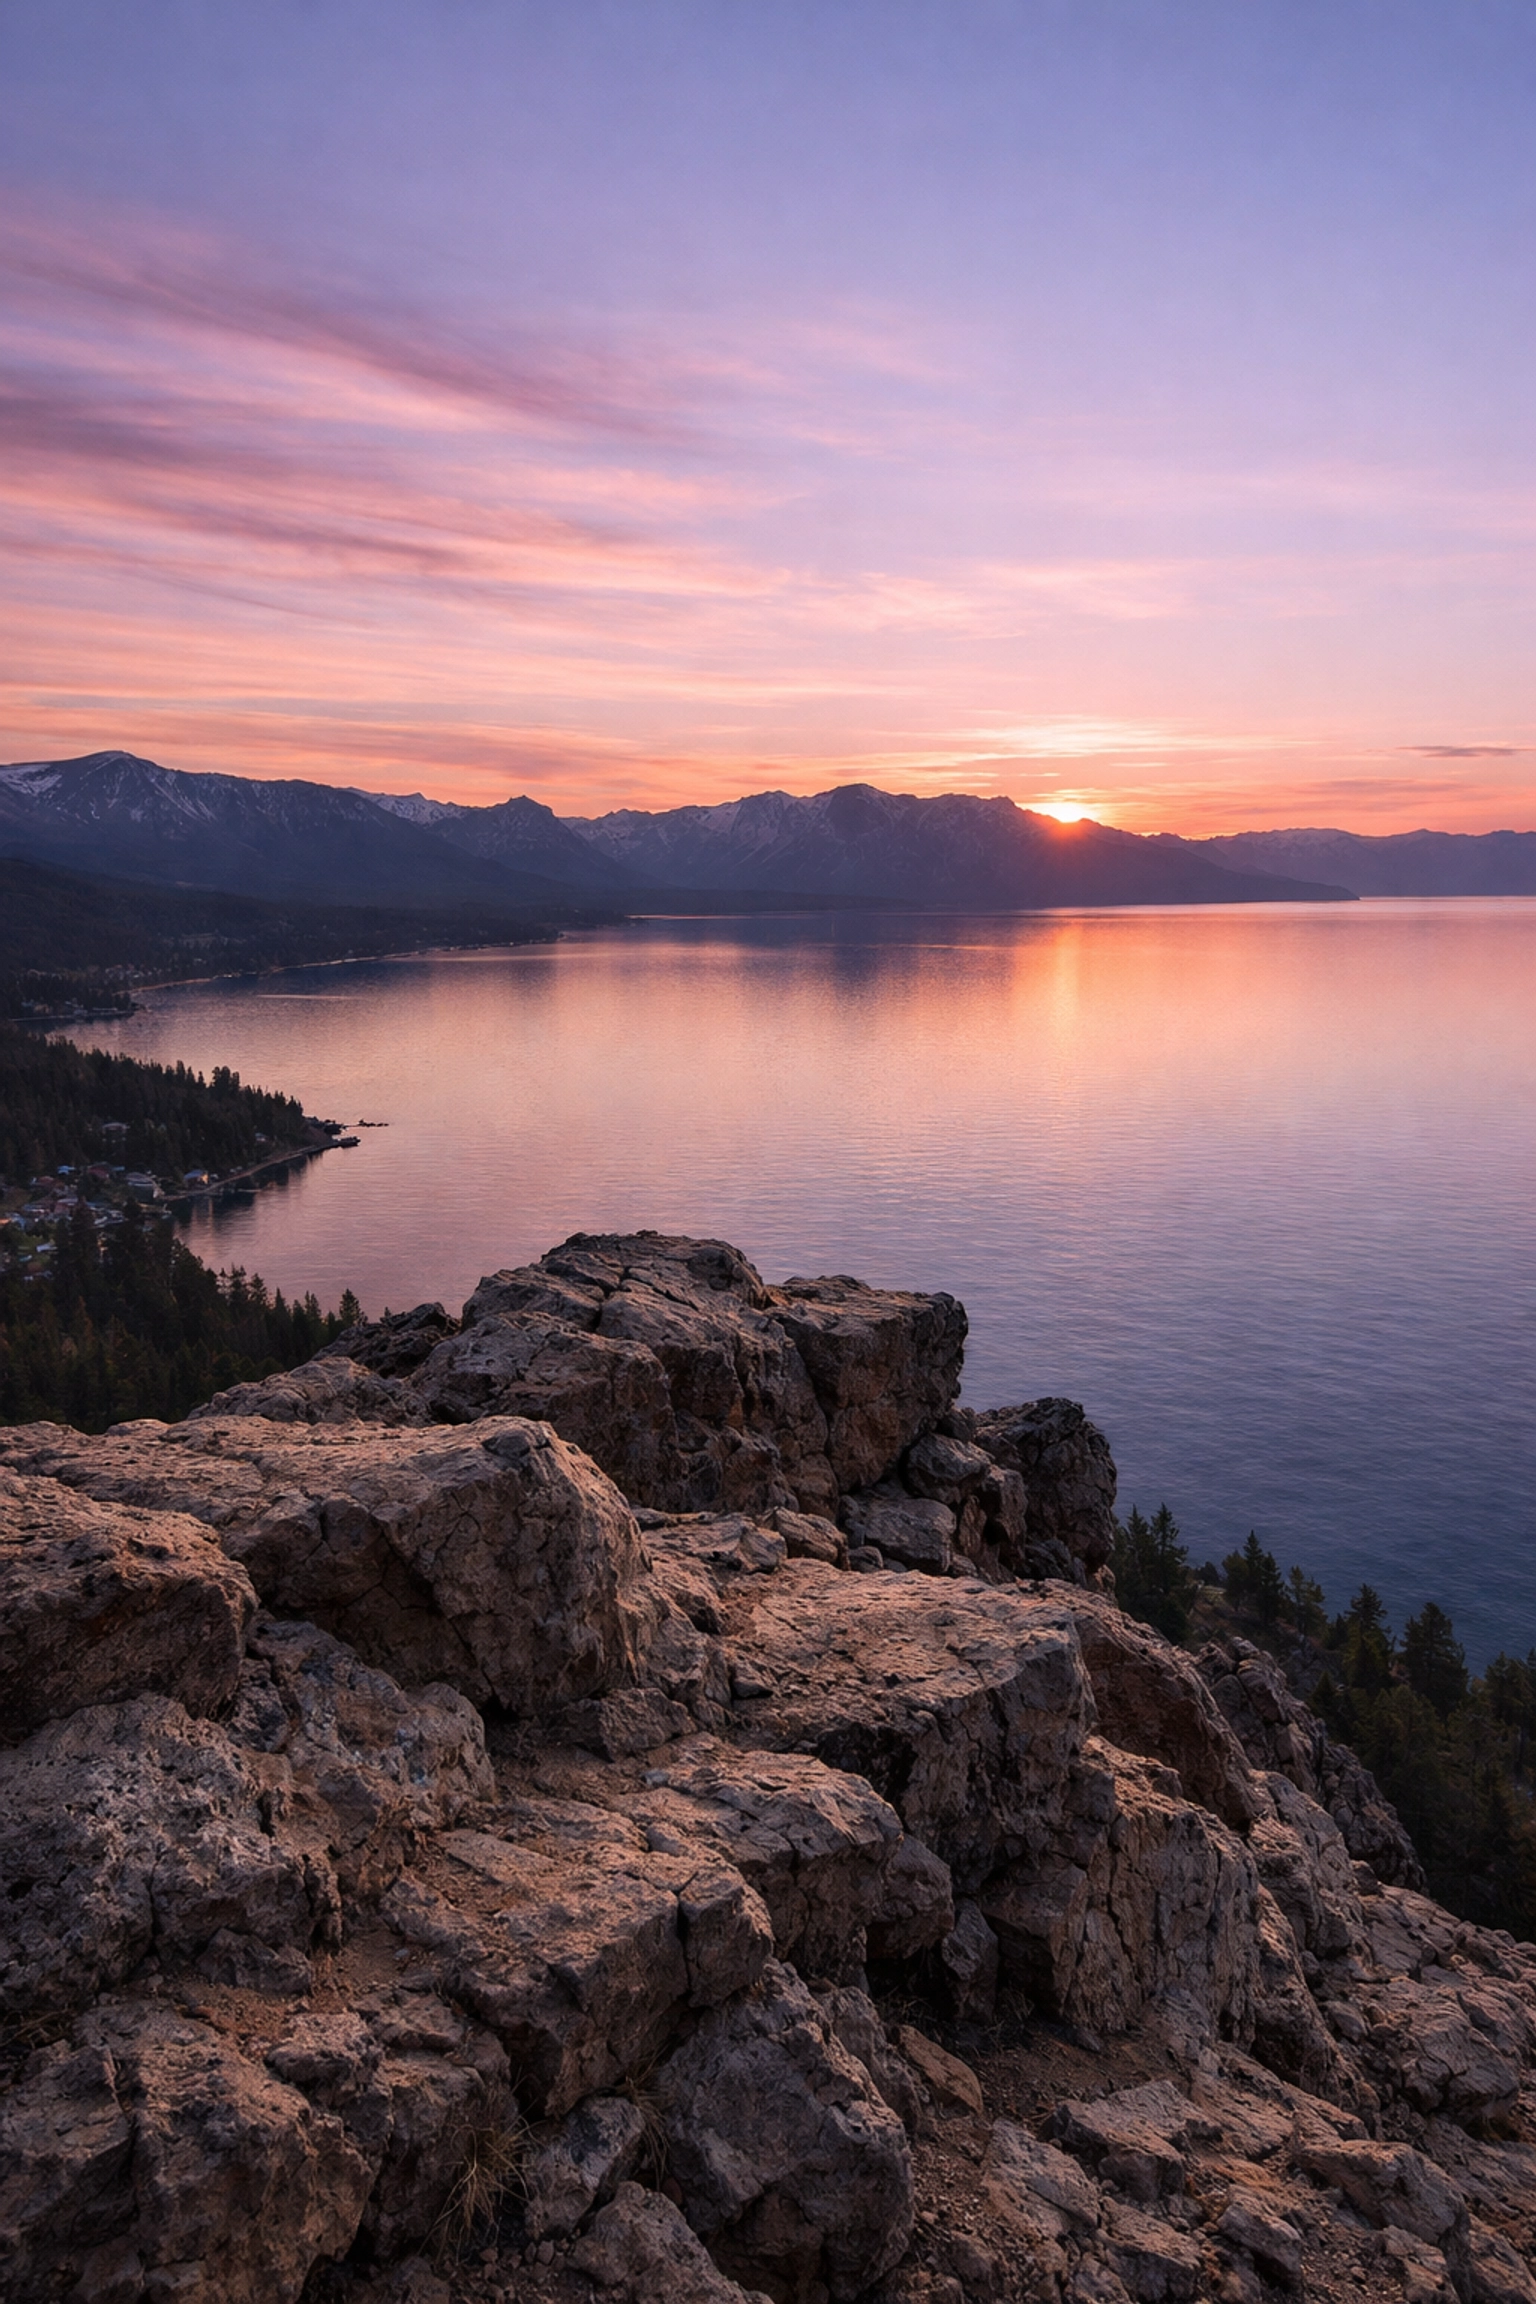
6. The 180-Degree View from Cave Rock
For a perspective that gives you a bird’s-eye view of the entire South Shore, Cave Rock is your destination. A short, five-minute scramble takes you to the top of a volcanic plug that looms over Highway 50. From here, you can see the curve of the earth and the massive scale of the lake.
Sunset here is legendary. As the sun dips behind the mountains on the California side, the entire sky turns into a canvas of pinks and purples. It provides you with a clean, unobstructed horizon line that is essential for high-end landscape work.
7. Weather and Seasonal Shifts
Your experience in Lake Tahoe will change dramatically depending on the month. In the winter, the snow-capped peaks add a layer of drama and scale that is impossible to replicate in the summer. However, the cold is biting, and your gear: specifically your batteries: will drain much faster.
In the spring, the waterfalls around Emerald Bay and Eagle Falls are roaring. This is the best time for action-oriented shots where you can use a slow shutter speed to capture the motion of the water against the static mountain backdrop. No matter the season, ensuring your colors are true to life is vital. I always recommend using the Ultimate Lightroom Preset Collection to bring out those specific Sierra tones during your post-processing.
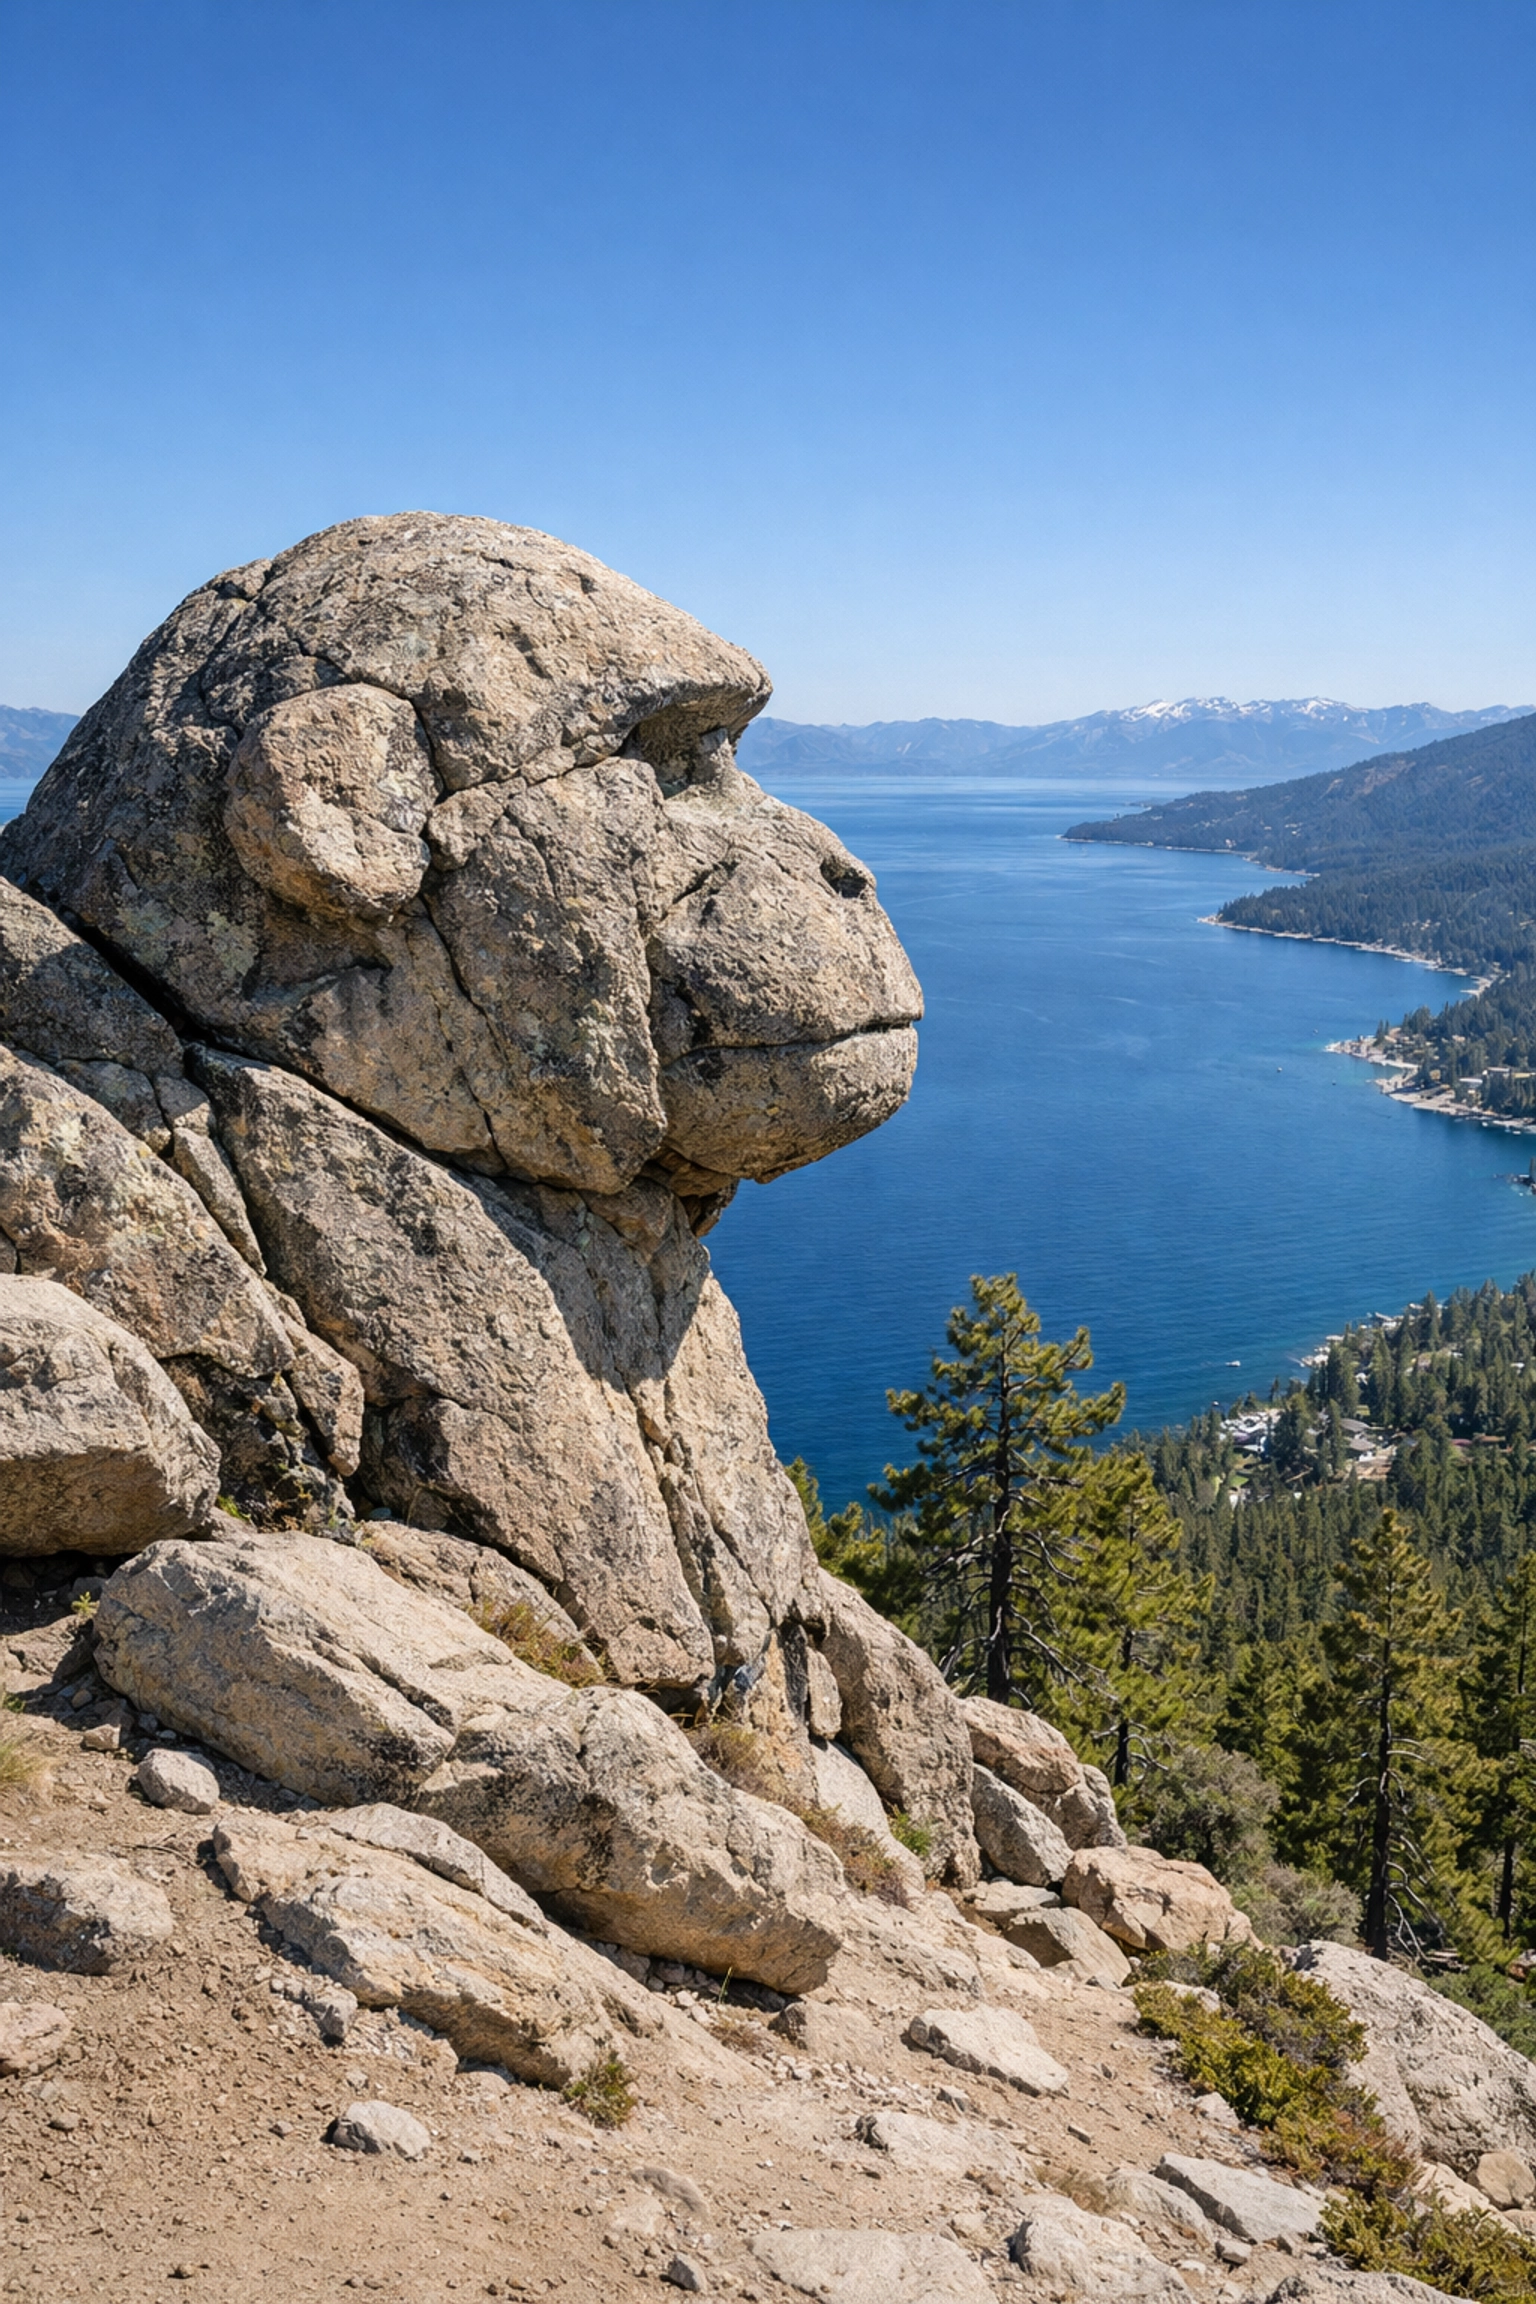
8. The Flume Trail and Monkey Rock
If you are looking for a unique foreground element, Monkey Rock is a must-visit. It’s a rock formation that looks: you guessed it: exactly like a monkey’s head overlooking the lake. It adds a bit of fun and character to your landscape shots.
The hike up the Flume Trail offers some of the most consistent best photo spots Lake Tahoe has for those who enjoy "lifestyle" landscape photography. You get sweeping views of the North Shore that are unparalleled in their vastness.
9. Respect the Environment: Leave No Trace
As a professional photographer, your responsibility goes beyond just getting the shot. The Tahoe ecosystem is fragile. When you are out exploring these Lake Tahoe photography locations, you must stay on marked trails and pack out everything you bring in.
The "Keep Tahoe Blue" initiative isn't just a bumper sticker; it’s a necessity. Avoid trampling meadow grass or disturbing local wildlife. By respecting the land, you ensure that these locations remain pristine for the next generation of creators.
10. Elevating Your Edit
You’ve spent hours in the cold, hiked miles with a heavy pack, and finally captured the perfect frame. Now, the real work begins. To truly make your Lake Tahoe images sing, your editing needs to be as professional as your capture. You want to enhance the natural glow of the granite and the deep clarity of the water without making the image look "over-processed."
Using the Ultimate Lightroom Preset Collection allows you to apply a refined, professional look to your files in seconds. It ensures that your highlights are protected and your shadows retain that crucial detail, mirroring the high standards we hold at Edin Chavez Photography.
Final Thoughts for Your Tahoe Adventure
Lake Tahoe is a place that rewards the patient and the prepared. By understanding the light at Emerald Bay, the clarity of the East Shore, and the technical requirements of the high-altitude environment, you set yourself up for success.
Don't go in blind. Use the tools available to you. Grab the Lake Tahoe Photography Guide to get the inside track on the best times, exact spots, and gear tips that will make your trip unforgettable. Whether you are looking for a massive print for your wall from our fine art collection or you want to create your own, Lake Tahoe is the ultimate canvas.
With these ten tips in your arsenal, your next photography trip to the Sierras will be more than just a vacation: it will be a professional breakthrough. Get out there, chase the light, and capture the magic of the Big Blue.
As you step into the world of professional imagery, you quickly realize that there is a massive gulf between taking a great photo and creating a piece of art. Many photographers can capture a sharp, well-exposed image of a sunset, but only a few can transform that scene into a narrative that stops a viewer in their tracks. This is the essence of fine art photography. It isn’t just about what you see; it’s about how you feel and the specific message you want to convey to the world.
Whether you are just starting out or looking to refine your portfolio, mastering this craft requires a blend of technical precision and uninhibited creativity. You aren’t just a documentarian; you are an artist using a camera as your brush. By following these five steps, you will elevate your work from simple snapshots to gallery-worthy masterpieces that define your unique brand.
1. Start with a Deep Conceptual Foundation
Before you ever touch your shutter button, you need to understand the "why" behind your work. Just as a painter spends hours sketching before the first drop of oil hits the canvas, your journey in fine art photography begins with a concept. You need to brainstorm topics that are personally meaningful to you. What keeps you up at night? What stories do you feel are left untold?
When you approach a subject with a clear intention, your images gain a layer of depth that casual photography lacks. You are no longer just capturing a building or a person; you are exploring themes like solitude, chaos, or rebirth. To get started, sit down with a notebook and write out five emotions you want your audience to feel. Use these as your North Star during your next shoot. This intentionality is what separates the hobbyist from the fine artist. You can find more inspiration on how to structure your creative process at Edin Chavez Photography.
2. Master Your Technical Tools to Execute Your Vision
Your camera settings are the language you use to speak to your audience. To create ethereal photography, you must move beyond "Auto" mode and take full control of your exposure triangle. Understanding how aperture, shutter speed, and ISO interact allows you to manipulate reality to fit your artistic vision.
If you want to achieve that soft, glowing look common in fine art photography, you might experiment with a wide aperture (low f-stop) to create a shallow depth of field. This blurs the background into a creamy bokeh, making your subject appear as if they are floating in a dream. Conversely, playing with long shutter speeds can turn crashing waves into a misty, cloud-like floor. Practice photographing the same subject 100 times using different settings. This isn't just a drill; it's how you learn the limits of your gear so that when inspiration strikes, your technical skills are second nature.
| Feature |
Snapshot Approach |
Fine Art Approach |
| Aperture |
Set for maximum sharpness |
Set for emotional impact and "dreamy" depth |
| Shutter Speed |
Freezes action clearly |
Used to imply motion or create ethereal textures |
| Focus |
Always on the subject's eye |
Can be soft or "missed" to create a sense of mystery |
| Lighting |
Needs to be bright and clear |
Can be high-contrast or purposefully underexposed |
3. Study Composition and Perspective Through an Artistic Lens
Mastering composition is about more than just the Rule of Thirds. In fine art photography, you are encouraged to learn the rules specifically so you can break them with purpose. You should look at your frame as a balanced ecosystem where every element: shadow, light, line, and texture: serves a function.
To capture truly ethereal photography, you need to change your perspective. Don't just stand at eye level. Get low, shoot through foliage to create natural frames, or use a "freelens" technique to introduce light leaks and organic blurs. Light is your most important tool. Look for the "Golden Hour" or "Blue Hour" to provide that soft, diffused glow that makes a scene feel otherworldly. If you are shooting in a vibrant location like Florida, check out my Miami self-driving photography guide to find spots where the light hits just right for fine art compositions. If you prefer a guided experience, you might even consider a private Miami photography tour to see these spots through an expert's eyes.

4. Elevate Your Work with Dreamy Photography Editing
The magic of fine art photography often happens in the "darkroom" of the digital age. Post-processing is where you polish your raw files into finished art. This is where dreamy photography editing techniques come into play. You aren't just correcting colors; you are grading the image to evoke a specific mood.
To achieve an ethereal look, you might reduce the clarity and texture in specific areas of the image to soften the skin or the landscape. Adding a subtle "Orton Effect": a technique that overlays a blurred version of the image onto the sharp one: can give your work a painterly glow that feels timeless. Consistency in your editing is the secret sauce to a signature style. To help you get that professional, high-end look instantly, I recommend using the Ultimate Lightroom Preset Collection. These presets are designed to streamline your workflow and give your portfolio a cohesive, sophisticated feel that attracts collectors and galleries.
5. Build a Cohesive Portfolio and Your Signature Style
Your signature style isn't something you find; it's something you grow through deliberate practice. As you apply consistent techniques across your body of work, a pattern will begin to emerge. Whether it's a specific color palette, a recurring theme, or a unique way of using light, this "visual thumbprint" is what makes your work recognizable.
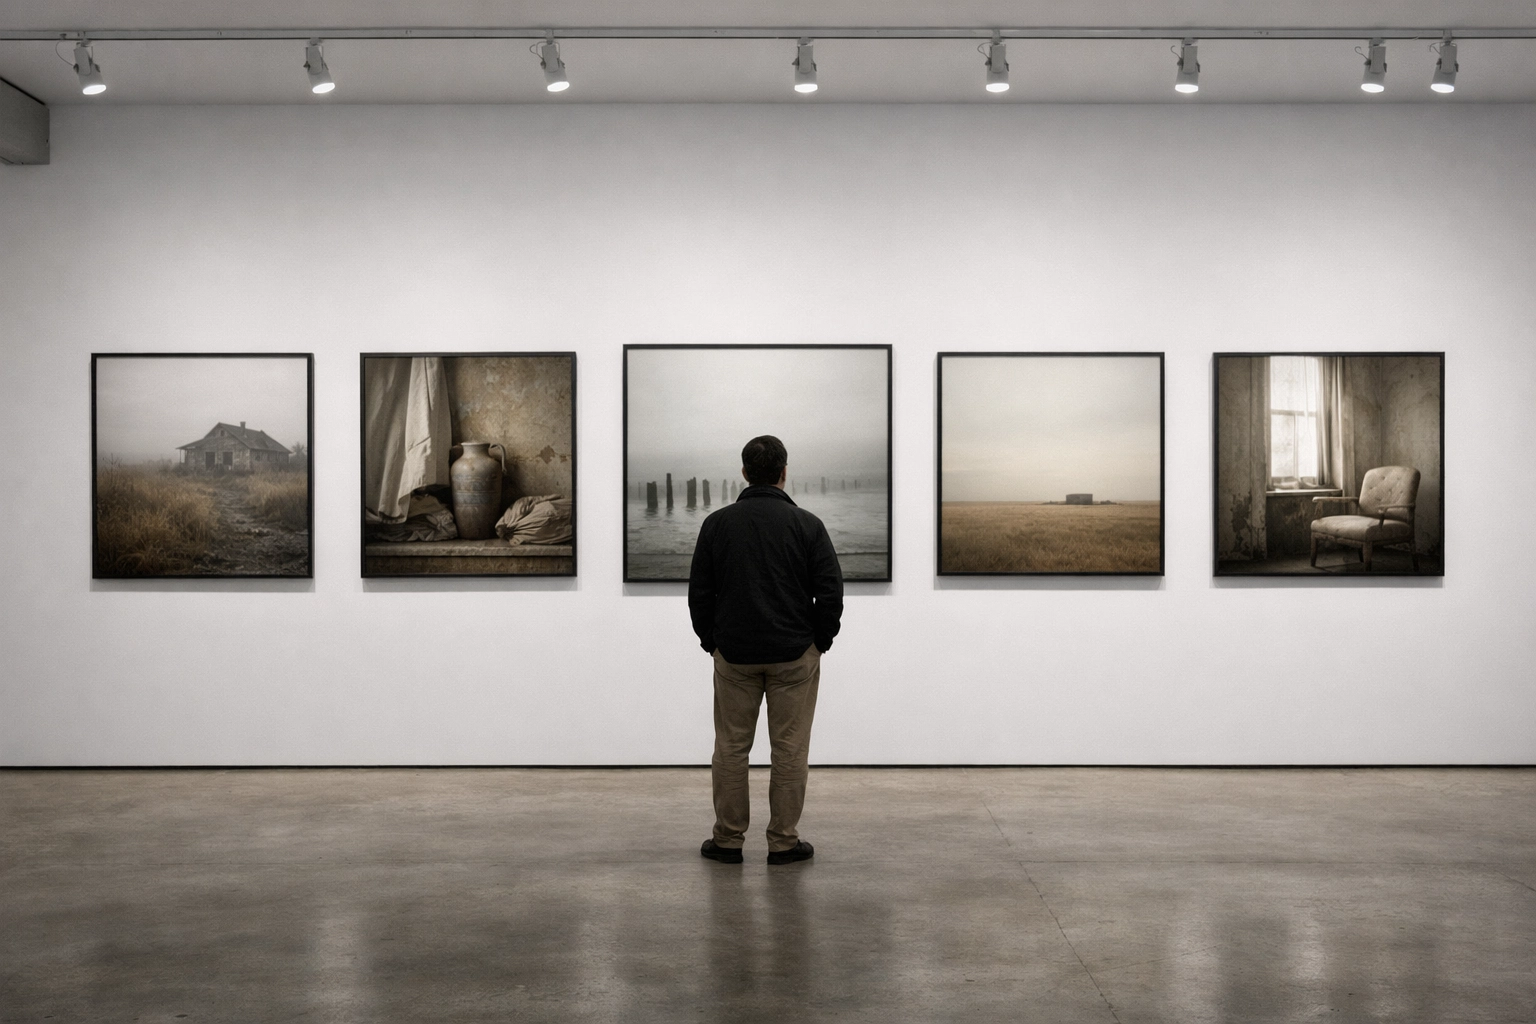
Study the masters by visiting galleries or investing in high-quality art books. Look at how they curate their collections: the photos aren't just individual wins; they work together to tell a larger story. When you are ready to showcase your work, ensure your presentation is as professional as your process. You can see examples of a curated, cohesive body of work at Edin Fine Art. Building a signature style takes time, so don't rush it. Take creative breaks when you feel stuck, and always return to the core concepts that made you fall in love with photography in the first place.
Final Thoughts on Your Artistic Journey
Mastering fine art photography is a lifelong pursuit, but it is one of the most rewarding paths you can take as a creator. By moving from a technical mindset to a conceptual one, mastering your gear, and refining your dreamy photography editing, you empower yourself to create work that truly resonates.
Remember, your vision is unparalleled. Don't be afraid to experiment with ethereal photography techniques that might seem "wrong" to a traditionalist. If it feels right to your soul, it belongs in your portfolio. For more tips on technical skills and location-specific guides: like the New York City photography guide if you're heading to the Big Apple: keep exploring Edin Studios. Your journey to becoming a fine art master starts with the very next frame you compose. Stay inspired, keep shooting, and let your signature style shine.
Just as the creative landscape continues to evolve, your approach to finding consistent work must adapt to stay ahead of the curve. As a professional photographer, you know that the struggle isn't just about taking the perfect shot: it's about finding the clients who value your vision and are ready to pay for it. With the launch of Proshoot.io, the game has officially changed. This platform isn't just another job board; it is a robust marketplace designed specifically to streamline how you find jobs for photographers, manage your projects, and secure your income.
Many freelancers spend more time chasing leads and sending invoices than actually behind the lens. By integrating Proshoot.io into your daily workflow, you reclaim that time, allowing the platform’s infrastructure to handle the heavy lifting of business development. Whether you are a seasoned pro or an emerging talent looking to break into the industry, understanding the nuances of this platform will be the catalyst that propels your career to the next level.
Understanding the Marketplace Ecosystem
As you step into the world of Proshoot.io, you are entering a specialized ecosystem built on transparency and efficiency. Unlike generic freelance sites where you compete against a million different skill sets, this marketplace is laser-focused on visual creators. This dedication ensures that the clients posting jobs already understand the value of professional imagery.
The core of the platform is a proactive bidding system. Instead of waiting for a client to stumble upon your website, you have the power to browse active listings and submit tailored proposals. By focusing on a time-limited bidding structure: often featuring 12, 24, or 48-hour windows: the platform creates a sense of urgency that benefits you. Clients who post on Proshoot.io are typically ready to hire, which means you won't find yourself in a weeks-long "maybe" cycle.

Building a Portfolio That Converts
Your profile is your digital storefront, and on a platform this competitive, "good enough" simply won't cut it. To truly stand out, you need to curate a portfolio that speaks directly to the needs of the clients you want to attract. When you host your work on Proshoot.io, you are providing potential clients with a seamless viewing experience that highlights your technical skill and artistic flair.
To ensure your images have that professional edge that commands higher rates, consider refining your post-processing workflow. Using tools like the Ultimate Lightroom Preset Collection can help you maintain a consistent aesthetic across your portfolio, making your brand more recognizable to scouts and art directors. This commitment to quality is what separates the hobbyists from the professionals who land the most lucrative jobs for photographers.
By organizing your work into specific categories: such as commercial, portrait, or fine art: you make it easier for clients to see your relevance to their specific project. If you need inspiration for world-class imagery, you can always browse the collections at Edin Fine Art to see how high-end photography is presented and sold.
The Art of the Winning Bid
With the time-limited bidding system on Proshoot.io, your ability to communicate your value quickly is paramount. When you see a job that fits your style, you must act with confidence. A successful bid is not just about having the lowest price; it is about demonstrating that you are the most capable solution to the client's problem.
| Feature |
Proshoot.io Advantage |
Benefit to You |
| Bidding Windows |
12, 24, or 48-hour cycles |
Reduces ghosting and accelerates the hiring process. |
| Direct Communication |
Integrated messaging dashboard |
Keeps all project details and requirements in one place. |
| Client Profiles |
Transparent client history |
Allows you to vet clients before you commit your time. |
| Project Scoping |
Detailed requirement forms |
Ensures you know exactly what is expected before you bid. |
By tailoring your message to the specific needs mentioned in the job posting, you show the client that you have actually read their brief. In a world of copy-paste responses, a personalized touch is as smooth as butter and can be the deciding factor in your favor.
Mastering the User Dashboard
Once you land a gig, the administrative side of your business needs to be just as sharp as your photography. The Proshoot.io user-friendly dashboard is designed to be your central command center. From here, you can track your active bids, communicate with clients, and manage your project timelines without ever having to leave the platform.
This centralized system reduces the friction that usually comes with managing multiple clients. Instead of juggling emails, texts, and various project management tools, you have one source of truth. This efficiency allows you to focus more on your creative output and less on the "business of being a business." For more tips on managing a successful photography brand, you can explore the educational resources at Edin Chavez Photography.
Security and Guaranteed Payments
One of the most significant hurdles in freelance photography is the risk of non-payment. We have all been there: the shoot goes great, the files are delivered, and then the client disappears. Proshoot.io eliminates this anxiety through its secure payment infrastructure. The platform acts as a protective middleman, ensuring that funds are secured before you even pick up your camera.
By using this system, you are signaling to your clients that you are a legitimate professional who values your time and work. This level of security fosters a relationship of mutual respect. When you know the payment is guaranteed, you can put 100% of your energy into the creative process, resulting in a better product for the client and a better review for you.

Networking and Scaling Your Business
While Proshoot.io is a powerhouse for finding immediate work, it is also a tool for long-term growth. Every job you complete on the platform is an opportunity to build your reputation. As you accumulate positive reviews, your profile gains authority, making it progressively easier to win higher-paying bids.
If you are looking to expand your reach into specific high-demand markets, like the vibrant scene in Florida, you might consider offering specialized services. For instance, if you're aiming to land more travel or lifestyle gigs, booking a Private Miami Photography Tour can help you build a stunning localized portfolio that appeals to Miami-based clients. This proactive approach to networking and portfolio building ensures you are always ready for the next big opportunity.
Essential Tips for Success on Proshoot.io
To maximize your success and consistently land the best jobs for photographers, you should treat your presence on the platform as a dynamic, evolving asset.
- Be Responsive: In a marketplace that moves this fast, the early bird truly does get the worm. Set up notifications so you never miss a bidding window.
- Highlight Your Niche: Don't try to be everything to everyone. Focus on what you do best, whether it's drone photography, high-fashion, or corporate headshots.
- Use High-Quality Gear and Software: Clients can tell the difference. Ensure your final deliveries are polished and professional.
- Leverage Reviews: After every successful project, politely ask your client for a review. These testimonials are the social proof that drives future sales.
- Stay Educated: The industry changes fast. Keep up with the latest trends and techniques by following the Edin Chavez Blog.
Elevating Your Professionalism
Beyond the technical skills, the way you conduct yourself on the platform defines your brand. Professionalism on Proshoot.io means meeting deadlines, communicating clearly, and exceeding client expectations. By treating every small gig with the same level of care as a major commercial shoot, you build a foundation of trust that will sustain your career for years to come.
This commitment to excellence is what Proshoot.io was built to highlight. The platform empowers you to take control of your career path, moving away from the uncertainty of traditional freelancing and toward a structured, reliable professional life.
Why Proshoot.io is the Future of Photography Jobs
As the gig economy grows, the need for specialized marketplaces becomes more critical. Proshoot.io stands out because it doesn't just provide a list of jobs; it provides a comprehensive toolkit for the modern photographer. From the secure payment protocols to the intuitive dashboard, every feature is designed to solve a specific problem you face in your daily professional life.
By choosing to build your business here, you are joining a community of like-minded creators who are raising the bar for the entire industry. This platform provides the unparalleled support you need to turn your passion for photography into a thriving, sustainable business.
Hence, the transition to a more organized and secure way of working is not just an option: it’s a necessity for any photographer serious about their craft. With Proshoot.io, you have the technology, the marketplace, and the security to finally land the gigs you deserve.
With these considerations in mind, it’s time to head over to Proshoot.io and start building the future of your photography career today. For more insights into the world of professional photography and fine art, don't forget to visit Edin Chavez Photography and explore our latest guides and galleries.


