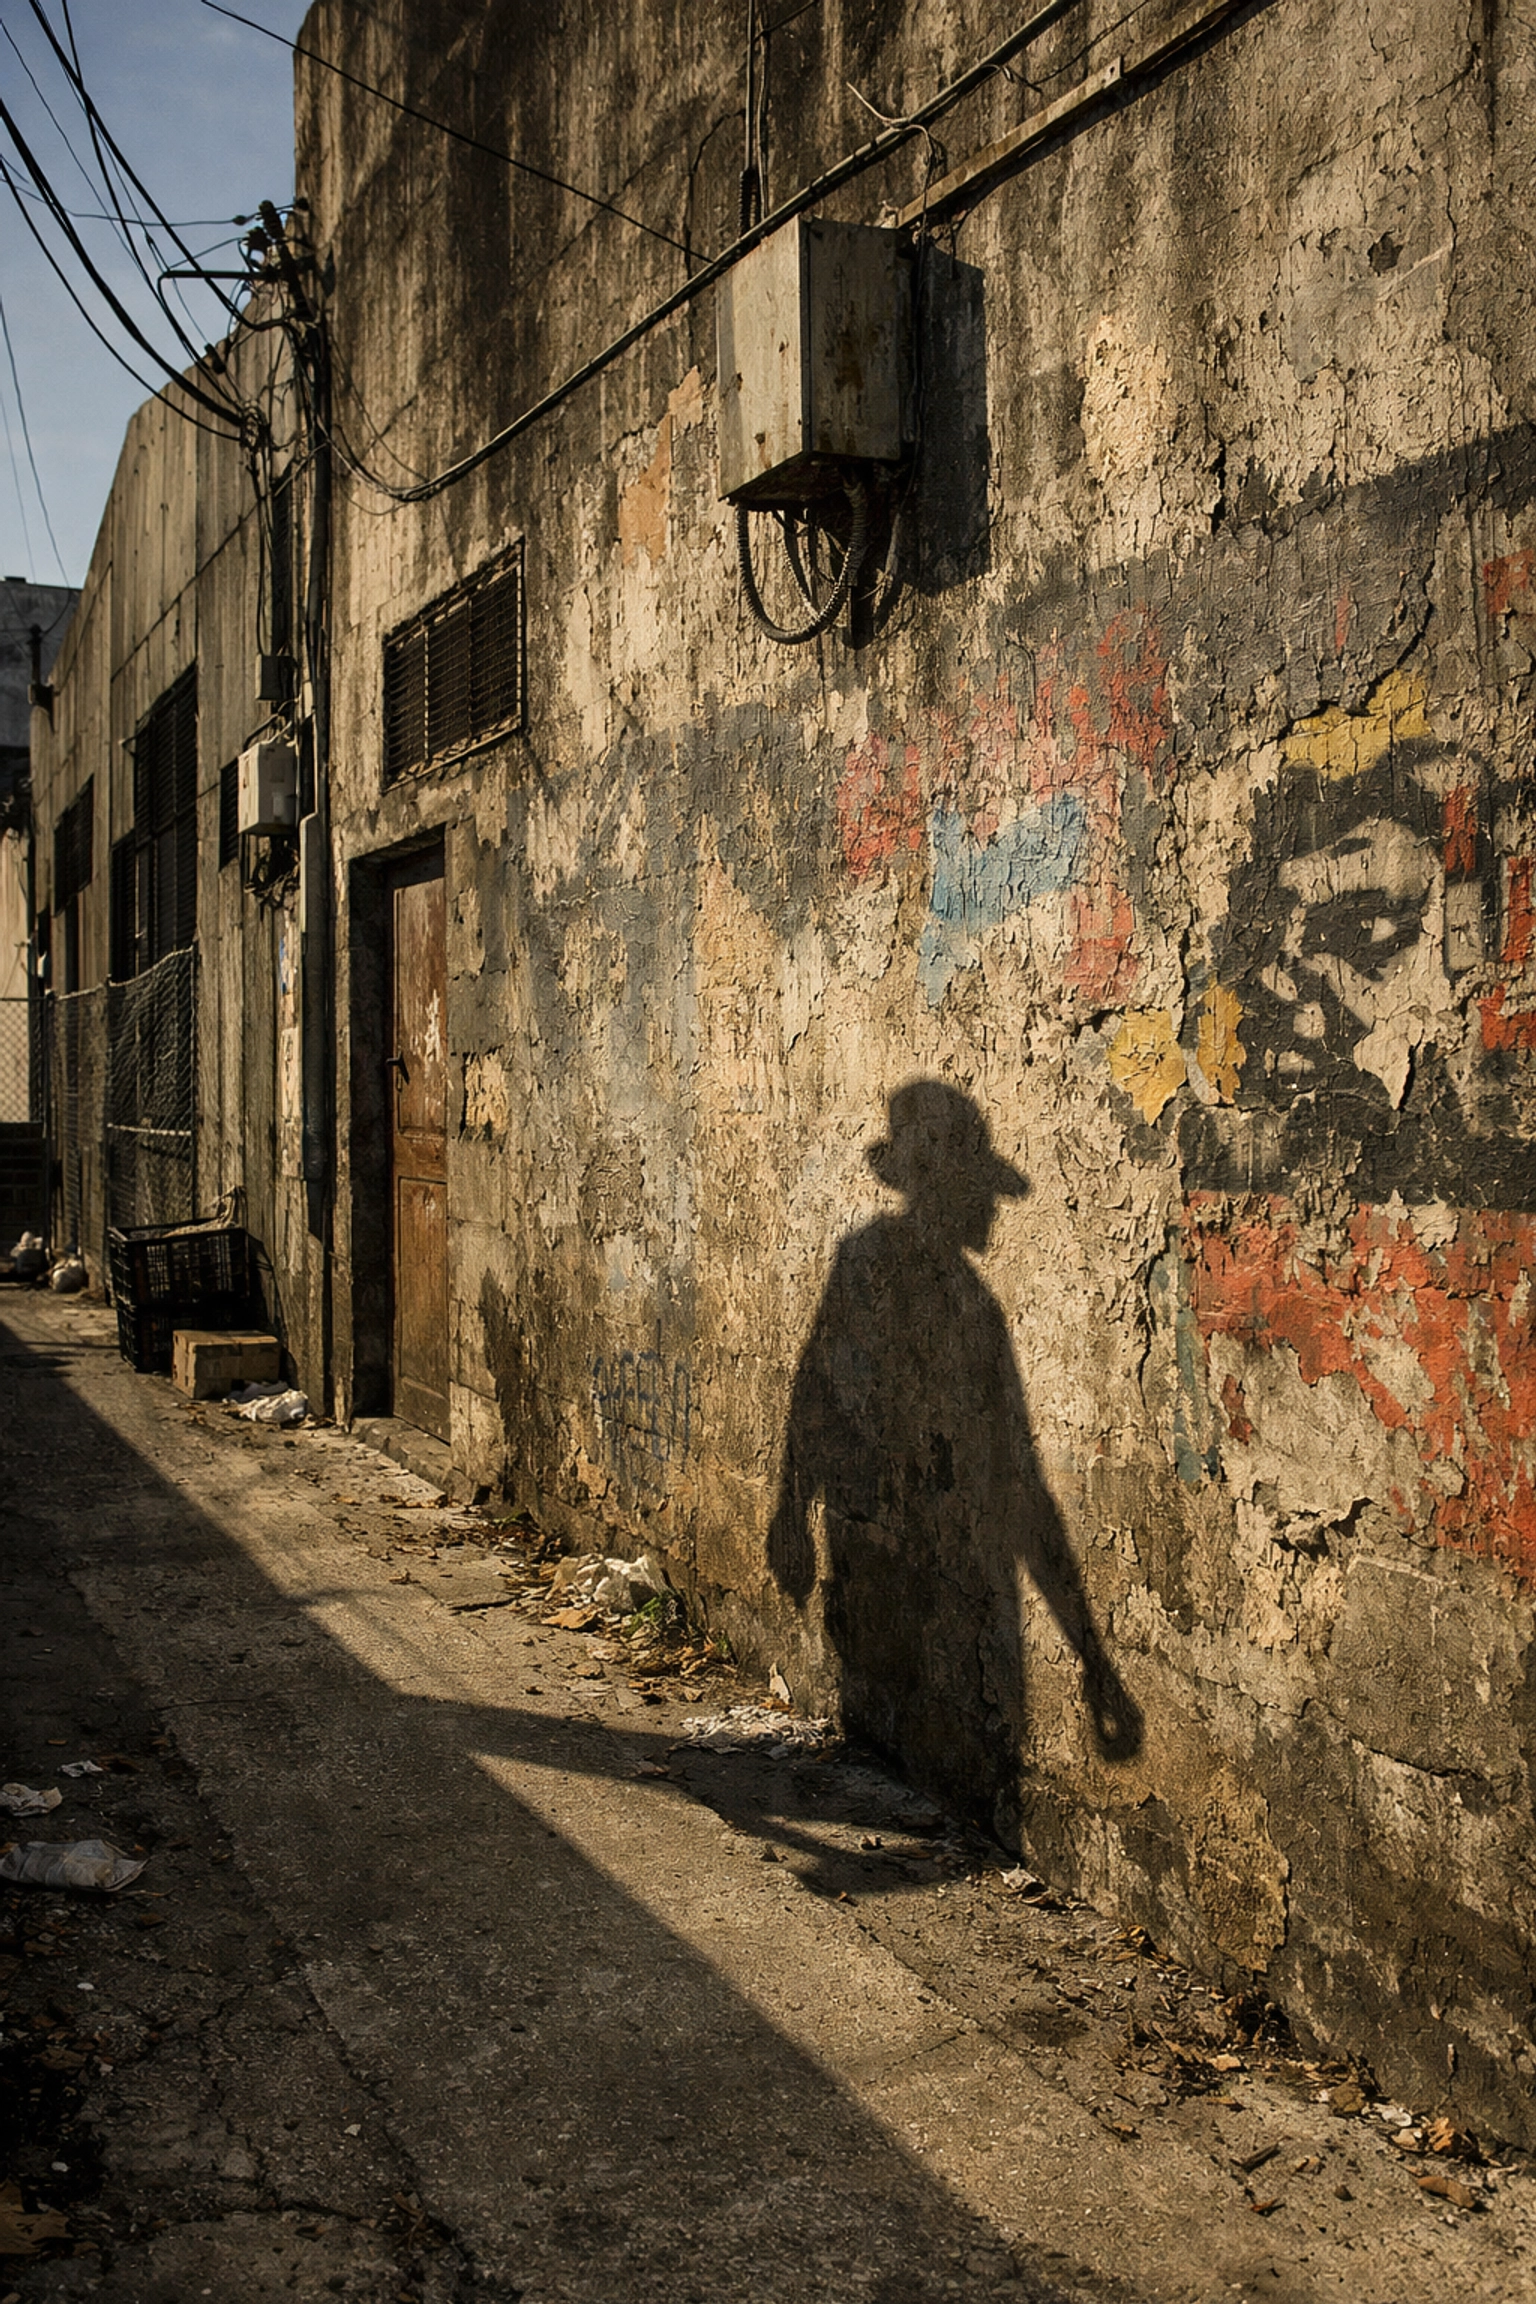
Just as a painter faces a blank canvas with a specific story to tell, you approach your camera not just to document reality, but to interpret it. Fine art photography is the bridge between the world as it is and the world as you imagine it to be. It is a discipline where your vision dictates the outcome, and your technical skills serve as the tools to manifest that vision. Whether you are aiming to capture the quiet stillness of a landscape or the haunting beauty of a portrait, mastering this craft requires a blend of intentionality and technical precision.
Many photographers struggle to make the jump from "good photos" to "fine art." The difference lies in the narrative. In the world of fine art photography, you are the director, the author, and the artist. This guide is designed to empower you with the technical foundations and creative editing workflows needed to elevate your work to a professional standard. By the time you finish reading, you’ll have a clear roadmap to creating images that don't just sit on a hard drive but belong on a gallery wall. For more inspiration on how to push your creative boundaries, you can always explore my latest work at Edin Chavez Photography.
Defining Your Artistic Vision
Before you even touch your shutter button, you must define what you want to say. Fine art is distinguished by its thematic consistency. Unlike commercial or editorial photography, where the goal is often to sell a product or tell a news story, fine art is about your personal perspective. You are looking for subjects that stir something inside you, whether that is a feeling of nostalgia, isolation, or wonder.
When you develop a theme, you provide your audience with a cohesive experience. This consistency is what separates a hobbyist from a professional artist. You might choose to explore environmental issues, the passage of time, or the concept of ethereal photography, where the subjects feel like they belong to a dream world rather than our physical reality. If you are looking for examples of how to build a portfolio with a strong narrative, check out the resources available on our photography blog.
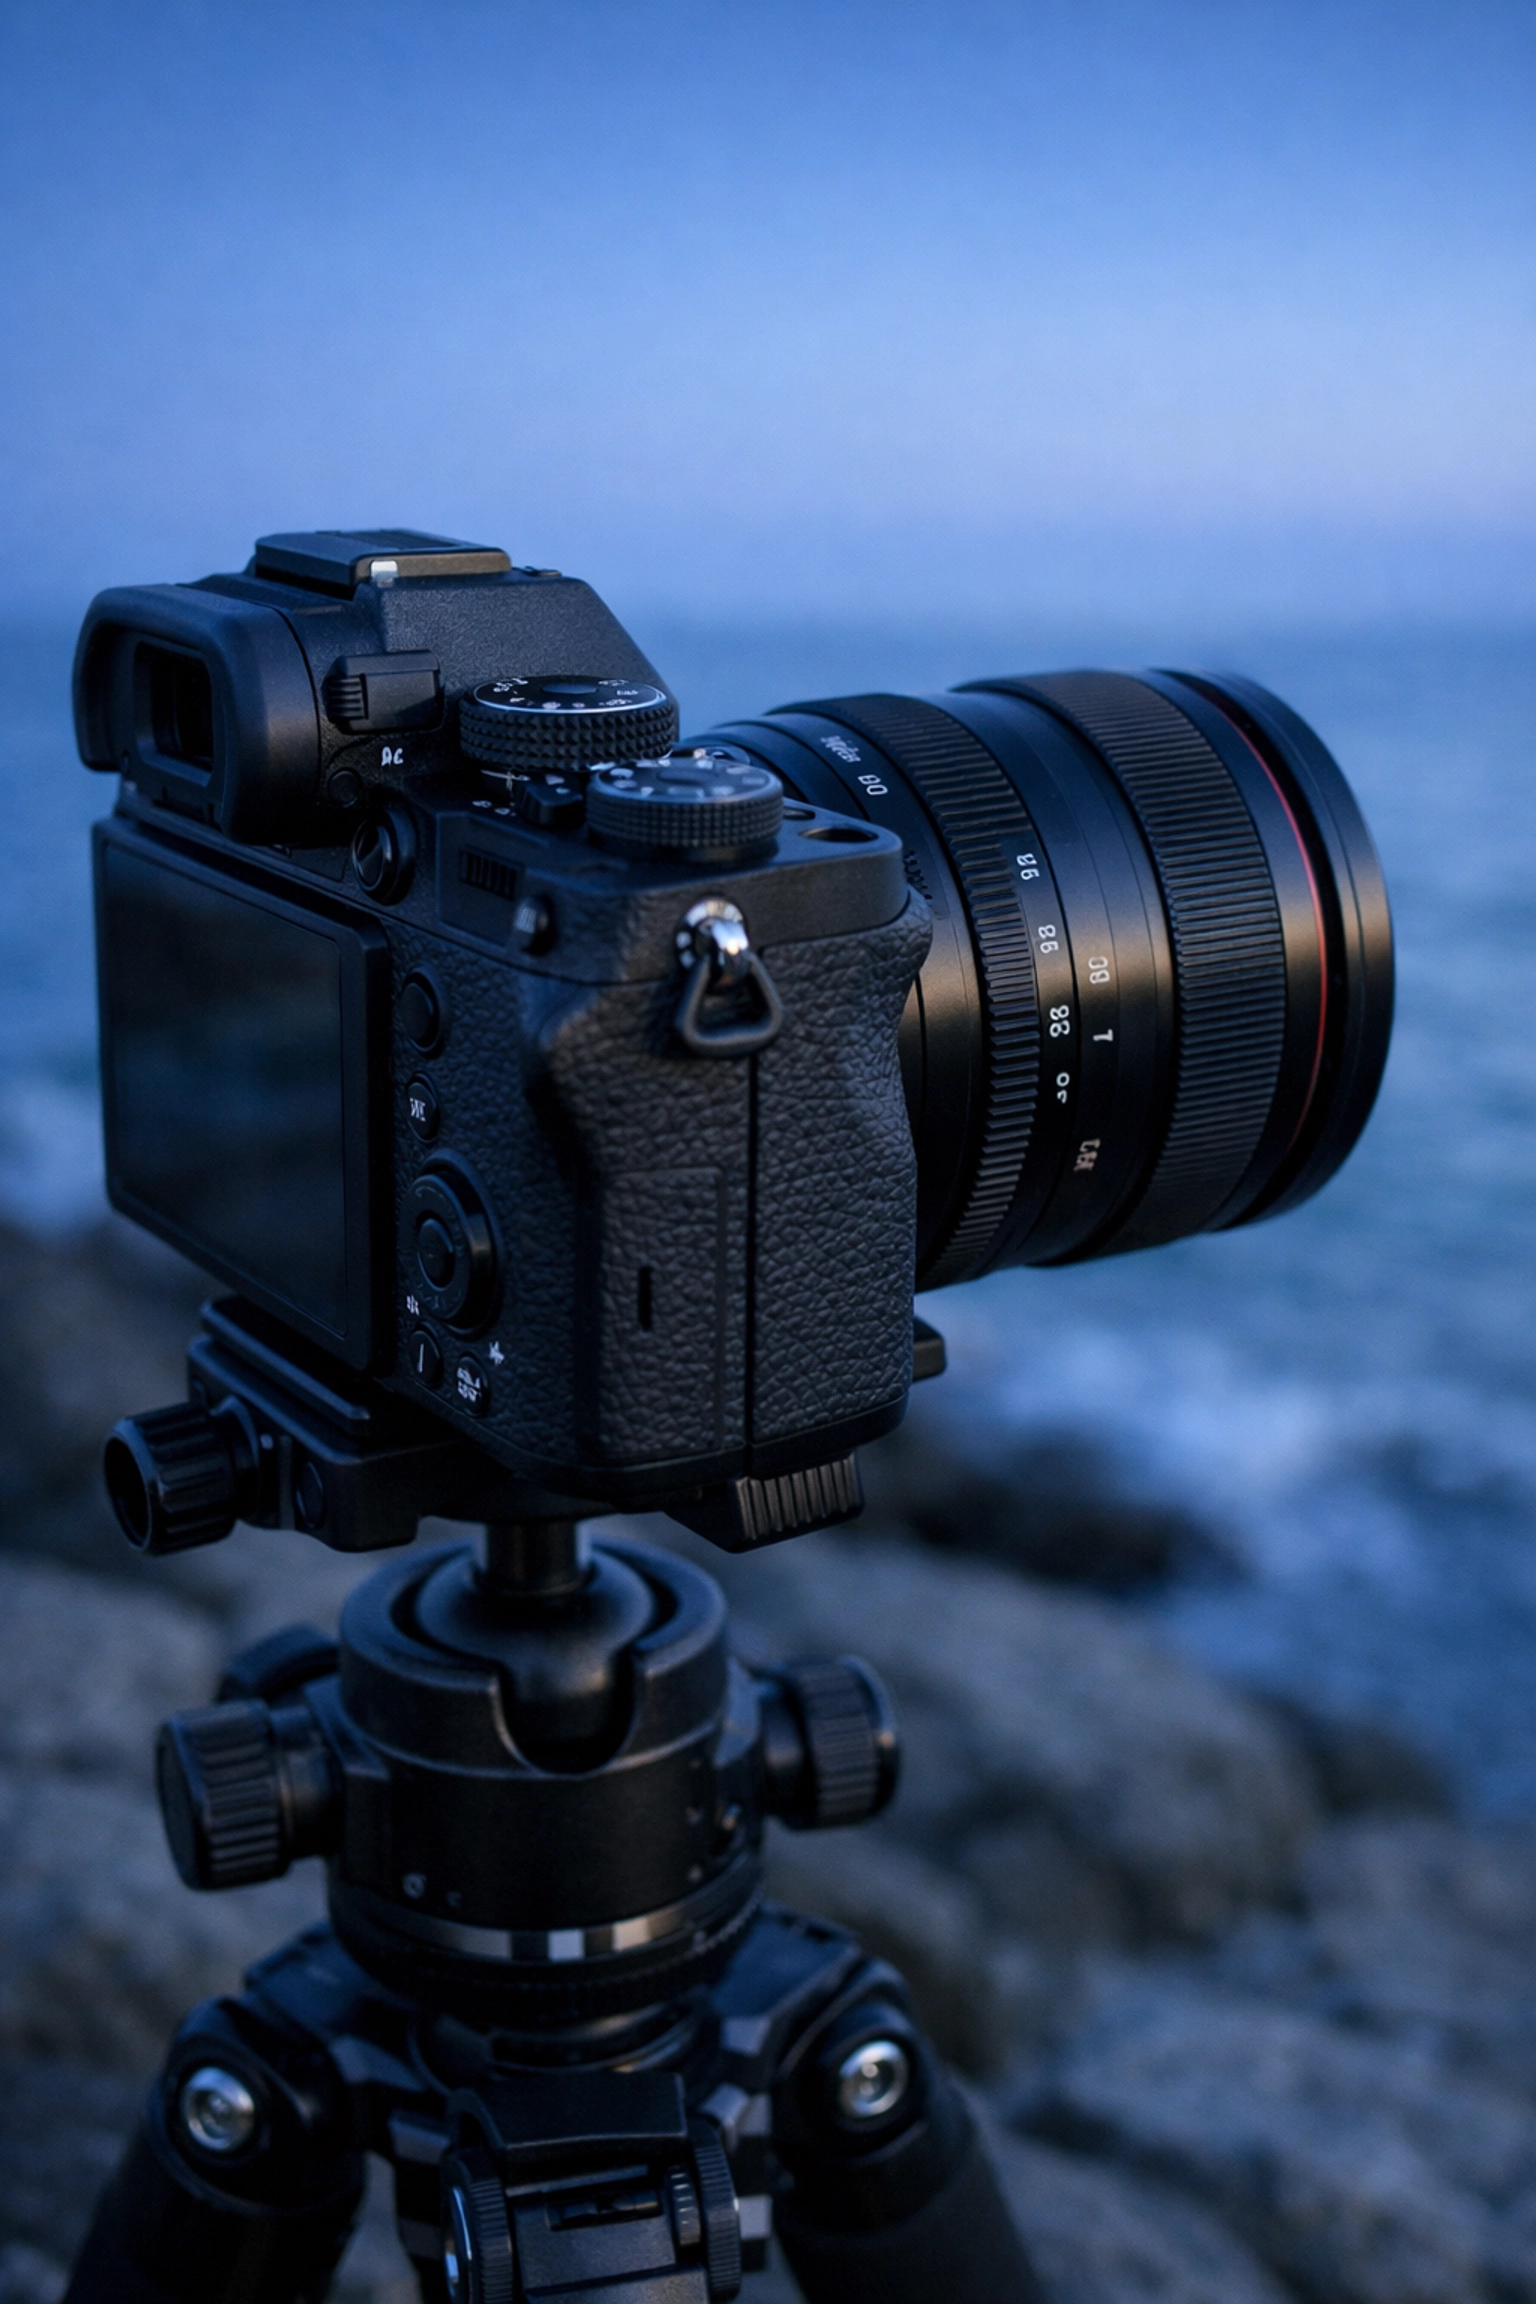
The Technical Foundation: Gear and Settings
While your vision is the soul of the image, your technical skill is the body that carries it. To succeed in fine art photography, you need a deep understanding of how your equipment manipulates light and time. You aren't just letting the camera "guess" the exposure; you are making deliberate choices to achieve a specific look.
Essential Equipment for Fine Art
Your gear should never limit your creativity. High-resolution mirrorless or DSLR cameras are the standard because they allow for large-scale printing without losing detail. When your work is eventually showcased for collectors at Edin Fine Art, every pixel counts.
| Equipment |
Why You Need It |
| High-Resolution Body |
Ensures your images retain incredible detail for large-format gallery prints. |
| Prime Lenses |
Offers unmatched sharpness and wider apertures for superior depth-of-field control. |
| Sturdy Tripod |
Essential for long exposures and achieving the sharpest possible focus. |
| Neutral Density (ND) Filters |
Allows you to use slow shutter speeds in broad daylight to create ethereal motion. |
| Remote Shutter Release |
Eliminates camera shake, which is vital for high-quality fine art captures. |
Mastering Camera Settings
To create ethereal photography, you must move beyond "Auto" mode. You need to be in total control of your exposure triangle:
- Aperture: Use wide apertures (f/1.4 to f/2.8) to isolate your subject and create a creamy, out-of-focus background. Conversely, use narrow apertures (f/11 to f/16) when you need every detail from the foreground to the horizon to be tack-sharp.
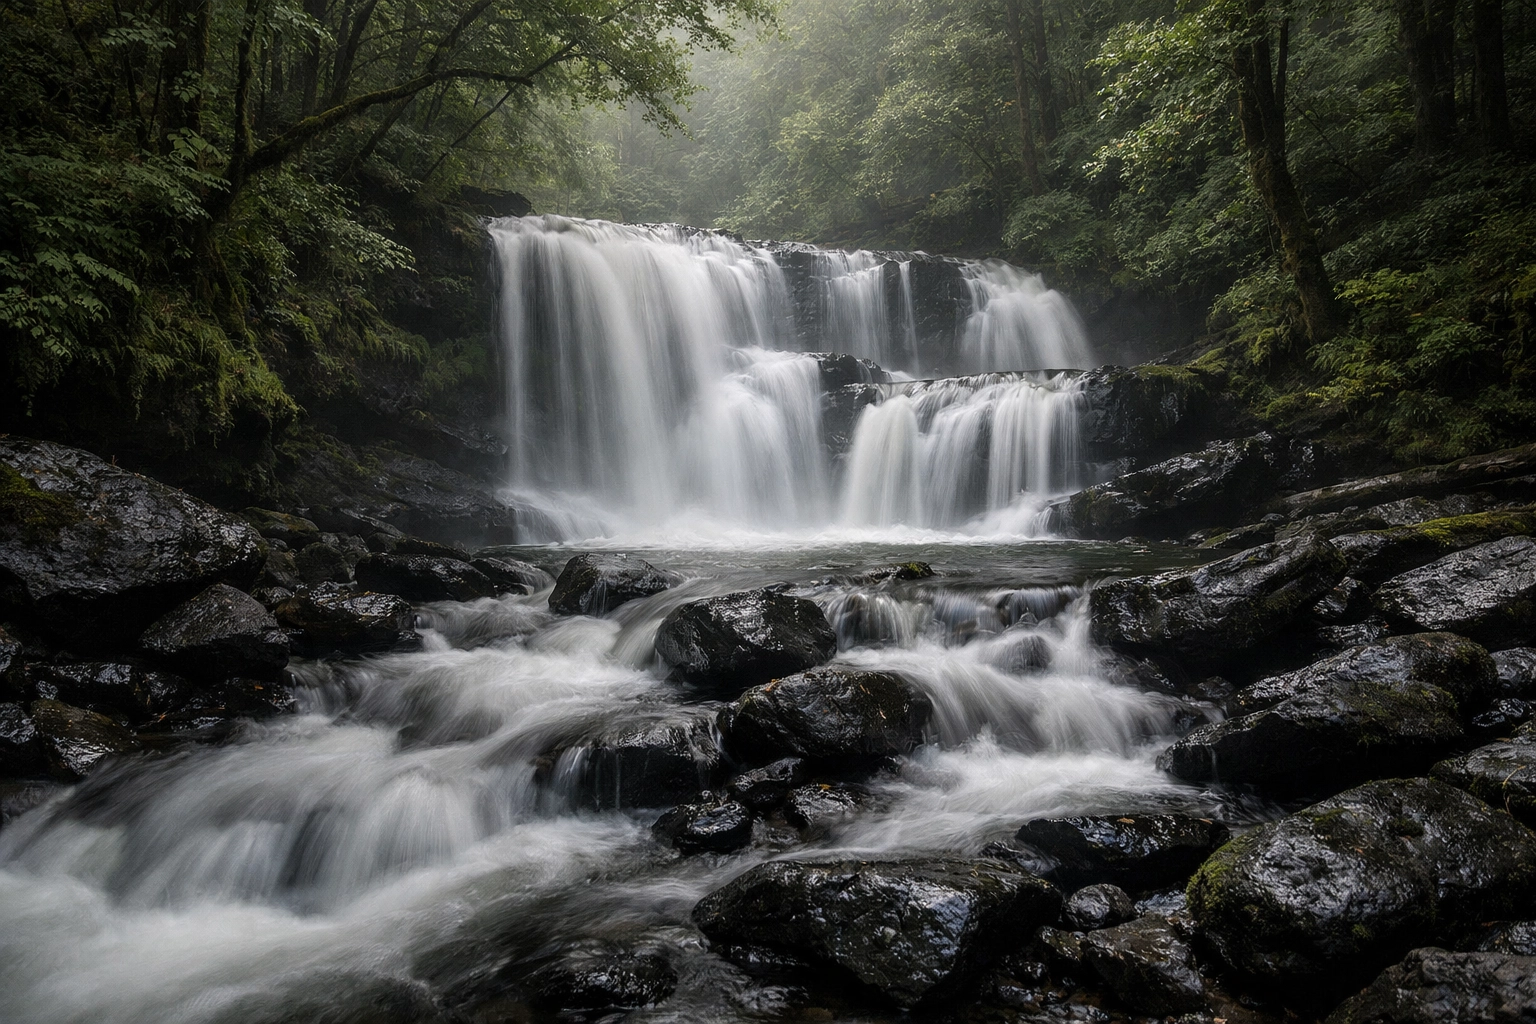
- Shutter Speed: This is your primary tool for capturing time. Slow shutter speeds (1/2 second to several minutes) transform moving water into mist and clouds into soft streaks, providing that "otherworldly" feel.
- ISO: Keep your ISO as low as possible (usually ISO 100) to ensure the cleanest image with the least amount of digital noise.
Advanced Techniques for Ethereal Photography
If you want your images to stand out, you need to master techniques that the average person can't replicate with a smartphone. Ethereal photography focuses on creating a sense of lightness, mystery, and beauty that feels almost supernatural.
Long Exposure and Motion
Long exposure is the secret sauce for fine art landscapes. By using a sturdy tripod and an ND filter, you can extend your shutter speed to blur the movement of the world. This technique simplifies the composition, removing the "clutter" of choppy waves or busy crowds, leaving behind a serene, painterly image. This process ensures your work has a signature look that is both calm and captivating.
Multiple Exposures and Focus Stacking
Sometimes, a single frame isn't enough to capture your vision. Focus stacking involves taking multiple shots at different focal points and merging them in post-processing to achieve a depth of field that is physically impossible to capture in one shot. Similarly, in-camera multiple exposures allow you to layer different textures and subjects, creating abstract art directly on your sensor.
Dreamy Photography Editing: The Final Touch
The capture is only half the battle. In fine art, the "darkroom" (or Lightroom and Photoshop) is where you breathe life into your vision. Dreamy photography editing is a specific style that emphasizes soft highlights, muted colors, and a glow that makes the viewer feel like they are stepping into a dream.
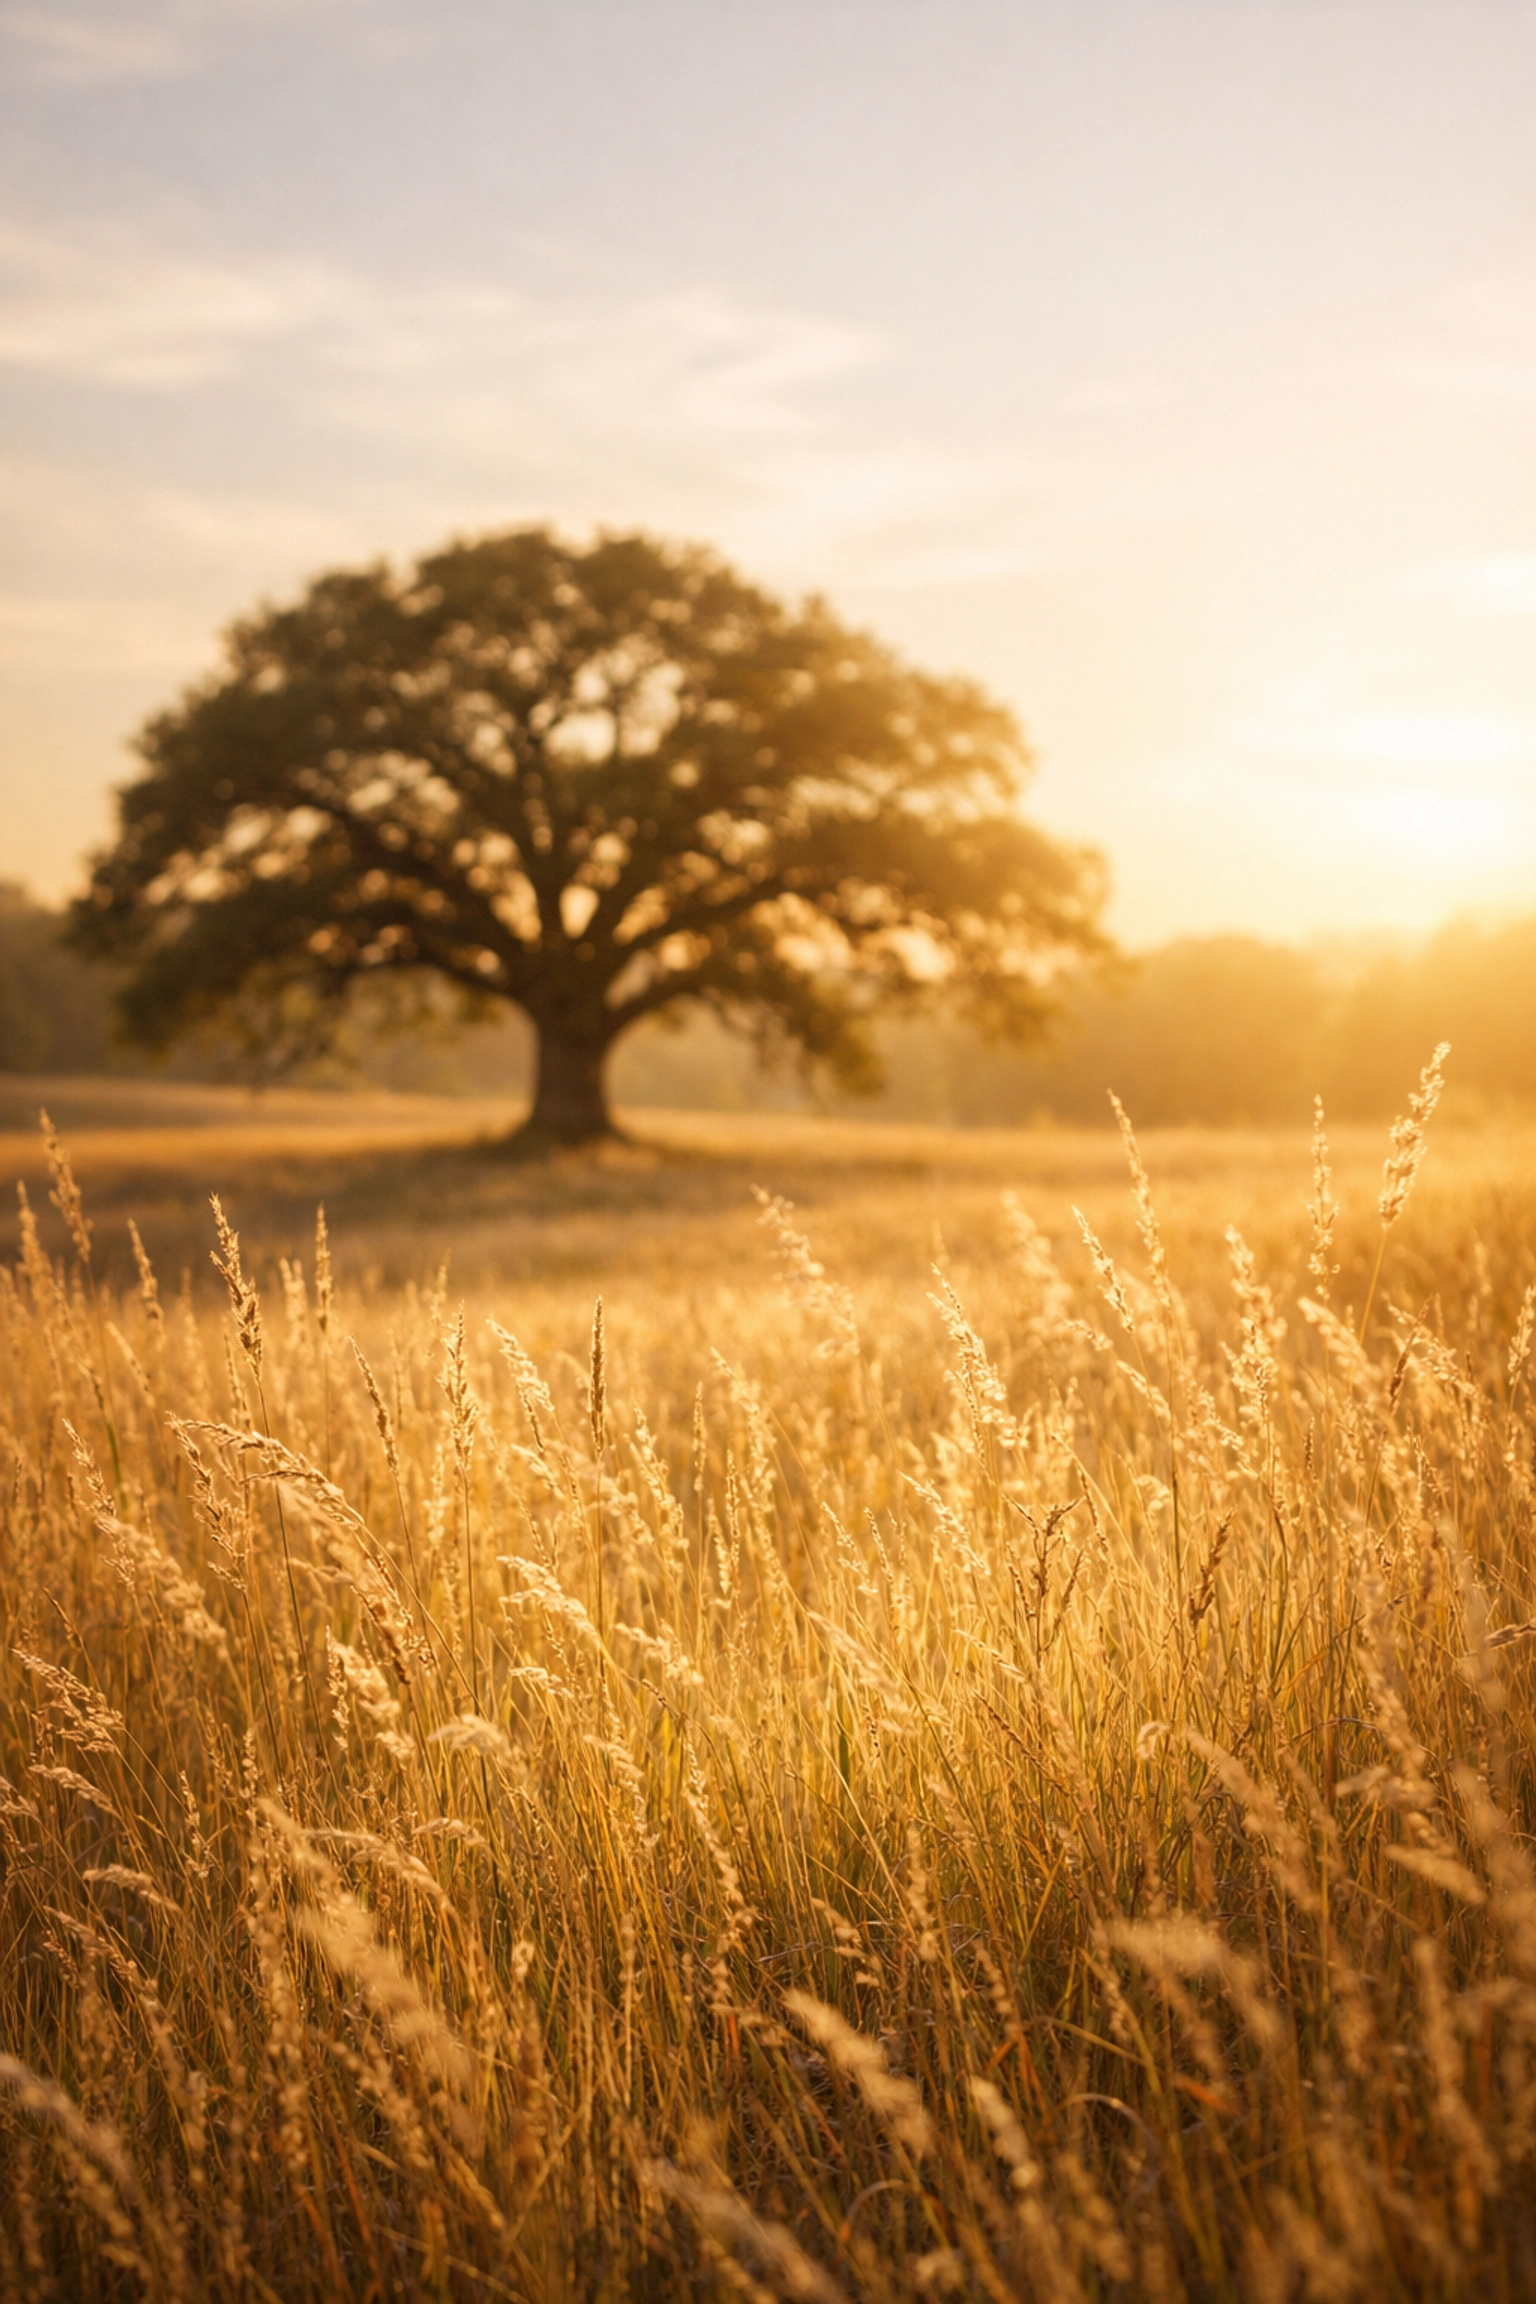
The Orton Effect
One of the most popular techniques in dreamy photography editing is the Orton Effect. This involves layering a sharp version of an image with a slightly blurred, overexposed version. The result is a photograph that maintains its detail but possesses a beautiful, radiant glow. It’s perfect for forest scenes, flowers, or soft-lit portraits.
Color Grading and Luminosity Masks
Your color palette should be intentional. Fine art photographers often use color grading to evoke specific emotions. Warm, golden tones suggest comfort and nostalgia, while cool, desaturated blues might evoke solitude or mystery. By using luminosity masks, you can target specific brightness levels in your image, ensuring that your highlights stay soft and your shadows remain deep and rich without losing detail.
| Editing Technique |
Visual Impact |
| Orton Effect |
Adds a soft, romantic glow and enhances the painterly feel. |
| Luminosity Masking |
Provides precise control over contrast, ensuring smooth transitions in light. |
| Split Toning |
Adds different colors to highlights and shadows for a stylized, artistic look. |
| Dodge and Burn |
Manually sculpts light and shadow to draw the viewer’s eye to your subject. |
Building Your Signature Style and Portfolio
Consistency is your most valuable asset. When a collector or a gallery owner looks at your work, they should be able to recognize your "hand" in the images. This doesn't mean every photo looks the same, but it does mean they share a common thread: whether it's your use of light, your preferred color palette, or your focus on ethereal photography.
As you build your portfolio, be your own harshest critic. Only include work that aligns with your ultimate vision. It is better to have five world-class images than fifty mediocre ones. If you're looking for guidance on how to curate your work or find the best locations to shoot, I've shared plenty of tips on my blog.

The Path to Professional Success
Success in fine art photography isn't an overnight achievement; it’s a journey of constant refinement. By mastering your technical skills, leaning into dreamy photography editing, and staying true to your unique vision, you elevate your work from a simple hobby to a profound art form.
You have the tools and the knowledge: now it’s time to head out and create. Remember that every master was once a beginner who refused to stop learning. Whether you are capturing the vibrant streets of Miami or the quiet isolation of a mountain peak, keep your vision at the forefront of everything you do.
With these considerations, you are well-equipped to dominate the fine art space. Your journey is just beginning, and the world is waiting to see through your eyes. For continued education and to see how I apply these principles in the field, visit Edin Chavez Photography and let's keep pushing the boundaries of what's possible with a camera.
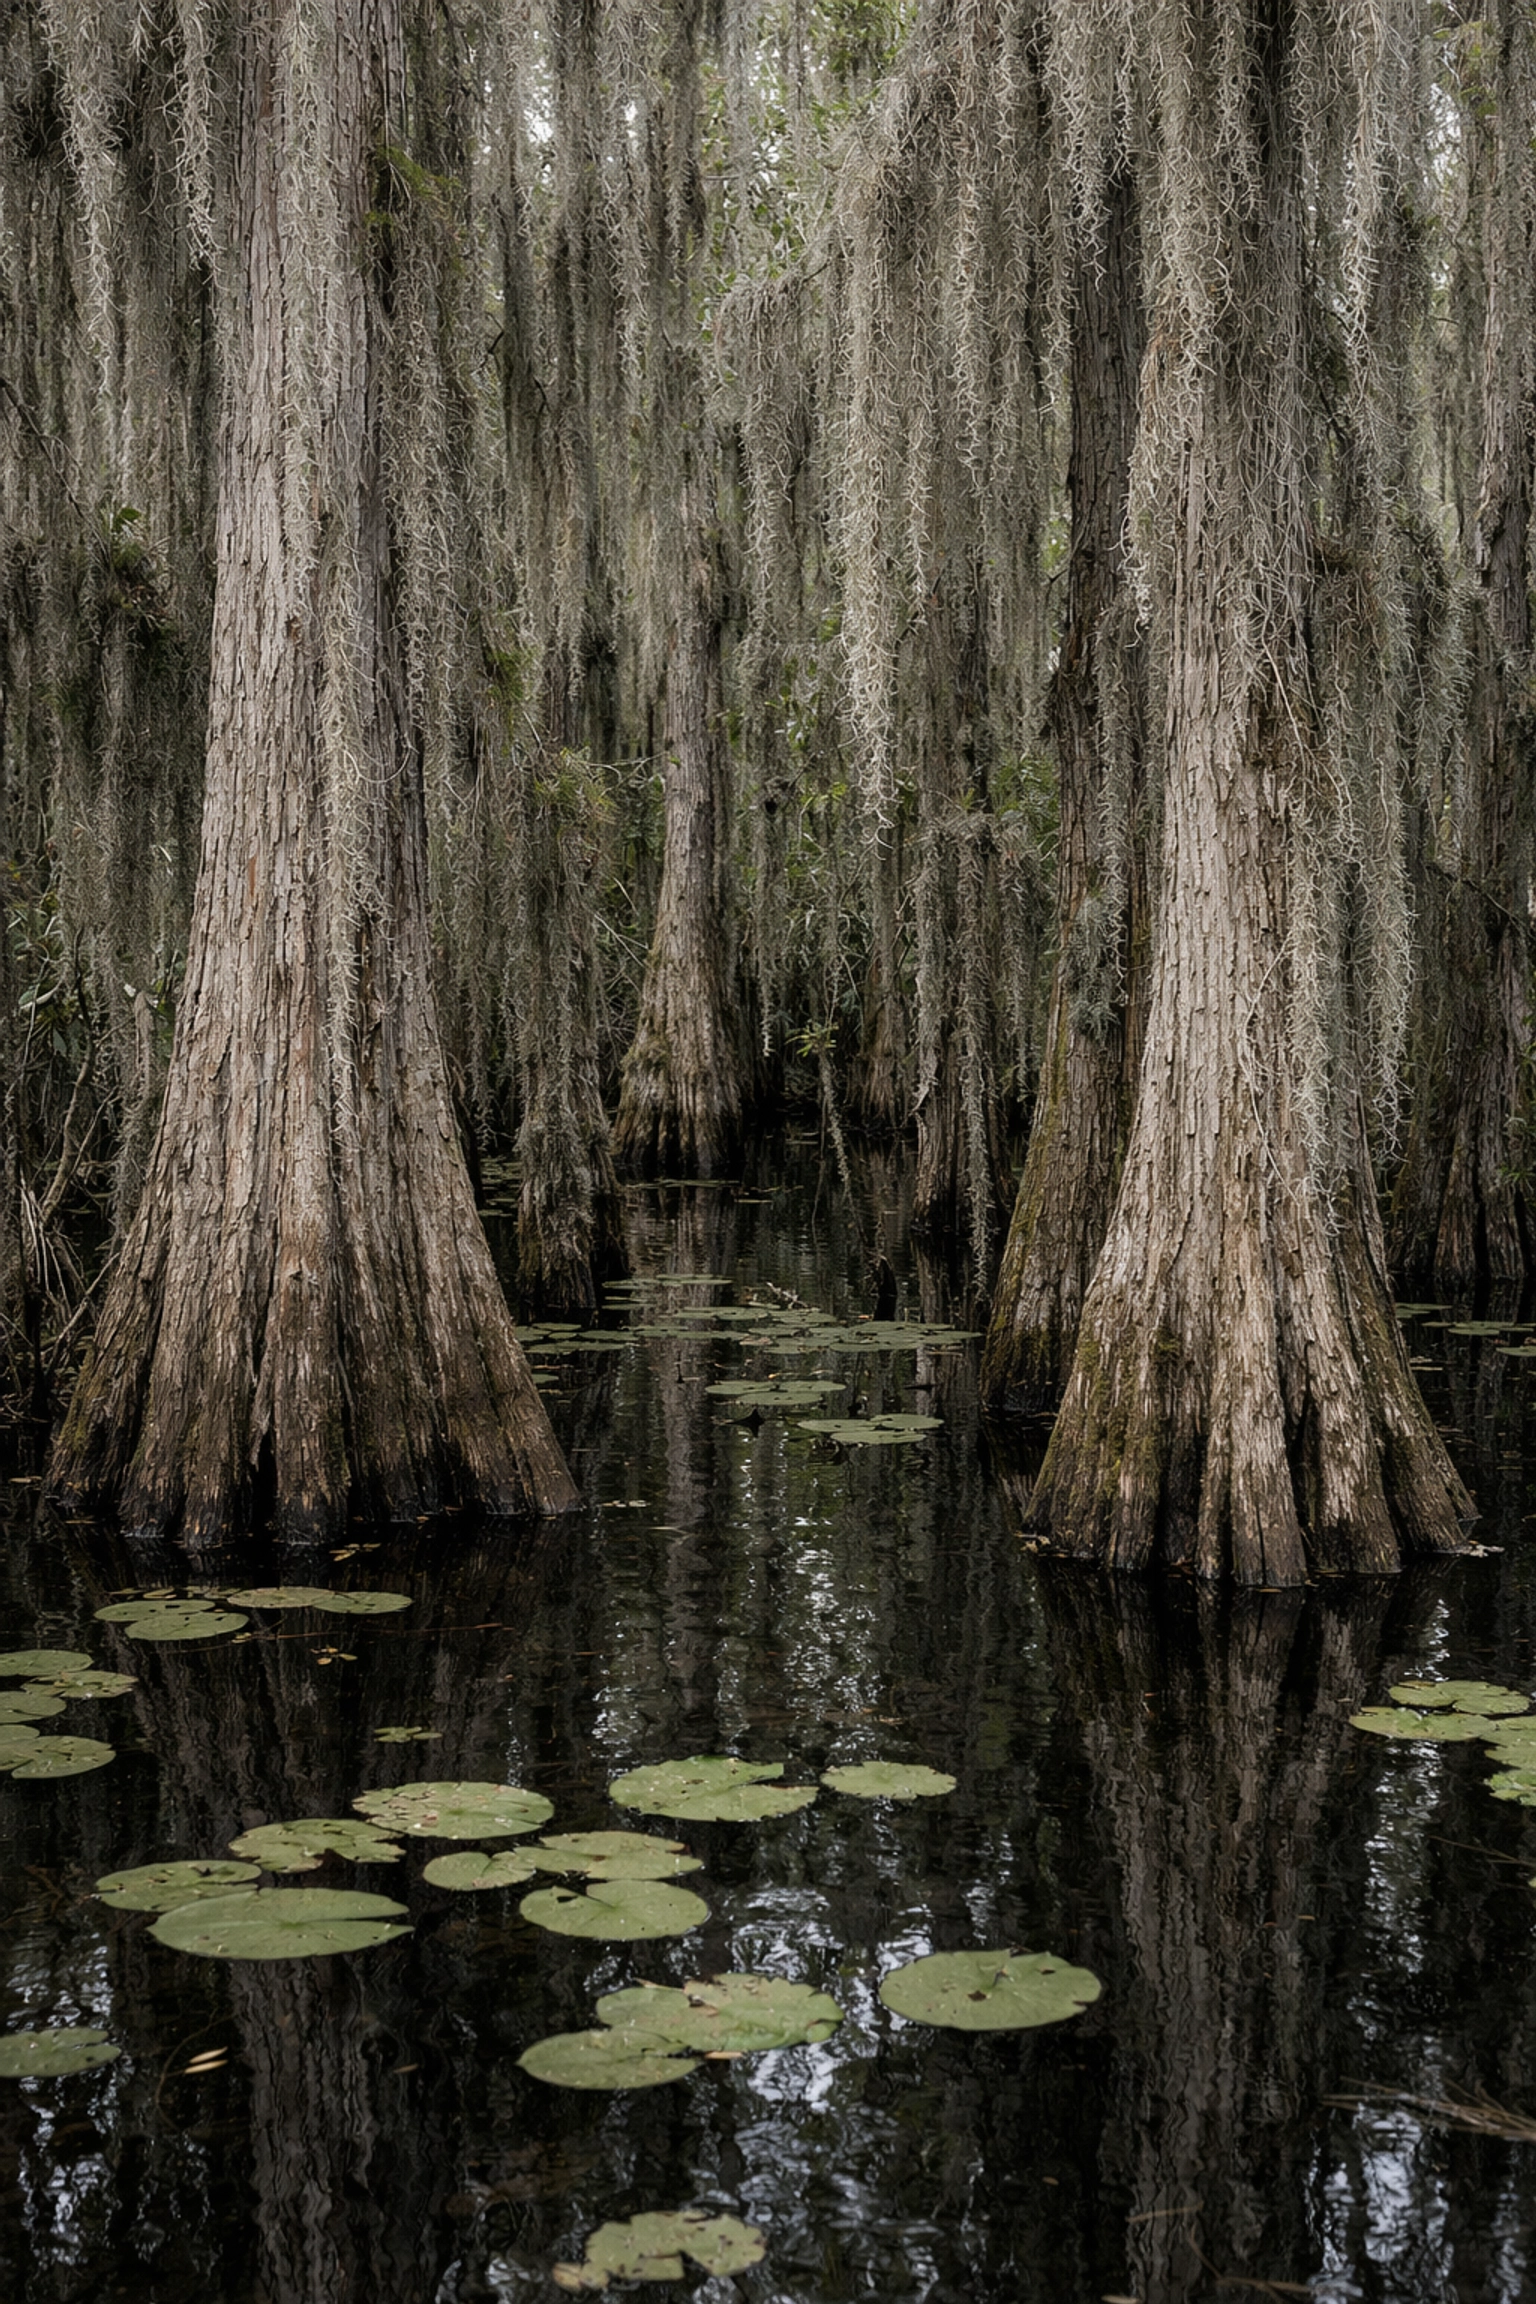
As the morning mist hangs heavy over the sawgrass and the first light of dawn begins to bleed across the horizon, you realize that the Everglades is not just a swamp: it is a living, breathing masterpiece. For any serious photographer, this ecosystem offers a level of raw, ethereal beauty that is unmatched anywhere else in the world. Whether you are chasing the prehistoric silhouette of an alligator or the delicate, painterly colors of a coastal sunset, the River of Grass provides a canvas that rewards patience and technical precision.
To truly master Everglades photography locations, you need to know exactly where to stand when the light hits just right. Navigating this vast wilderness can be daunting, but with the right guidance, you can transform a standard trip into a fine art expedition. At Edin Chavez Photography, we believe in empowering you to see the world through a more intentional lens. This guide will walk you through the top 10 locations to capture stunning landscape photography Everglades and breathtaking wildlife shots that will elevate your portfolio to professional standards.
1. Anhinga Trail (Royal Palm)
If you are looking for the quintessential wildlife photography Everglades experience, the Anhinga Trail at Royal Palm is your first stop. Located near the Homestead entrance, this boardwalk winds through a sawgrass marsh teeming with life. You will find anhingas drying their wings, herons standing motionless in the reeds, and alligators lounging just feet from the trail.
The magic here happens at sunrise. As the sun creeps up, the mist rising off the water creates a soft, ethereal glow that is a dream for fine art collectors. By arriving early, you ensure you beat the crowds and capture the wildlife while they are most active. This is the perfect spot to practice your composition, using the boardwalk as a leading line to draw the viewer’s eye into the heart of the marsh.
2. Shark Valley
Located along the Tamiami Trail, Shark Valley offers a 15-mile loop that takes you deep into the freshwater marl prairies. While many visitors take the tram, as a photographer, you want the freedom to stop whenever the light changes. Biking the loop or walking the first few miles allows you to find those secluded spots where the reflections are as smooth as butter.
The 65-foot observation tower at the halfway point provides a panoramic perspective that is essential for landscape photography Everglades. From here, you can see the vastness of the ecosystem, capturing the patterns of the water and grass that define this unique terrain.
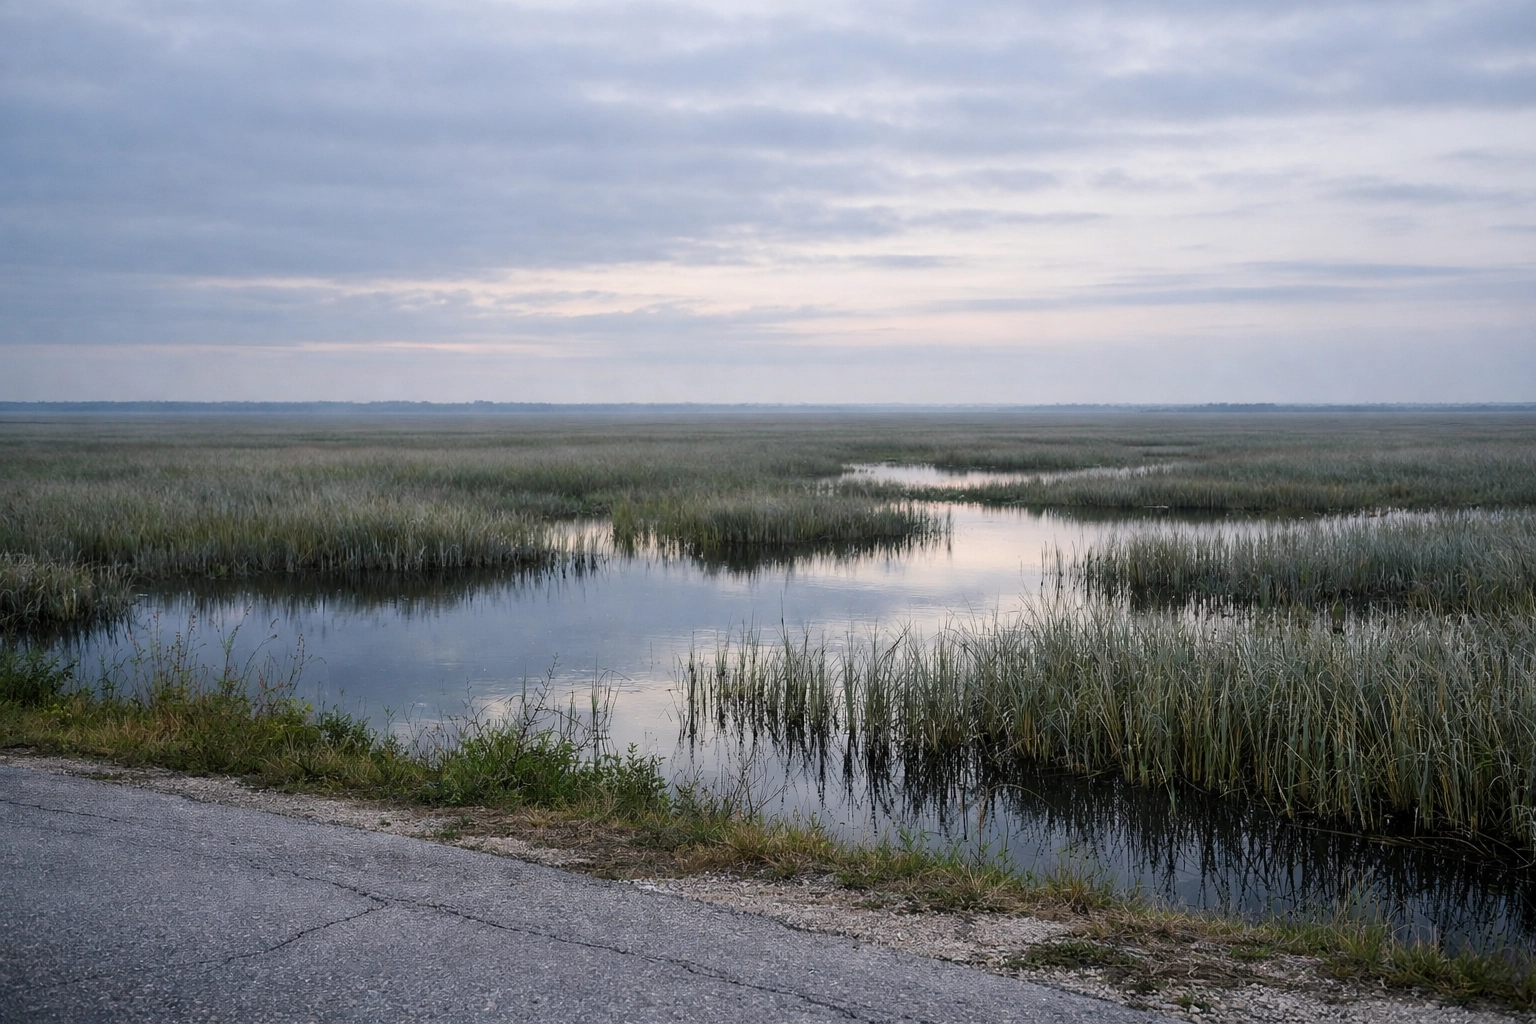
3. Pahayokee Overlook
Pahayokee is perhaps the best location for capturing the "River of Grass" in its purest form. The raised observation platform offers an unobstructed view of the horizon, making it a premier sunrise location. When the sky turns shades of purple and gold, the scattered cypress trees stand as dramatic silhouettes against the light.
When water levels are low, you can often find interesting textures in the limestone and sawgrass. This spot encourages you to think about minimalism in your photography: focusing on the vastness of the sky and the subtle shifts in the landscape. To truly master these conditions, you might consider our Everglades Photography Guide, which provides deeper insights into the seasonal changes of the park.
4. Big Cypress National Preserve (Loop Road)
While technically adjacent to the main park, Big Cypress is ecologically inseparable and offers a more rugged, untamed atmosphere. The 24-mile Loop Road is a photographer's paradise. It is unpaved, dusty, and absolutely packed with opportunities for fine art photography.
Here, you are looking for cypress domes, rare orchids, and the elusive barred owl. The ancient cypress trees, draped in Spanish moss, create a gothic, ethereal mood that is perfect for black-and-white conversions. Because it is less crowded than the main park trails, Big Cypress allows you the solitude necessary to wait for the perfect moment.
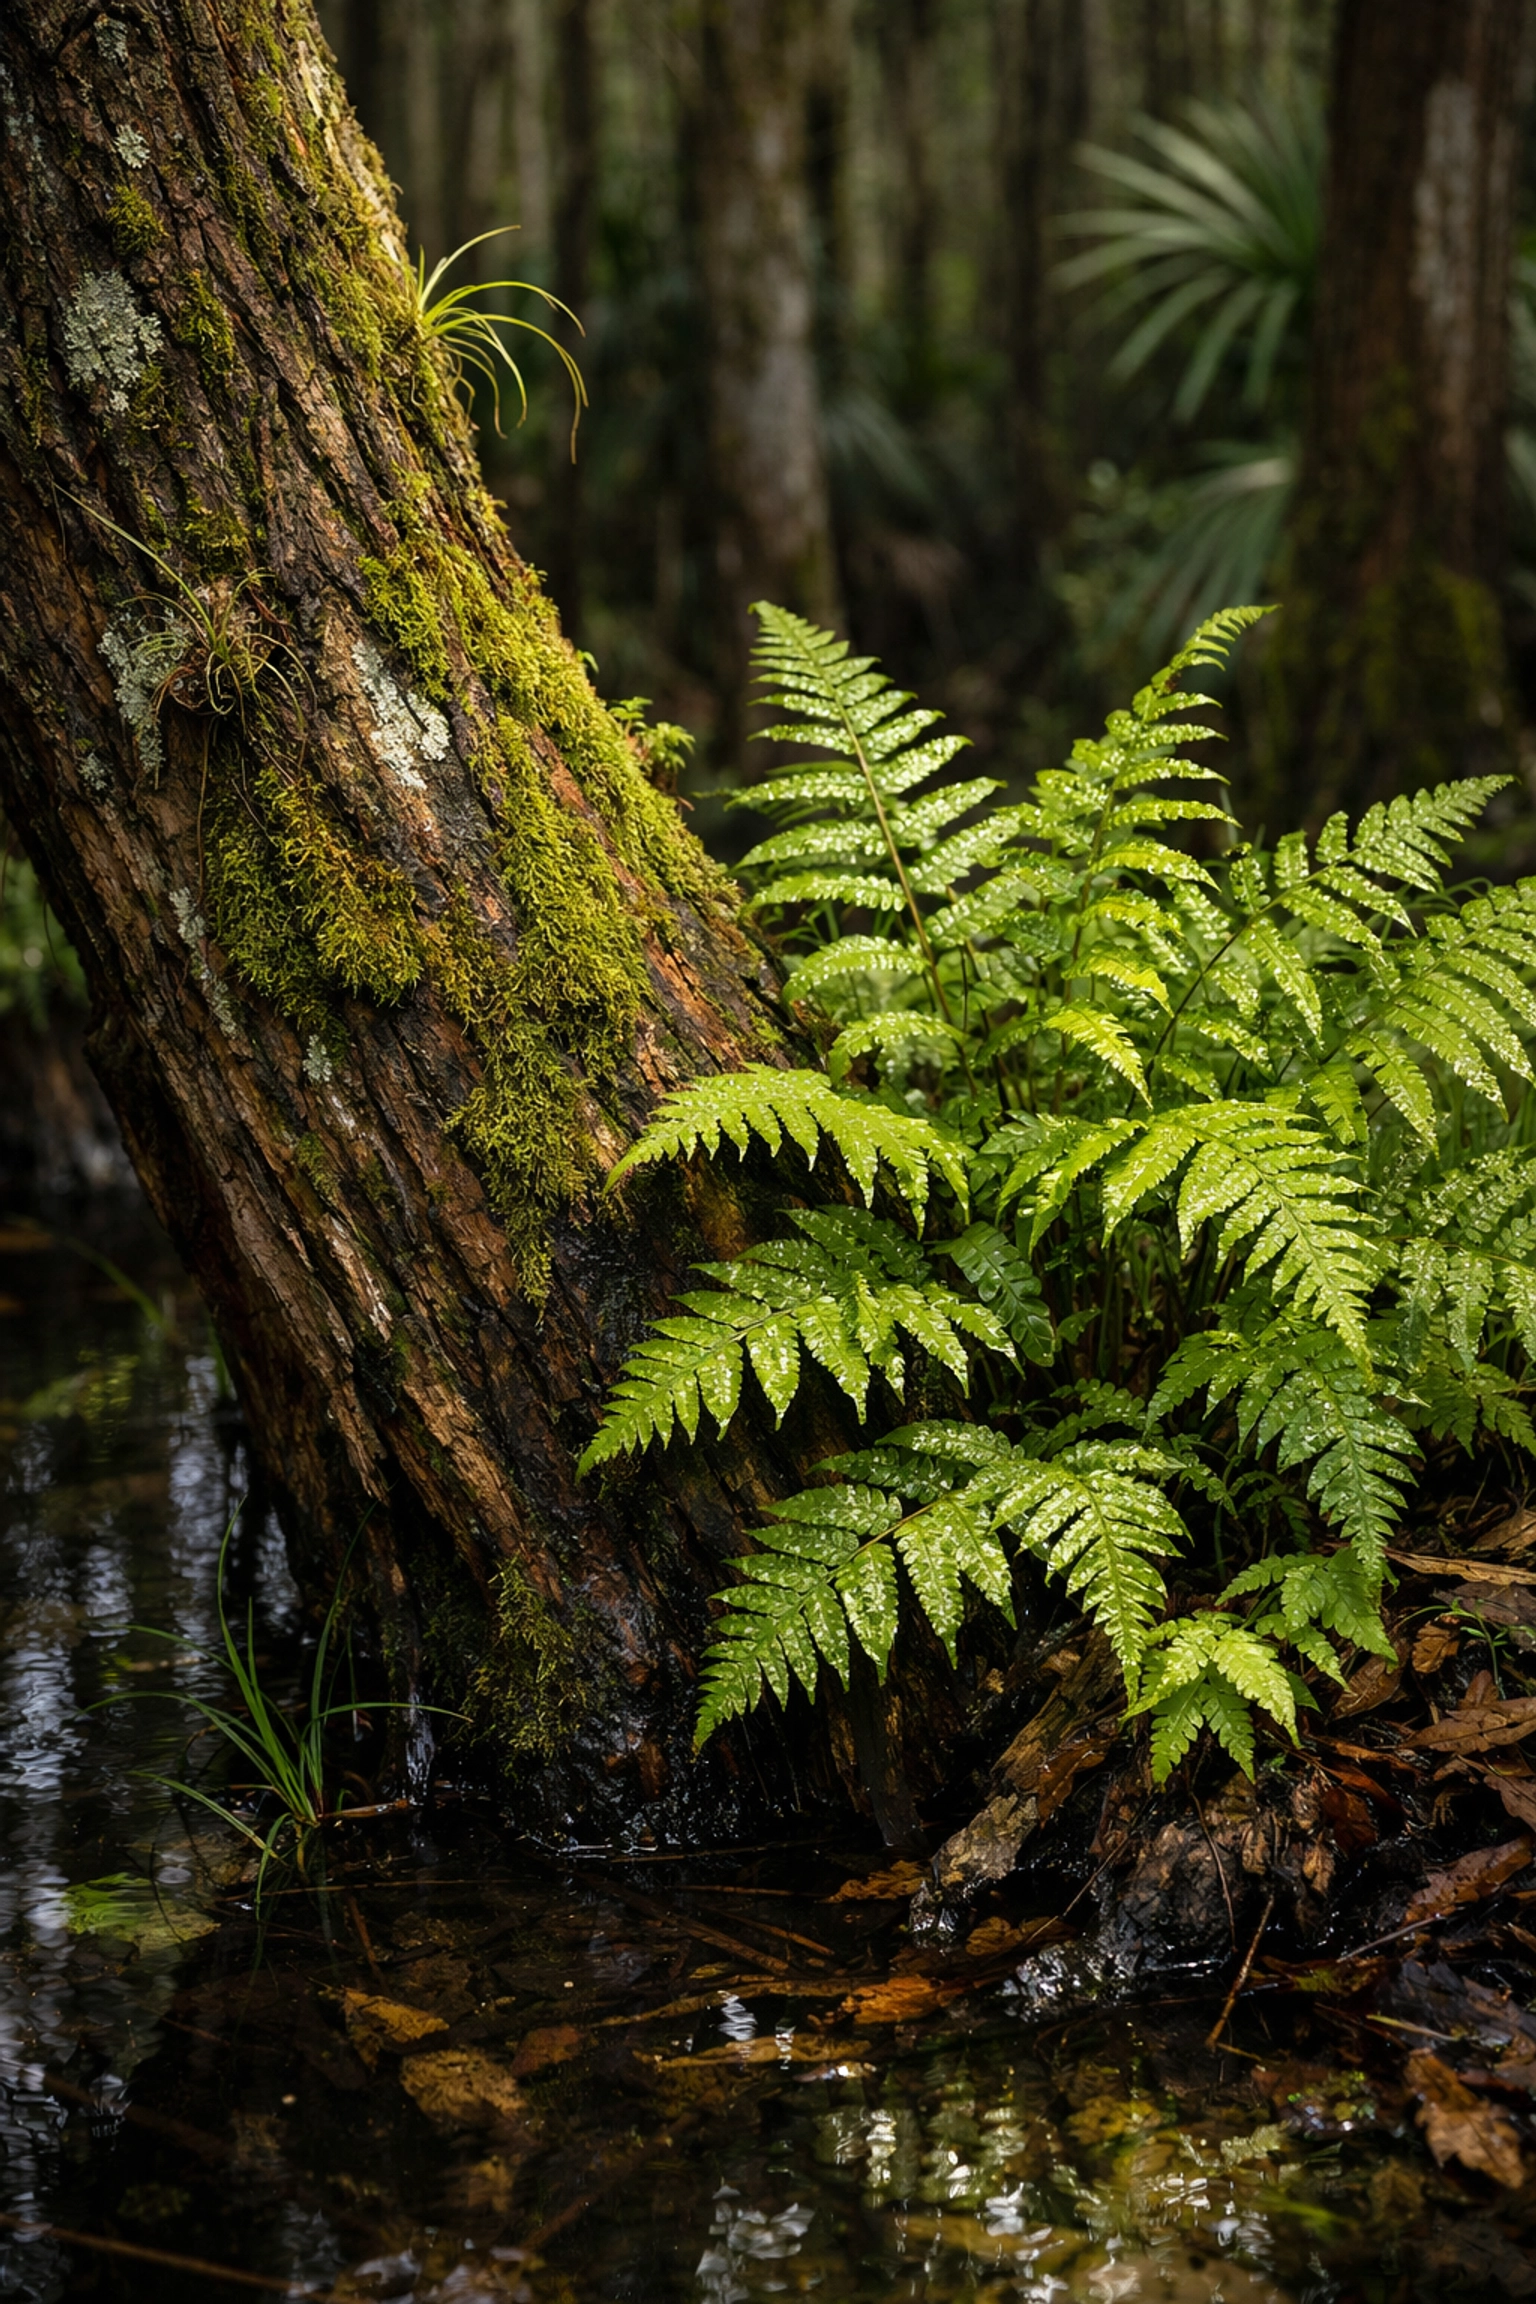
5. Mahogany Hammock
Step into a different world at Mahogany Hammock. A boardwalk leads you through a dense island of hardwood trees, including the largest living mahogany tree in the United States. The lighting here is filtered and moody, providing a stark contrast to the bright, open prairies found elsewhere in the park.
This location is ideal for capturing intricate textures, ferns, and the play of light through the canopy. If you are patient, you might even spot an owl perched high in the branches. It’s an excellent spot for macro photography and for capturing the "hidden" details of the Everglades.
6. Eco Pond (Flamingo)
Near the southernmost point of the park in Flamingo, Eco Pond is a haven for waterfowl. During the winter months, when water levels drop, birds congregate here in massive numbers. You can expect to see roseate spoonbills, their pink feathers popping against the deep greens and blues of the pond.
Sunset is the prime time here. As the sun dips low, you can capture silhouettes of birds in flight against a fiery sky. The stillness of the pond often creates mirror-like reflections that enhance the ethereal quality of your images.
7. Nine Mile Pond
For the adventurous photographer, Nine Mile Pond offers the chance to get on the water. Renting a canoe or kayak allows you to access perspectives that are impossible from land. You can glide through mangrove tunnels and out into open flats where the water is only inches deep.
Photographing from a low angle on the water provides an intimate view of the environment. It allows you to emphasize the foreground reflections and the architectural beauty of the mangrove roots. Remember to bring a waterproof bag for your gear to ensure your equipment stays safe while you explore.
8. Fakahatchee Strand Preserve
Often called the "Amazon of North America," Fakahatchee Strand is where you go for raw, authentic Florida swamp photography. This is the home of the famous ghost orchid and some of the most stunning cypress strands in the state.
The photography here is challenging but rewarding. You’ll want to visit in the late afternoon when the light filters through the trees, illuminating the bromeliads and ferns. It’s a place that demands a professional approach to light management, often requiring a tripod and longer exposures to capture the deep shadows and bright highlights of the swamp.
9. Turner River Road
Another gem within the Big Cypress area, Turner River Road runs north-south through a variety of habitats. The canals lining the road are almost always filled with alligators and birds, making it a reliable spot for wildlife photography Everglades.
What makes Turner River Road special is the scale. The vast open vistas of the prairies transition into dense cypress forests, providing a diverse range of subjects within a single drive. It is an excellent location for "bird-on-a-stick" shots as well as wide-angle landscapes that showcase the dramatic Florida clouds.
10. Wakodahatchee Wetlands
While located slightly north of the official park boundaries in Delray Beach, Wakodahatchee is built on the same principles and offers some of the most accessible bird photography in the region. The boardwalk takes you right into the middle of nesting colonies.
For a fine art photographer, the proximity to the subjects at Wakodahatchee allows for stunning detail shots of feathers, eyes, and nesting behaviors. It’s a great place to warm up your skills before heading deeper into the more remote areas of the Everglades.
Comparison of Key Photography Spots
| Location |
Primary Subject |
Best Time to Shoot |
Photography Type |
| Anhinga Trail |
Alligators & Herons |
Sunrise |
Wildlife / Fine Art |
| Shark Valley |
Panoramic Vistas |
Mid-morning / Sunset |
Landscape |
| Pahayokee |
Sawgrass Prairies |
Sunrise |
Landscape / Ethereal |
| Big Cypress |
Cypress Domes |
Late Afternoon |
Fine Art / Nature |
| Eco Pond |
Roseate Spoonbills |
Sunset |
Wildlife / Silhouette |
Essential Gear for Your Everglades Expedition
To make the most of these Everglades photography locations, your gear choice is critical. A telephoto lens (300mm or longer) is a must for wildlife to ensure you maintain a safe and respectful distance. For landscapes, a wide-angle lens will help you capture the immense scale of the sky and prairies.
Don't forget a sturdy tripod and a circular polarizer. The polarizer is essential for cutting glare off the water and foliage, allowing the true colors of the Everglades to shine through. Most importantly, ensure you are prepared for the elements with bug spray, sun protection, and plenty of water.
Elevate Your Artistry
Capturing the Everglades is about more than just clicking a shutter; it’s about understanding the rhythm of the water and the movement of the light. Each of these locations offers a unique story, and it is your job to tell it through your lens. Whether you are looking to create large-format prints for your home or simply want to document one of the world’s most unique ecosystems, these spots provide the foundation you need.
If you are ready to take your skills to the next level and want the ultimate insider's guide to these locations, I highly recommend picking up our Everglades Photography Guide. It contains the specific GPS coordinates, seasonal tips, and technical advice that I use for my own fine art work.
Explore more of our work and educational resources at Edin Studios or browse our latest articles on the Edin Chavez Blog. For collectors looking for museum-quality prints of these stunning locations, visit Edin Fine Art to see the Everglades captured in all its glory.
With these considerations in mind, grab your gear and head into the wild. The ethereal landscapes of the Everglades are waiting for you to capture them.
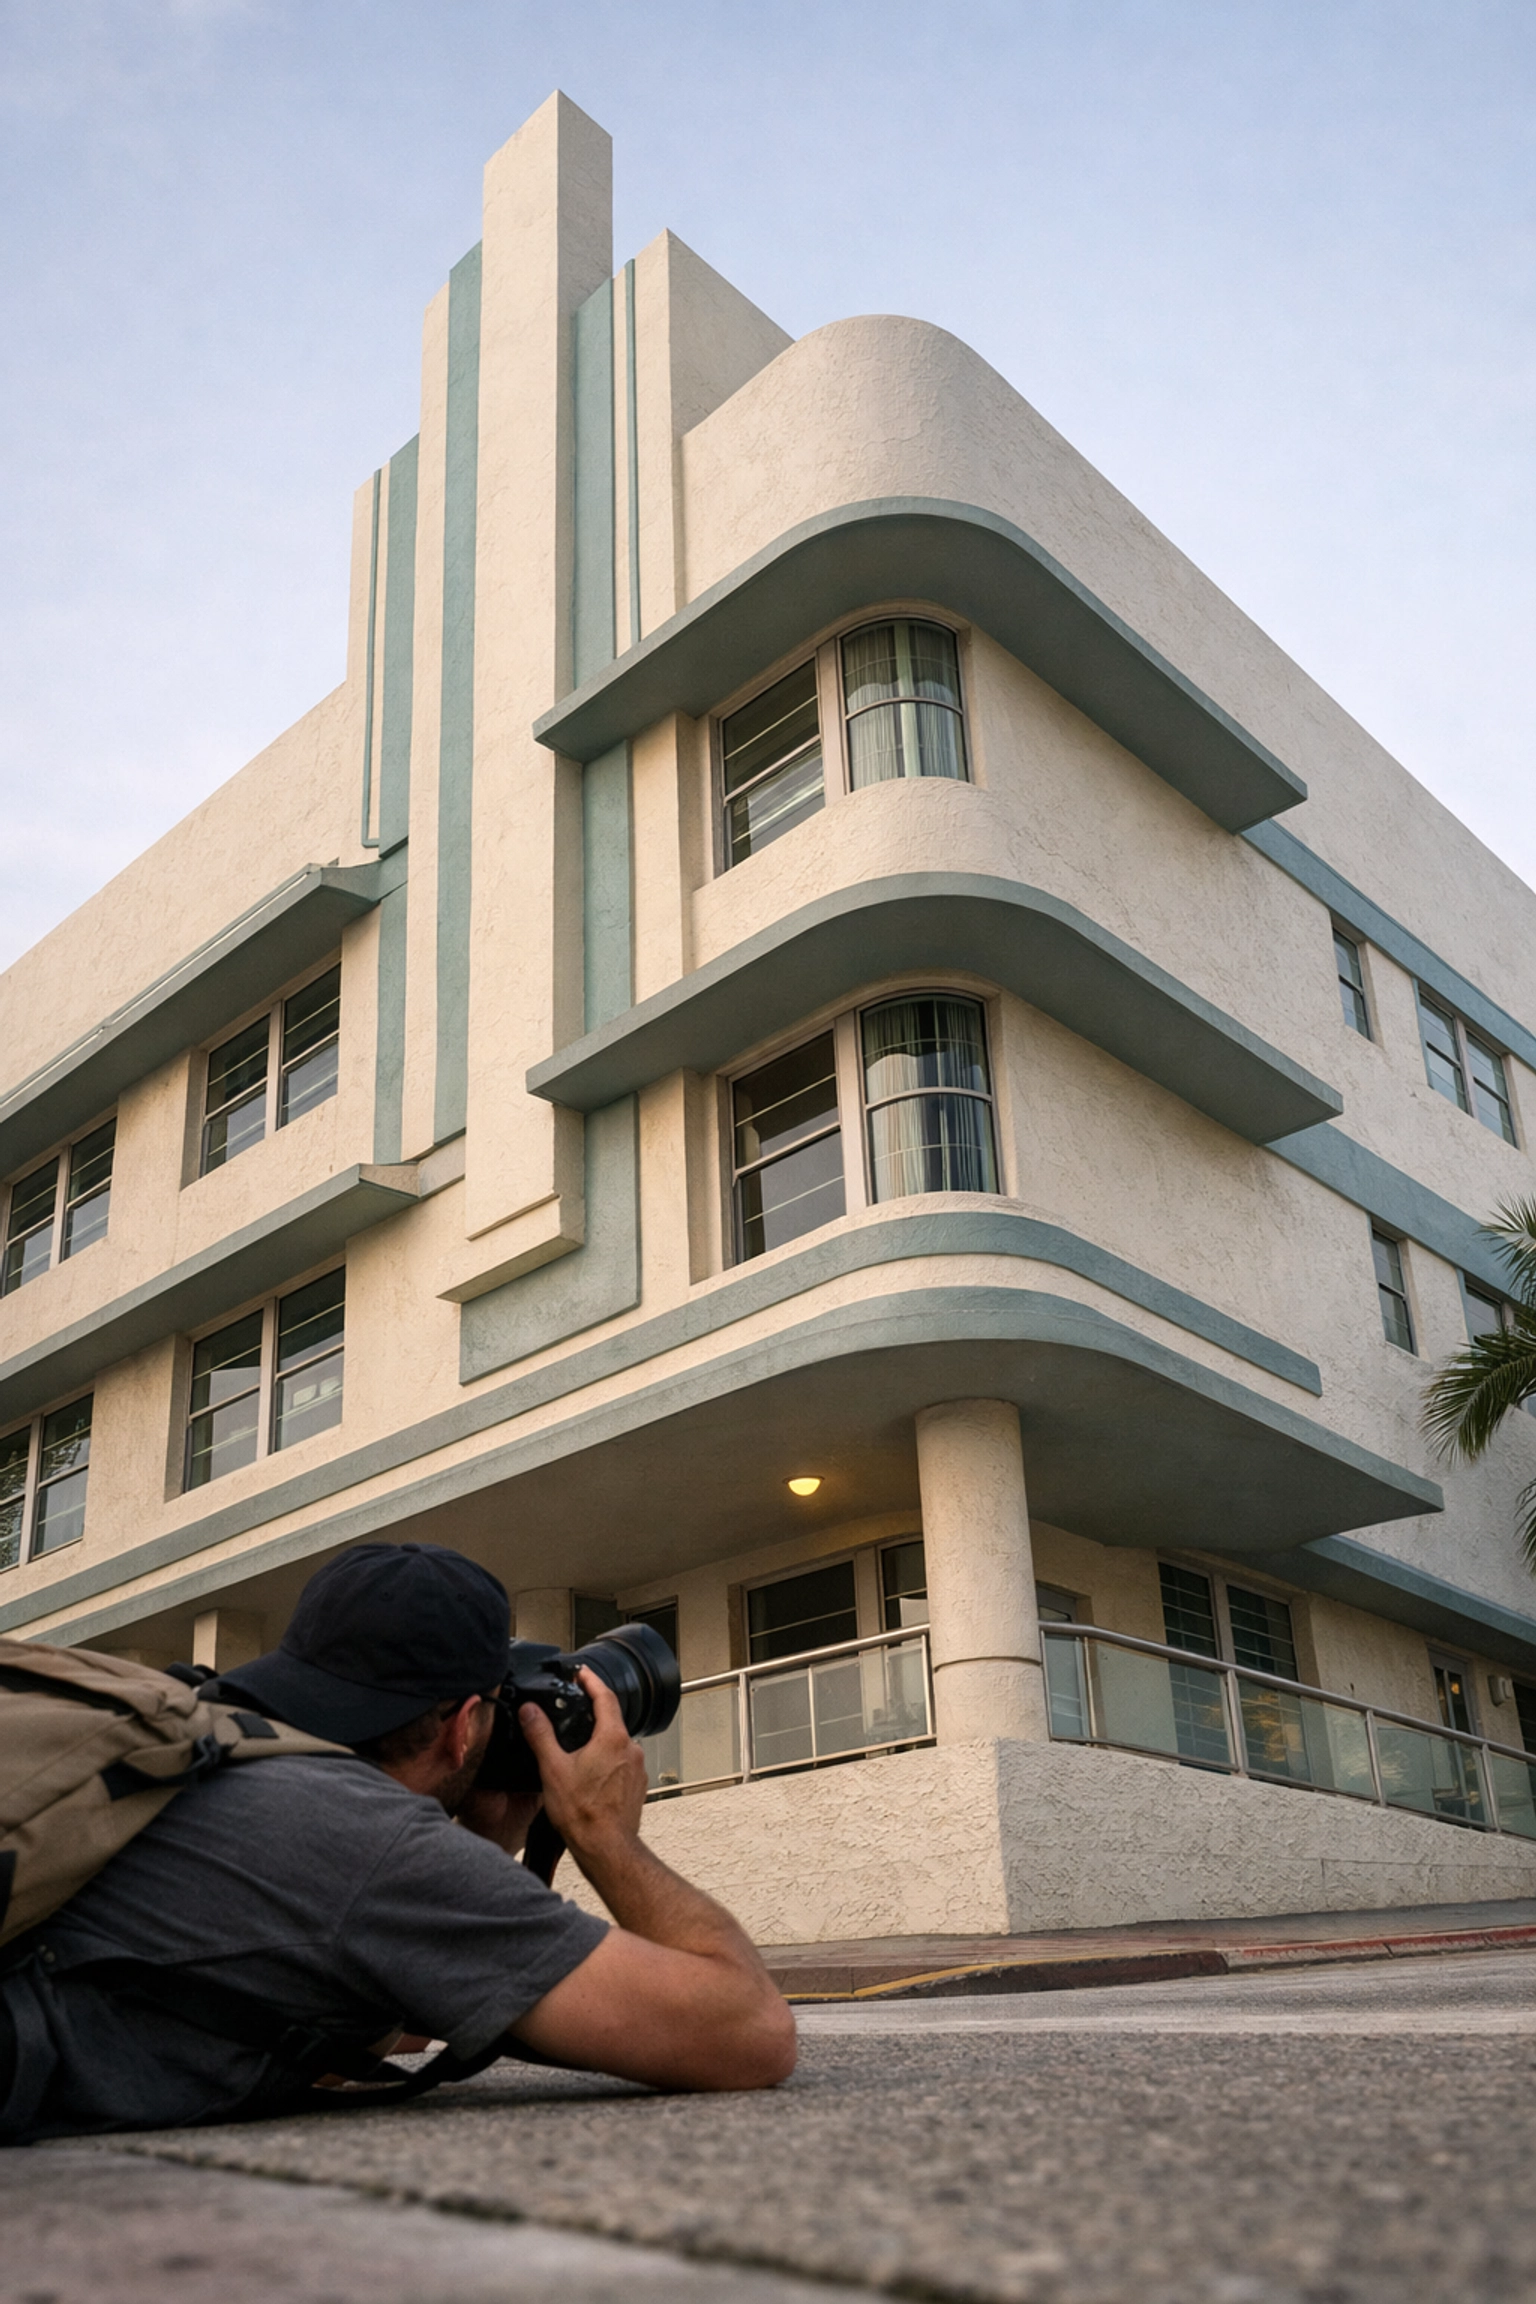
Just as the sun begins to dip below the horizon, painting the Atlantic in hues of violet and gold, you realize that Miami is far more than a collection of neon lights and sandy beaches. While many visitors spend their time wandering aimlessly through the most crowded miami photo spots, you have the opportunity to step behind the curtain and see the city through a professional lens. Understanding the nuance of light, the geometry of Art Deco architecture, and the rhythm of the streets requires more than just a camera; it requires a guide who knows these streets as intimately as their own viewfinder.
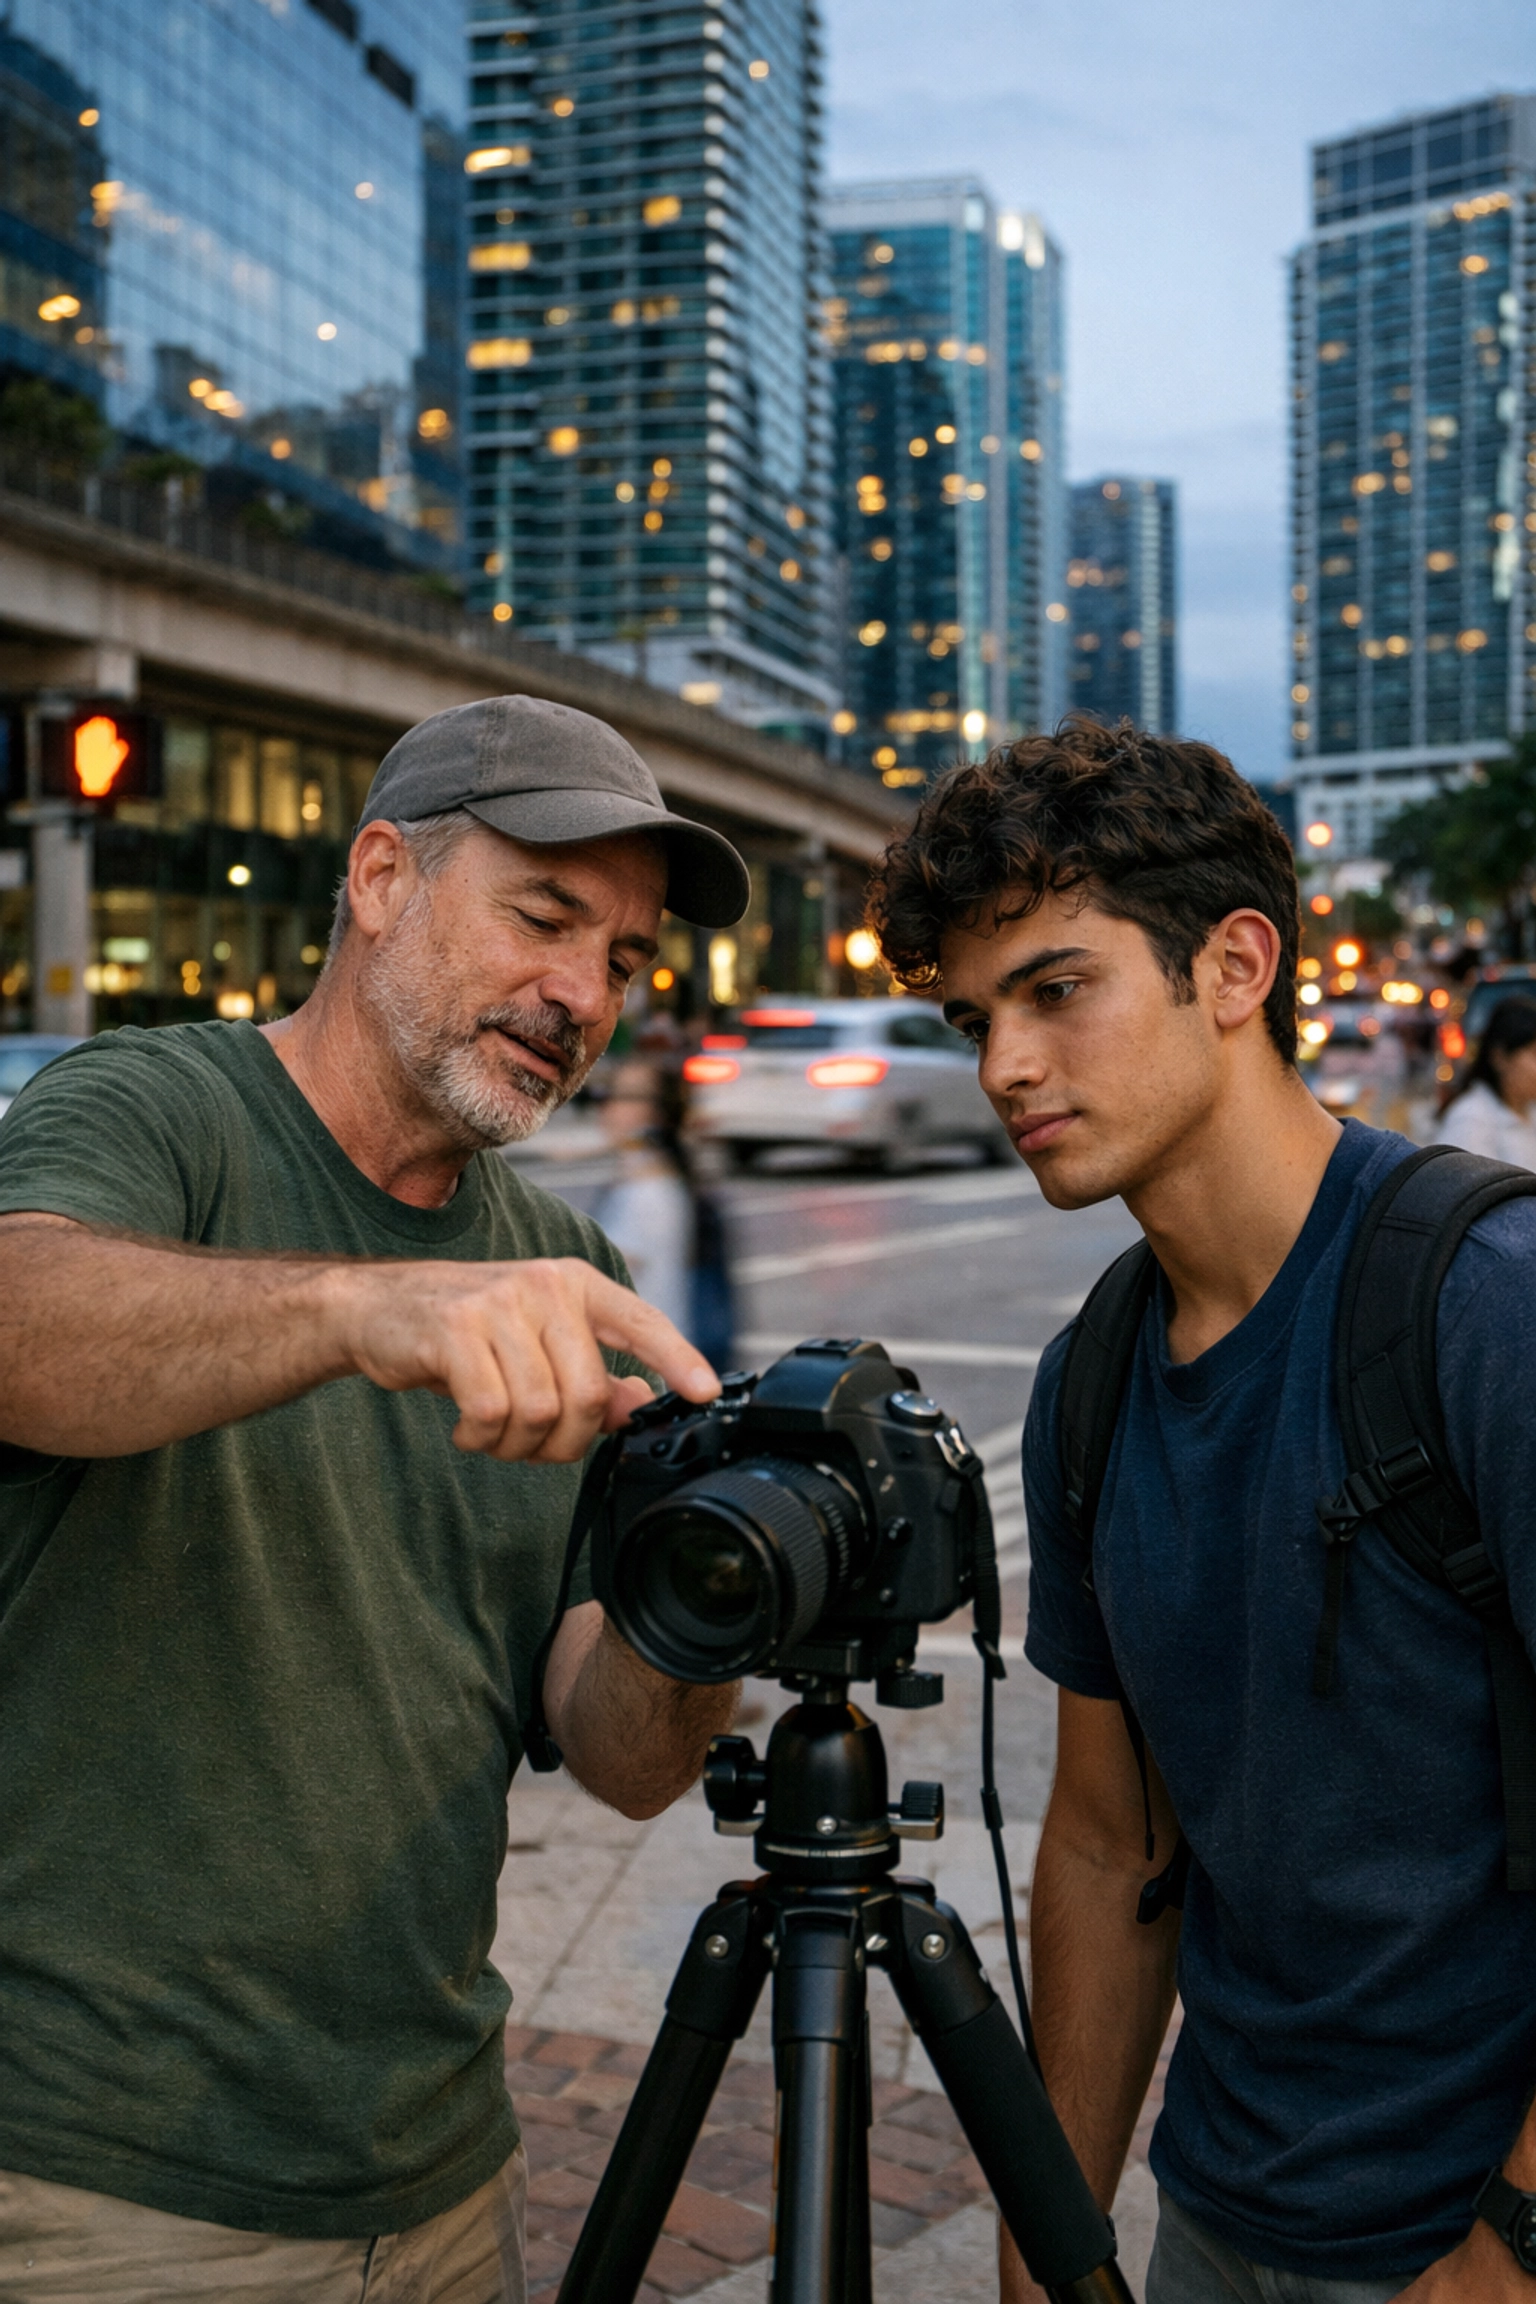
When you book a Private Miami Photography Tour, you aren’t just paying for a walk around the block. You are investing in a fundamental shift in how you observe the world around you. By moving beyond the surface-level beauty of common miami photography locations, you will learn to identify the stories hidden in the shadows of Wynwood and the reflections of the Downtown skyline. This is about elevating your craft and ensuring that every shutter click results in a piece of fine art.
Shifting Your Perspective: Beyond the "Tourist" Shot
Many photographers arrive in Miami with a checklist of famous landmarks they want to capture. While those icons are beautiful, simply standing where everyone else stands ensures your photos look like everyone else’s. A private tour propels you past these cliches. We focus on finding the "classic" angles first to get them out of your system, and then we dive into the creative "why" behind your composition. This approach ensures you leave with a portfolio that is uniquely yours.
Your experience on a Private Miami Photography Tour is designed to challenge your default settings. Instead of snapping what is directly in front of you, you will learn to analyze depth, leading lines, and the play of light. This shift in perspective transforms a standard street corner into a masterclass in urban geometry. By the time we finish, your eye will be trained to see potential in locations you previously would have walked right past.
Why "Miami Photo Spots" Aren't Just Locations: They're Experiences
When you search for the best places to take pictures in miami, you’ll find lists of parks and buildings. However, a location is only as good as the conditions in which you shoot it. A private tour provides you with the strategic advantage of timing and local intelligence. We don't just go to a spot; we go to the right spot at the exact moment the light is doing something extraordinary.
| Feature |
Solo Exploration |
Private Miami Photography Tour |
| Location Selection |
Based on generic internet lists. |
Curated based on your style and current light. |
| Timing |
Often hit-or-miss with crowds/weather. |
Optimized for "Golden Hour" and peak conditions. |
| Pacing |
Rushed or aimless wandering. |
Dedicated time to perfect each shot. |
| Technical Support |
Trial and error on your own. |
Real-time professional settings adjustment. |
| Vantage Points |
Restricted to public viewpoints. |
Access to unique, "hard-to-find" perspectives. |
This structured approach at Edin Chavez Photography ensures that you are never "hunting" for a shot. Instead, you are positioned for success. Whether we are exploring the gritty textures of the Design District or the sleek lines of Brickell, every moment is maximized for your creative growth.
Mastering Technical Settings in the Field
It is one thing to understand your camera settings in a classroom; it is entirely another to master them while the light is changing by the second. One of the most significant advantages of a Private Miami Photography Tour is the real-time feedback you receive. If you are struggling with a high-contrast scene or trying to capture the motion of the city, I am right there to help you dial in your settings.
We focus on the pillars of a great image:
- Aperture Control: Understanding how to isolate your subject against the vibrant Miami backdrop.
- Shutter Speed: Learning how to freeze a fast-paced street scene or blur the ocean waves for a serene effect.
- ISO Management: Keeping your images crisp and clean, even as the sun goes down and the neon lights take over.
By integrating these technical skills into the actual shooting process, you retain the information far more effectively than reading a manual. This hands-on guidance ensures that when you return to Edin Studios, your raw files are already professional-grade, making the editing process smooth as butter.
Discovering Secret Miami Photography Locations
The true magic of a miami photography tour lies in the locations that don't have a geotag on Instagram. Over the years, I have discovered pockets of the city that offer unparalleled textures and stories. These are the spots where the "real" Miami lives: away from the velvet ropes and the tourist traps.
When you join me for a session, we explore a mix of environments. We might start with the iconic Art Deco architecture of South Beach, but we quickly move into the hidden alleys of Wynwood where the street art tells a deeper story. This variety ensures that your collection of miami photo spots is diverse, robust, and visually compelling. You aren't just getting photos; you are getting a comprehensive visual tour of a city in constant motion.
The Advantage of Local Expertise
Navigating Miami can be a challenge, especially when you are trying to find the best places to take pictures in miami during peak traffic or changing weather. My role is to eliminate that stress entirely. As a professional photographer based here, I know which streets are blocked, which buildings have the best reflections, and exactly where the sun will drop relative to the skyline.
This commitment to your experience means you can focus 100% on your creativity. You don’t have to worry about GPS or parking; you only have to worry about your composition. This level of service is what separates a generic tour from a Private Miami Photography Tour. We move with purpose, ensuring that every minute of our time together is spent with your eye to the viewfinder.
Elevating Your Fine Art Portfolio
For those who are looking to create gallery-quality work, the stakes are higher. You aren't looking for snapshots; you are looking for fine art. By working with me at Edin Chavez Photography, you gain an insider’s look at how to compose images that have commercial and artistic value. We discuss the "why" behind the image: the emotional impact of a certain color palette or the tension created by a specific frame.
The transition from a hobbyist to a serious creator happens when you stop taking pictures and start making them. This tour provides the infrastructure for that transition. Whether you are building a portfolio to show or simply want the best possible memories of your trip, the quality of your output will be unmatched. You can see the standard we aim for by visiting the main Edin Chavez website.
Why a Private Tour is Your Best Investment
Many people spend thousands of dollars on the latest camera bodies and lenses, yet they continue to take the same average photos. The most significant upgrade you can make to your photography isn't a piece of gear; it’s your ability to see. A Private Miami Photography Tour is the shortcut to that upgrade.
| Benefit |
How it Empowers You |
| Direct Mentorship |
Get instant answers to your specific photography questions. |
| Composition Coaching |
Learn to see layers and stories in any environment. |
| Efficient Scouting |
Don't waste hours looking for spots; go straight to the best ones. |
| Confidence Building |
Master your gear in real-world, high-stakes environments. |
| Professional Results |
Leave with images you are proud to print and display. |
With these tools at your disposal, you will find that your entire approach to photography changes. You will begin to look for the light before you even take your camera out of the bag. This new way of seeing will stay with you long after you leave Miami, influencing every photo you take in the future.
Final Thoughts: Secure Your Spot
Miami is a city that is constantly evolving, and its miami photography locations are no different. What was a great spot yesterday might be gone tomorrow. By booking a Private Miami Photography Tour, you are ensuring that you capture the very best of what this city has to offer right now, under the guidance of a professional who lives and breathes this craft.
Don't settle for the same photos everyone else has. Elevate your perspective, master your technical skills, and discover the soul of the city with me. Visit blog.edinchavez.com to see more of our 30-day series on the best spots in the city, or head directly to Edin Studios to see the final results of what we can achieve together.
Hence, the choice is yours: you can walk the streets alone, or you can take a journey that will forever change how you see through your lens. Secure your Private Miami Photography Tour today and let's create something extraordinary.
Many people believe that building a prestigious art collection is a pursuit reserved exclusively for elite auction houses and hidden galleries. However, as the digital age matures, limited edition photography prints have emerged as one of the most accessible and rewarding ways for you to enter the world of fine art collecting. Whether you are looking to elevate your home’s aesthetic or you are eyeing a piece as a long-term investment, understanding the nuances of the photography market ensures you make a purchase that retains: and potentially increases: its value over time.
When you step into the world of Edin Chavez Photography, you aren't just buying a picture; you are acquiring a piece of a story that has been intentionally capped to maintain its exclusivity. This guide will walk you through everything you need to know to transition from a casual observer to a confident collector of museum quality prints.
Decoding the Limited Edition: What Are You Actually Buying?
As you begin your journey, you must first understand the "limited" in limited edition photography prints. Unlike "open editions," which can be printed an infinite number of times, a limited edition is a set number of physical reproductions produced from a single image. Once that number is reached, the edition is permanently retired. The artist legally and ethically agrees never to print that specific image in that specific format again.
You will typically see a fraction on the corner of the print or the accompanying documentation, such as 5/25. This tells you that you own the fifth print out of a total of only twenty-five in existence. Contrary to some myths, the specific number (whether it’s 1/25 or 25/25) doesn’t usually change the value; what matters is the total edition size. A smaller total number inherently increases the scarcity, which directly impacts the piece's desirability for future curators and buyers.
The Scarcity Scale and Your Investment
| Edition Size |
Market Scarcity |
Investment Potential |
Best For |
| Small (1-25) |
Extremely High |
Highest Growth Potential |
Serious Collectors & Investors |
| Medium (25-100) |
Moderate |
Balanced Value |
New Collectors |
| Large (100-500+) |
Lower |
Aesthetic Value |
Home Decor & Enthusiasts |
By choosing a smaller edition, you ensure that you are part of an exclusive group of owners. This scarcity is a primary driver when you eventually look at how to sell fine art photography prints on the secondary market. If you want to dive deeper into the technical side of how these pieces are categorized, check out our resources at https://blog.edinchavez.com/.

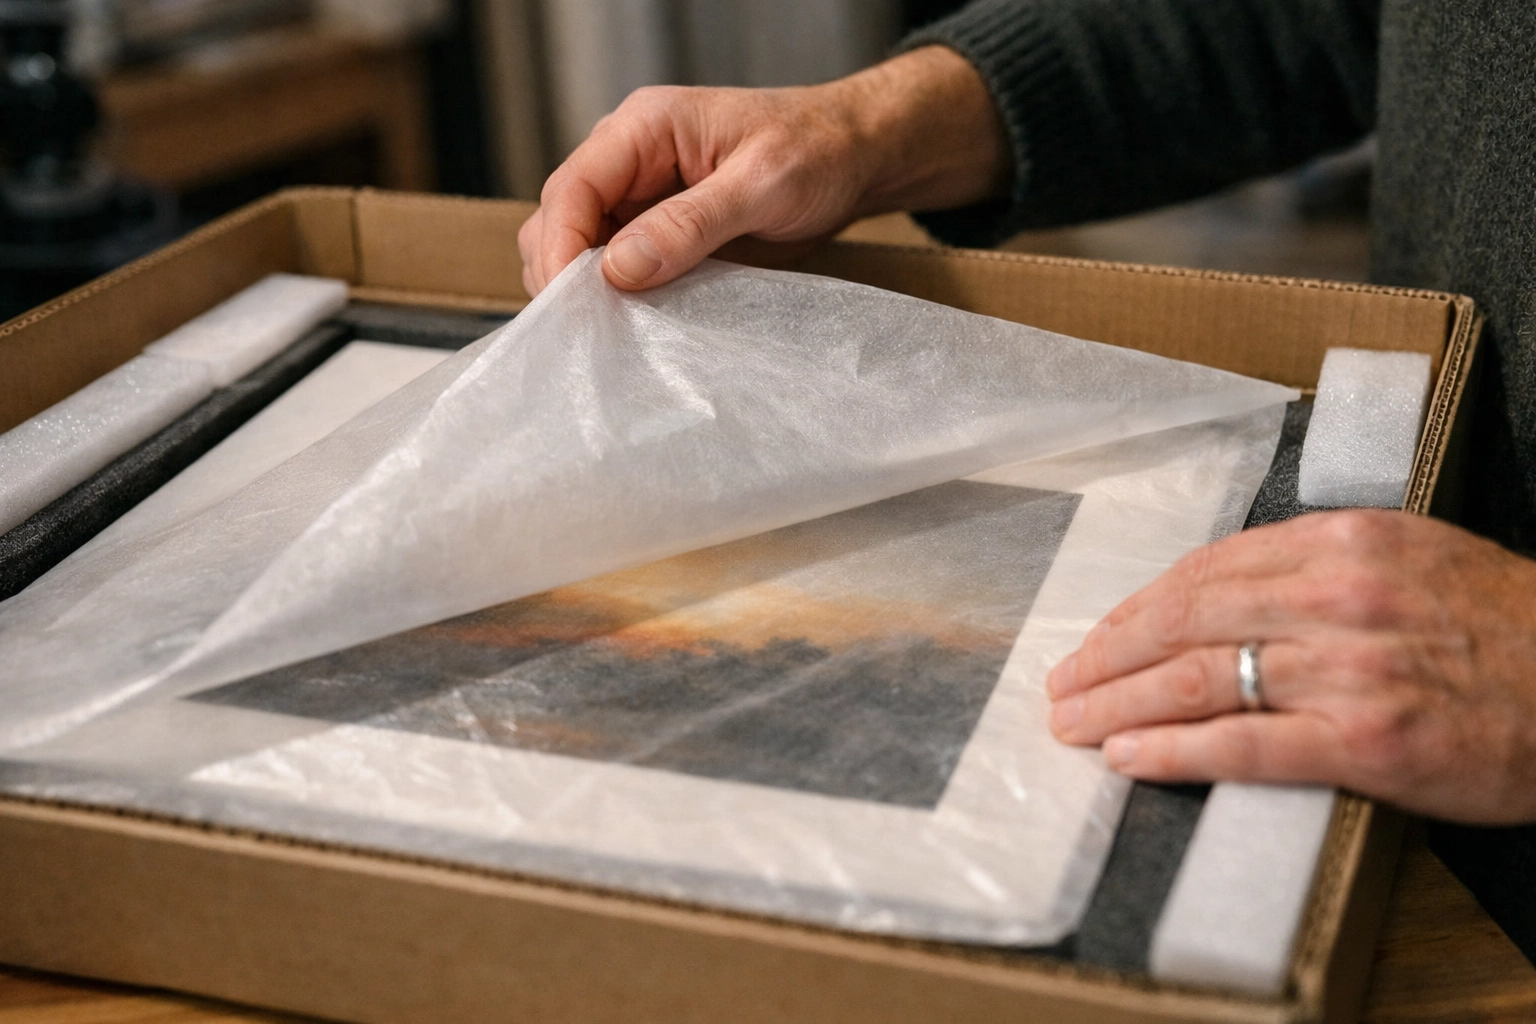
Material Matters: The World of Archival and Museum Quality Prints
As a collector, you are not just paying for the image; you are paying for the longevity and the physical presence of the work. This is where the terms archival prints and museum quality prints become essential to your vocabulary. If a print isn't archival, it will yellow, fade, or crack within a decade, effectively destroying your investment.
When you invest in a piece from https://edinfineart.com/, you are securing a work created with the highest standards in the industry. Archival quality means the combination of the substrate (paper, canvas, or metal) and the inks used are chemically stable.
- Acid-Free Substrates: Ensure the paper or canvas won't eat away at the image over time.
- Pigment-Based Inks: Unlike dye-based inks, pigment inks offer unparalleled UV resistance.
- Protective Coatings: High-end prints often feature specialized laminates or glass to prevent environmental damage.
Your collection deserves to be passed down through generations. By focusing on archival prints, you ensure that the vibrant colors and sharp details you see today will remain "smooth as butter" for a century or more.
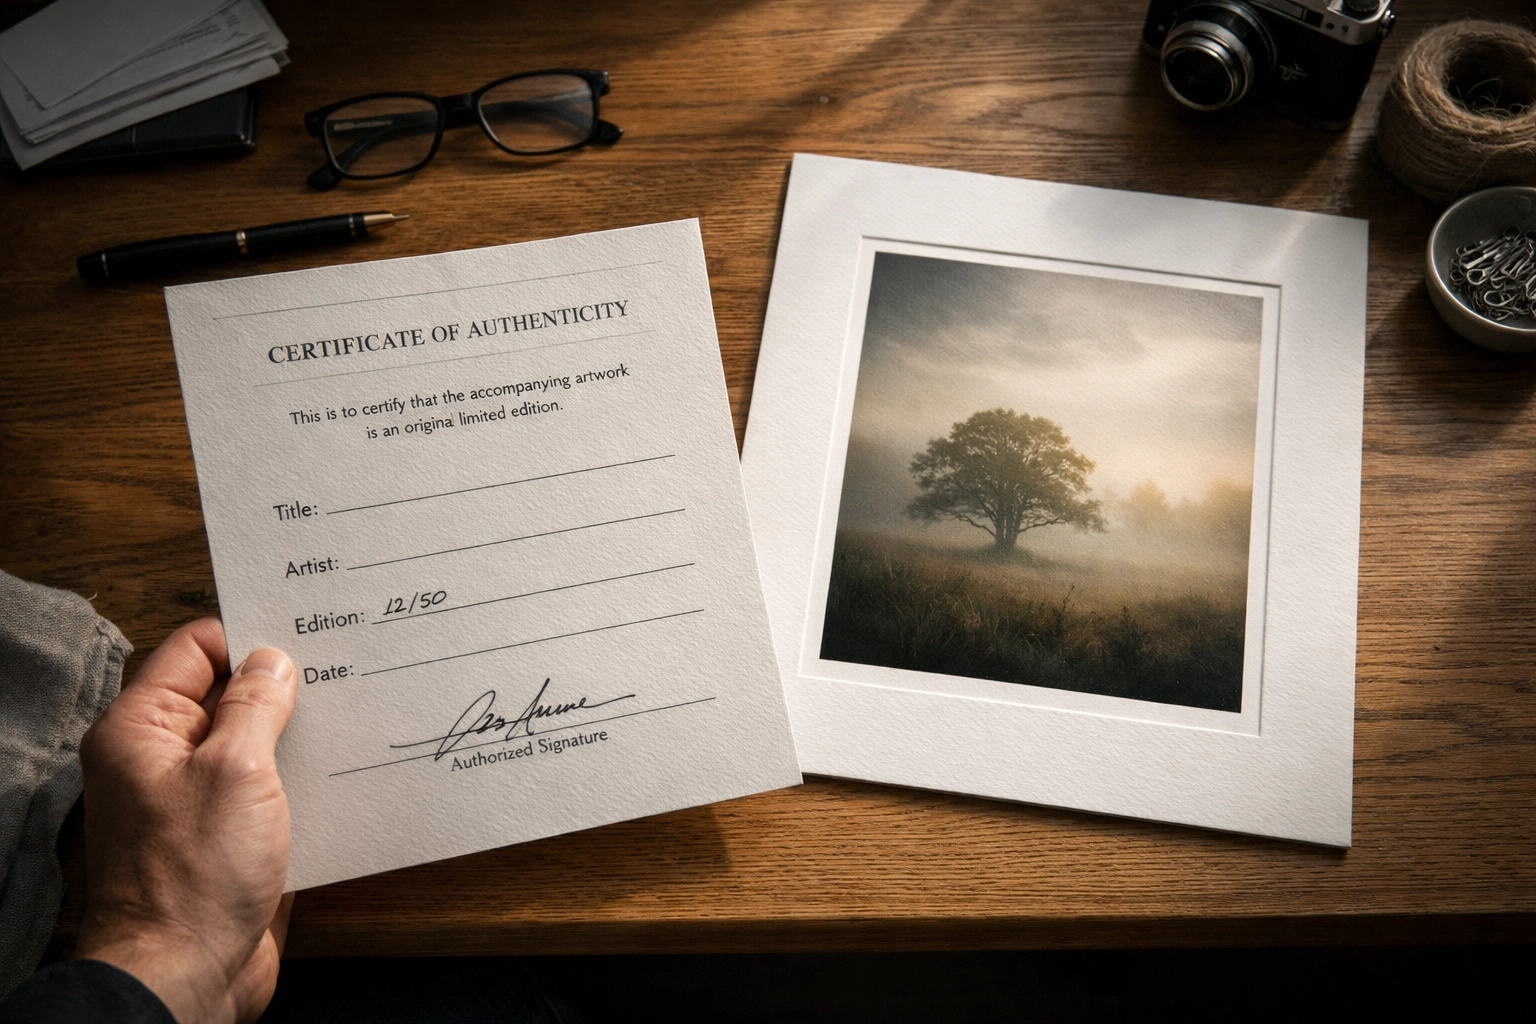
The Holy Grail of Provenance: The Certificate of Authenticity
In the art world, your word is only as good as your paperwork. This is why a certificate of authenticity for art prints (COA) is the most important document you will receive. This document serves as the "birth certificate" for your artwork. It links the physical print to the artist’s record and proves that it is not a bootleg or an unauthorized reproduction.
A valid certificate of authenticity for art prints should include:
- The title of the work and the artist’s name.
- The exact edition number (e.g., 12/50).
- The dimensions and materials used.
- The date of production.
- A holographic seal or a handwritten signature from the artist or the studio.
Without this document, the resale value of your piece plummets. When you buy from https://edinstudios.com/, we provide the necessary documentation to ensure your piece is recognized by appraisers and galleries worldwide.
Understanding Artist Proofs (AP)
While exploring collections, you might notice some prints marked as "AP" instead of a number. These are Artist Proofs. Historically, these were the first few prints pulled off the press for the artist to check the color and quality. Today, they represent a small percentage of the edition (usually 10%) that the artist keeps for their personal collection or for private sales.
For you as a collector, an AP is often considered more valuable because of its extreme scarcity and its direct connection to the artist's personal archive. If a main edition is 25, there might only be 2 or 3 APs in existence. Owning an AP is a definitive statement of your status as a serious collector.
Tiered Pricing: Why Waiting Costs You More
One of the most unique aspects of limited edition photography prints is the tiered pricing model. Many photographers, including Edin Chavez, use this system to reward early collectors. As an edition sells out, the price for the remaining prints increases.
For example, prints 1 through 5 might be priced at $2,000. Once those are gone, prints 6 through 10 might jump to $3,500. By the time the edition reaches its final few prints, the price could be triple or quadruple the original cost. This ensures that as soon as you purchase a piece, its "market value" begins to rise as the supply of that specific edition dwindles. This is a crucial concept to grasp if you are interested in how to sell fine art photography prints later on; your profit margin is often determined by how early you entered the edition.
The Lifecycle of a Limited Edition Print
| Phase |
Availability |
Price Point |
Collector Action |
| Release |
100% |
Entry Level |
Buy early for maximum ROI |
| Mid-Edition |
50% |
Moderate Increase |
Last chance for "fair" market value |
| End of Edition |
<10% |
Premium/Secondary |
High-competition buying |
| Sold Out |
0% |
Market Resale |
Sell or hold for long-term appreciation |
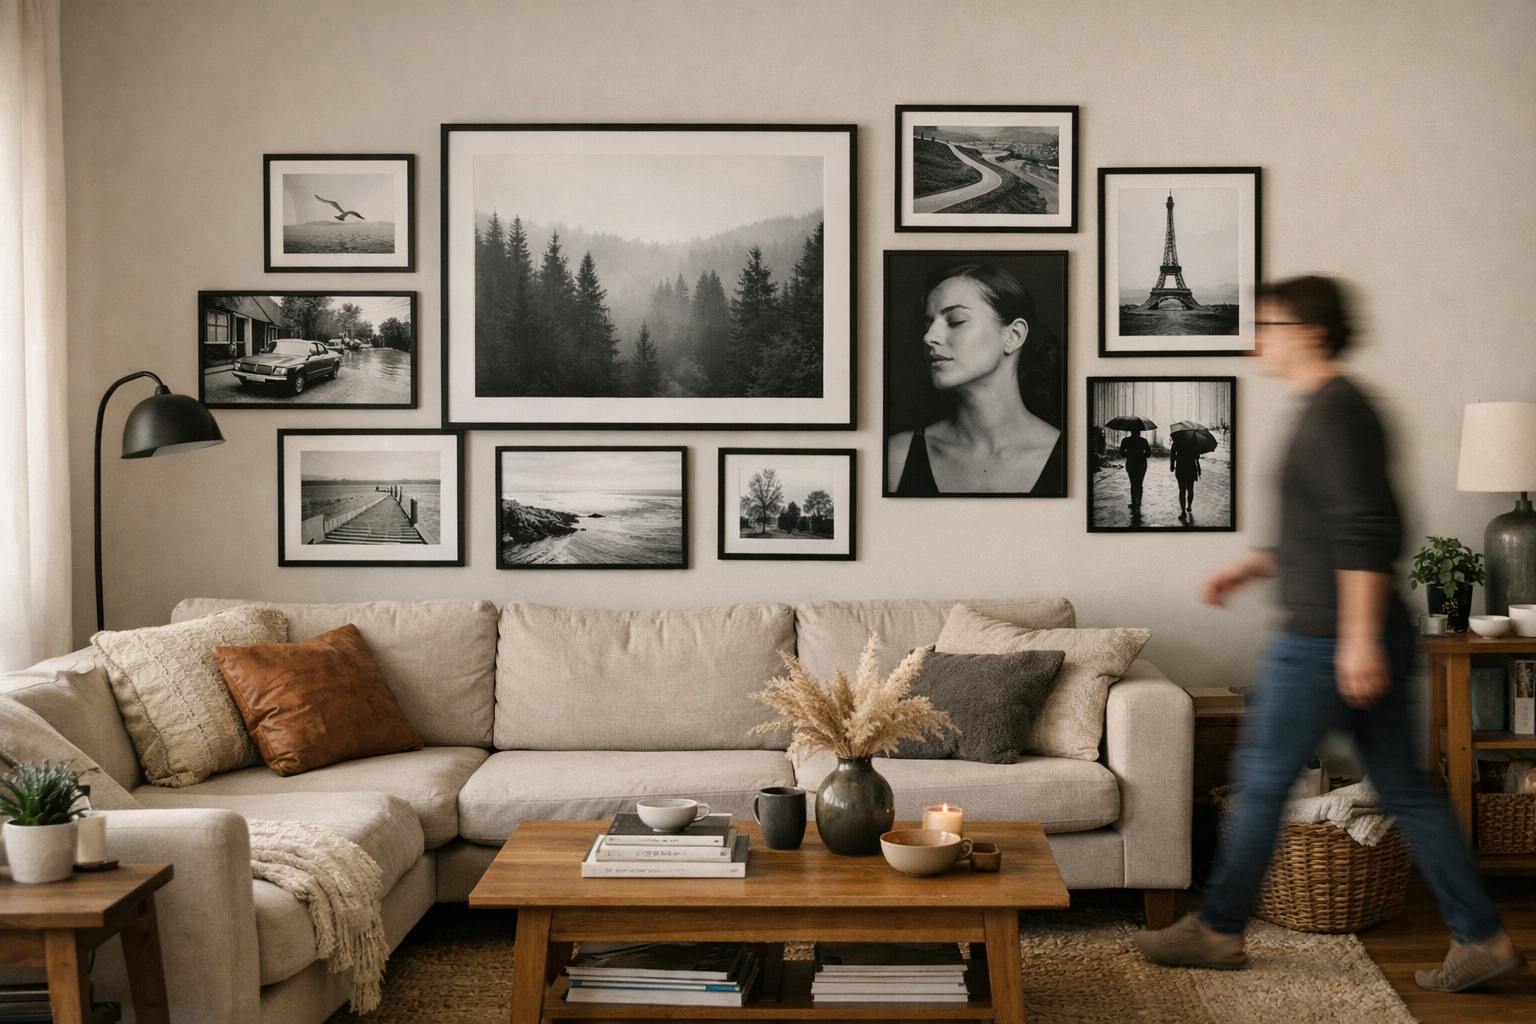
How to Build a Cohesive Collection
Just as a curator builds a museum gallery, you should build your home collection with intention. Don't just buy what looks good above the sofa; buy what moves you and what fits a broader narrative.
- Focus on a Theme: Do you love urban architecture, or are you drawn to the raw power of nature?
- Vary the Scale: Mix large-format statement pieces with smaller, more intimate works to create visual rhythm in your space.
- Research the Artist: Follow their career. An artist whose reputation is growing will see their older limited edition photography prints appreciate in value. You can follow our journey and see the latest releases at https://blog.edinchavez.com/post-sitemap.xml.
The Business Side: How to Sell Fine Art Photography Prints
While most collectors buy for the love of the art, it is empowering to know that your collection has liquidity. Knowing how to sell fine art photography prints involves keeping your pieces in pristine condition and maintaining all your records.
When you are ready to rotate your collection or realize a profit, you have several options:
- Private Treaties: Selling directly to other collectors.
- Auction Houses: Best for high-value, sold-out editions.
- Consignment: Working with galleries to find a buyer.
The key to a successful sale is always the condition of the archival prints and the presence of the certificate of authenticity for art prints. If you have treated your art as a high-value asset, the market will reward you.
Taking the First Step
Building an art collection is a journey that propels you into a world of creativity and sophistication. It enhances your environment and provides a tangible connection to the artist’s vision. By focusing on limited edition photography prints, you are choosing a path that balances aesthetic beauty with smart asset management.
Whether you are looking for your first piece or your fiftieth, Edin Chavez Photography is dedicated to providing you with museum quality prints that stand the test of time. Explore our current collections at https://edinfineart.com/ and find the piece that speaks to your soul.
With these considerations, you are no longer a beginner; you are an informed collector ready to make your mark on the art world. Start small, buy what you love, and always insist on archival quality. Your future self: and your walls: will thank you. For more tips on the photography industry and local insights, visit our blog at https://blog.edinchavez.com/best-photography-spots-miami.


