

As San Diego keeps evolving into a full-on visual playground: coastline drama, Spanish-Colonial architecture, neon city edges: your results come down to what you know before you show up. You’re not just hunting “pretty places.” You’re building a shoot plan that controls light, access, safety, crowds, and composition, so your keepers don’t depend on luck (or your ability to sweet-talk a seagull).
This post is your cluster guide for choosing the best San Diego photo spots with confidence: and it ties directly into the bigger, upcoming San Diego Photography Spots (Pillar) guide we’re building. For your fastest path to a dialed-in itinerary, grab the San Diego Photography Guide here: https://blog.edinchavez.com/product/sandiego-california-photography-guide/ : it’s built to keep you shooting, not guessing.
Before you dive in, bookmark our home base at https://blog.edinchavez.com/ and peek at my fine art work for reference framing/color ideas at https://www.edinfineart.com/. If you want the behind-the-scenes studio brain, you’ll also like https://edinstudios.com/.
How this “10 Things” guide fits the Pillar + Cluster SEO structure
As you plan your San Diego photo run, you’ll get better results by thinking in clusters: one hero location + nearby “bonus” locations + a specific time-of-day plan. That structure keeps your schedule tight and your shots consistent.
Here’s how you should use this post:
| What you need right now | What this post gives you | What the San Diego Photography Guide gives you |
|---|---|---|
| A fast overview of the best San Diego photo spots | 10 key things to know + 10 high-performing locations | A route-ready playbook with timing, angles, and practical logistics |
| Fewer wasted hours | Clear “when + why” guidance for each area | More precise time windows, alternates, and backup plans |
| Cohesive results | Style-based spot matching (seascape, architecture, street, skyline) | A complete shooting itinerary you can reuse and remix |
With that framing, let’s get you the intel that makes San Diego feel easy.
1) Your best San Diego photos come from timing, not luck
San Diego light rewards you when you show up with a plan. Coastal haze softens contrast; sunsets go nuclear; and blue hour turns downtown into a clean geometry study. If you want consistently strong files, you shoot around sunrise, golden hour, and blue hour: and you use midday for scouting, details, and interiors.
Your best timing cheat-code:
- Sunrise for emptier beaches, cleaner sand, calmer winds, and less foot traffic.
- Sunset for cliffs, silhouettes, and skyline glow.
- Blue hour for city reflections and long exposures on the bay.
If you want the “just tell me when to be there” version, the San Diego Photography Guide lays out the timing logic: https://blog.edinchavez.com/product/sandiego-california-photography-guide/
2) “Best” depends on your style: so pick spots that match your portfolio goals
When you’re choosing San Diego photo spots, decide what you want your final images to feel like. Otherwise you’ll bounce around collecting random thumbnails instead of building a cohesive set.
| Photography style you’re chasing | San Diego locations that nail it |
|---|---|
| Clean, iconic symmetry | Scripps Pier, Balboa Park |
| Rugged coastal drama | Sunset Cliffs, Torrey Pines |
| Skyline + city glow | Coronado skyline viewpoints, Embarcadero |
| Color, texture, storytelling | Barrio Logan / Chicano Park |
| Wildlife + reflections | Mission Bay |
Once you commit to a style for the day, your compositions tighten up fast: because you’re no longer second-guessing what to shoot.
3) You can’t access everything: so know what’s public (and what isn’t)
San Diego is friendly to photographers, but certain areas have hard boundaries. The big one people misunderstand: Scripps Pier. You can’t stroll out on it because it’s actively used by the Scripps Institution of Oceanography, but the beach is public: and the best frames happen from the sand anyway.
Similarly, in Balboa Park, you can photograph widely outdoors without a permit in most situations, but specific gardens (like the Japanese Friendship Garden) can have their own rules. Your advantage comes from knowing the access reality before you park and march over with a tripod like you own the place.
4) The coastline is your subject: and your safety problem
If you’re shooting cliffs and tidepools, your biggest enemy isn’t ISO noise. It’s the ocean.
At Sunset Cliffs and Cabrillo National Monument tidepools, the scene looks calm until a sneaker wave proves you wrong. When you’re framing sea stacks and foam lines, keep your escape route behind you and never turn your back on incoming sets.
If you want ultra-realistic coastal drama without becoming a cautionary tale, shoot:
- Longer lenses from safer footing
- Tripod low, but you high and stable
- After you’ve watched wave cycles for a few minutes
San Diego rewards patience. It also punishes overconfidence.
5) The “iconic shot” is easy: your job is to upgrade it
You can walk to many San Diego photo spots and grab a decent image in five minutes. The difference between “decent” and “print-worthy” is how you control foreground, repetition, and timing.
A good example: Scripps Pier. Everyone shoots the side profile at sunset. You elevate your shot when you:
- Go under the pier and use the pylons for leading lines
- Time waves so the foam breaks between supports like a rhythm pattern
- Shoot low enough that the sand reflections become a second sky
That’s the mindset that keeps your work from looking like a postcard rack at the airport.

6) Use micro-itineraries: pair nearby spots so you don’t waste golden hour in traffic
San Diego is not enormous, but it’s big enough to burn your best light in a car. Your smoothest strategy is building two- to three-spot clusters.
Here are clusters that consistently deliver:
- La Jolla Cluster: Scripps Pier → La Jolla area shoreline (Windansea nearby) → golden hour portraits on textured rocks
- Point Loma Cluster: Cabrillo National Monument → tidepools → blue hour back toward the harbor
- Downtown/Waterfront Cluster: Embarcadero → Seaport Village area → skyline view from Coronado
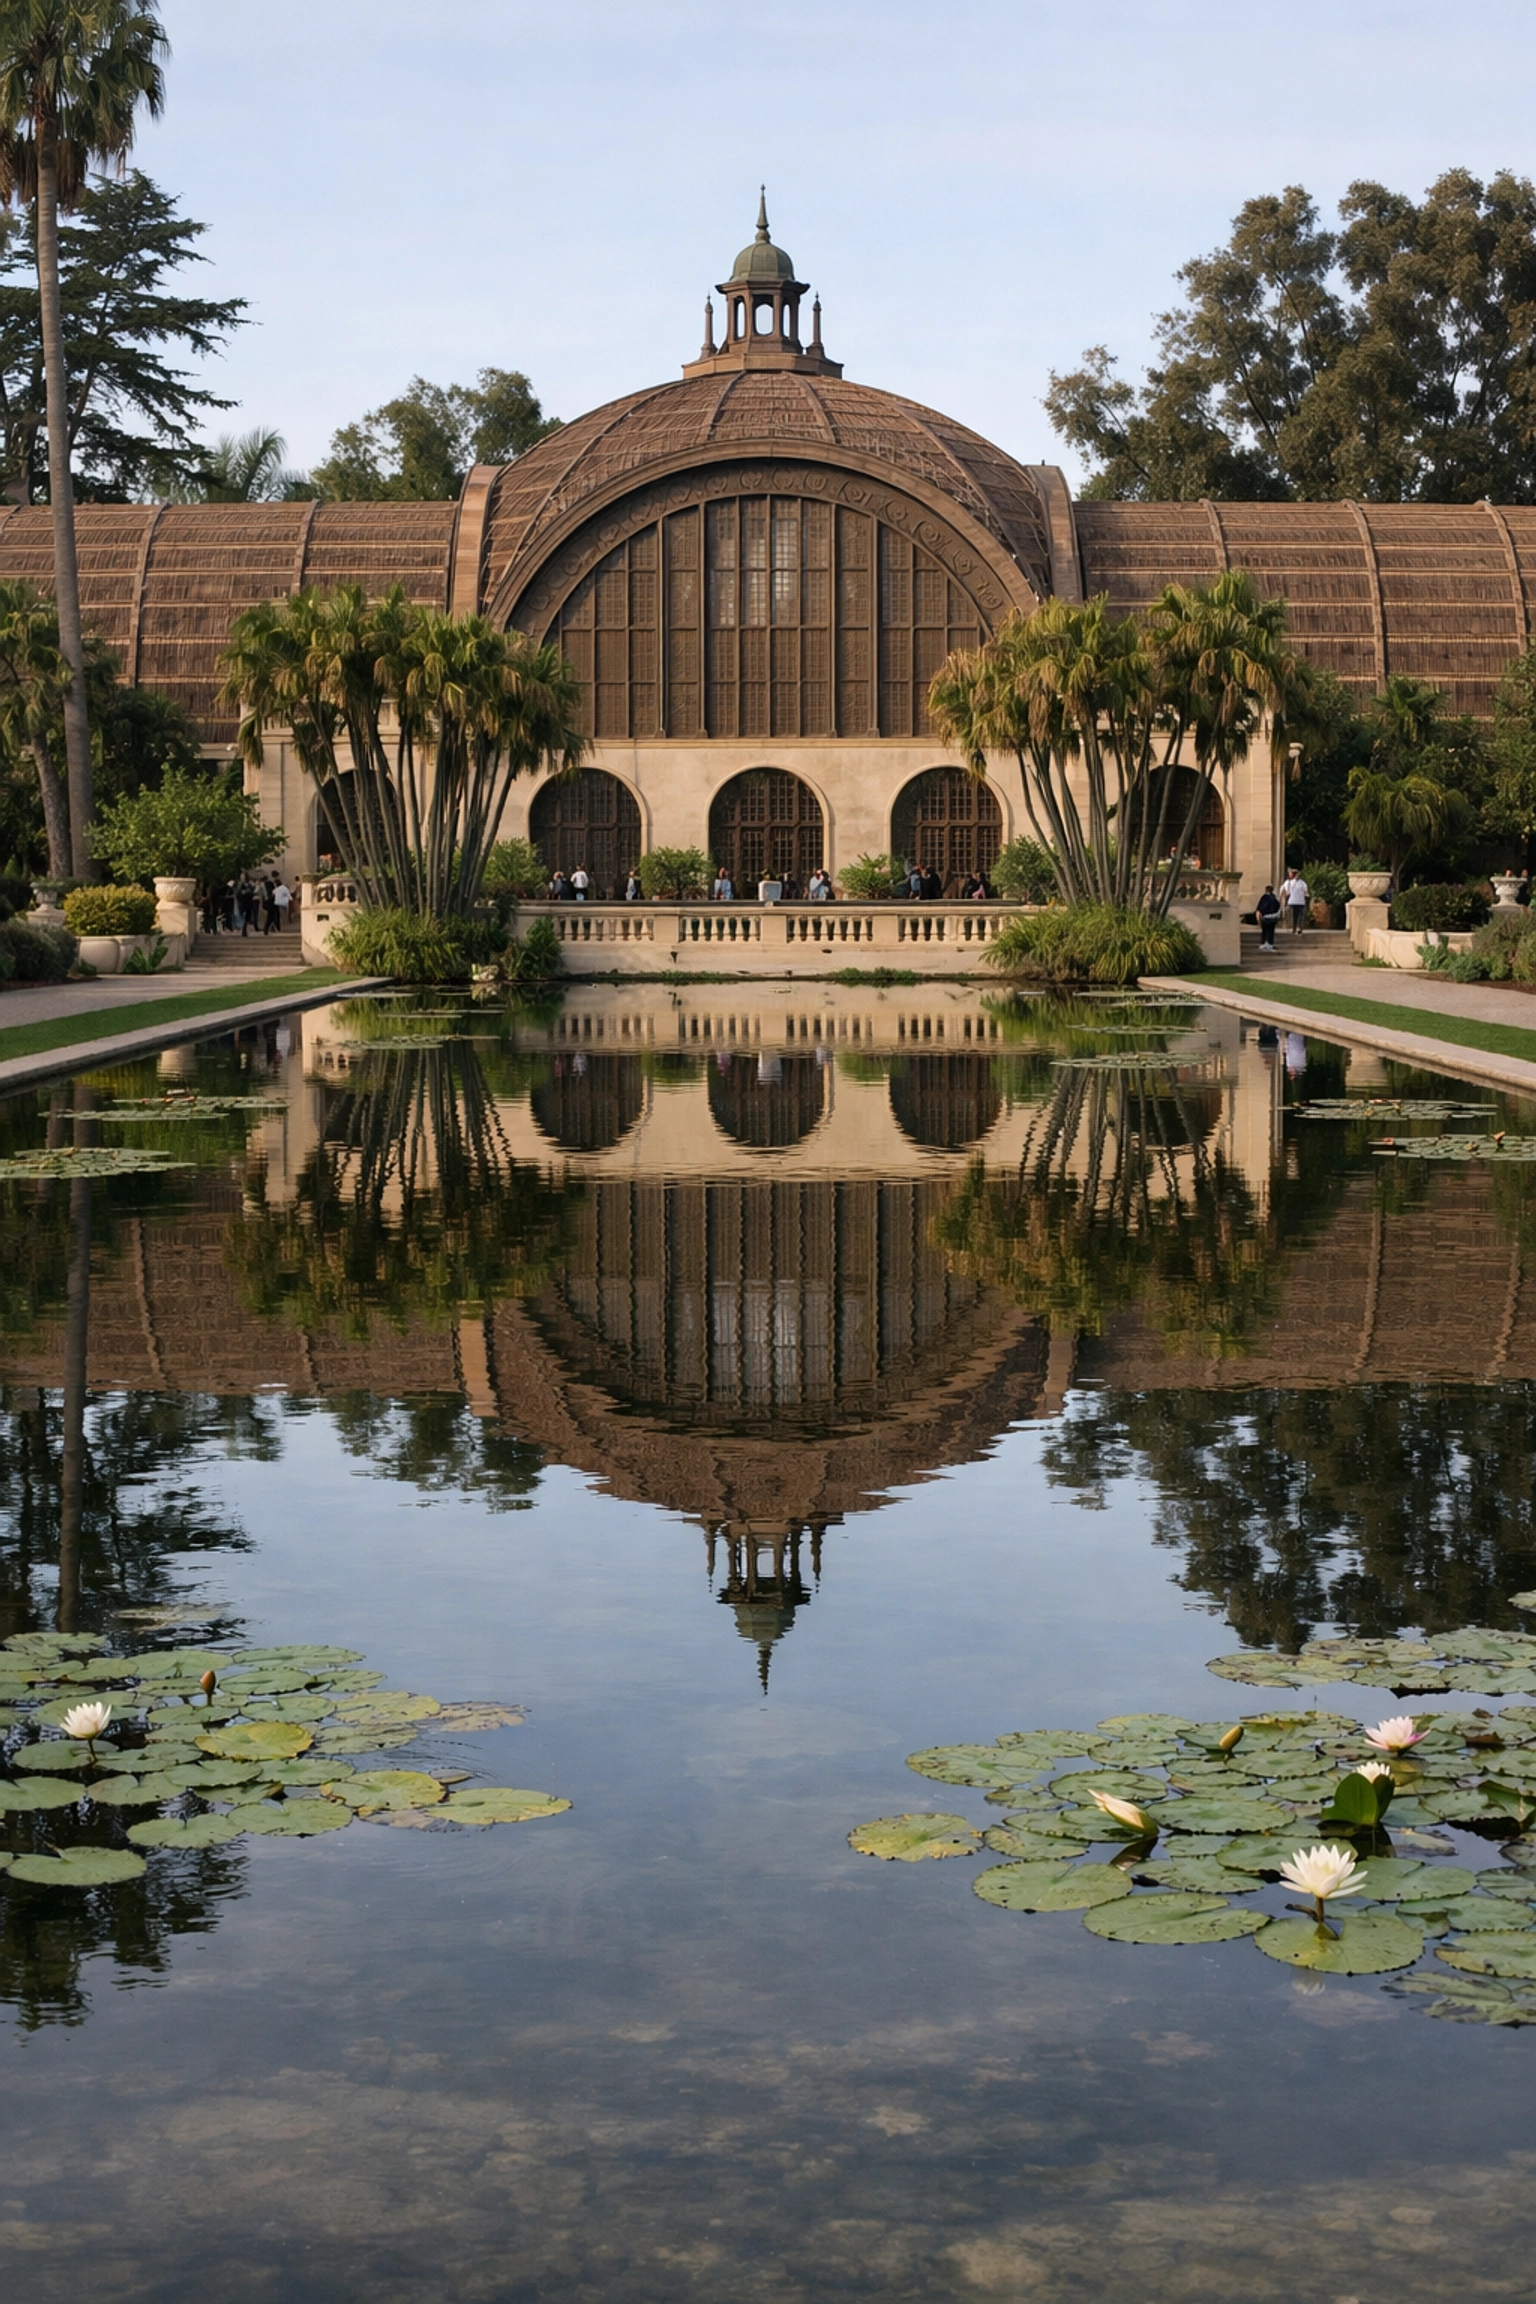
- Balboa Park Cluster: Botanical Building & lily pond → archways/arcades → evening details as crowds thin
That same cluster logic is baked into the San Diego Photography Guide: https://blog.edinchavez.com/product/sandiego-california-photography-guide/
7) Your top 10 San Diego photo spots (and what makes each one worth your time)
Below are the heavy-hitters: locations that consistently produce standout images when you bring the right lens and show up at the right time.
1) Scripps Pier (La Jolla)
This is San Diego’s symmetry machine. The pylons form a repeating tunnel that looks surgical when you center it, and cinematic when you offset it. Under-pier shots deliver ultra-realistic texture: wet sand polished like stone, salt haze hanging in the air, and waves threading between supports like white ribbon.
Pro move: aim for the sunset alignment events (often nicknamed “Scripps Henge”) when the sun drops into the pier’s opening.
2) Sunset Cliffs
You come here for raw coastline energy: sea stacks, arches, tidepools, and cliff-edge perspectives that make even a simple horizon line feel epic. In spring, wildflowers add color layers above the dark rock shelves, which gives you instant foreground interest without hunting.
Shoot it: sunset for silhouettes; overcast for moody, high-detail rock textures.
3) Balboa Park
If you want architectural elegance without leaving the city, Balboa Park stands out as the best. You get Spanish-Colonial facades, archways, tiled details, and garden geometry that makes portraits look expensive (even if you’re shooting a friend who paid you in tacos).
The Botanical Building and lily pond area is a classic for a reason: reflections, symmetry, and soft light that wraps around faces cleanly.
4) Coronado Island (Skyline viewpoints + Hotel Del vibes)
Coronado gives you the most reliable downtown skyline view: especially at sunset when the buildings glow and the bay turns into a reflective sheet. You also get Coronado Beach and the historic Hotel del Coronado, which photographs like a polished movie set when the light is right.
Shoot it: golden hour into blue hour for the full city-light transition.
5) Torrey Pines State Reserve
Torrey Pines delivers rugged coastline that stays accessible, and it shines even when the sky is gray. You’ll capture layered cliffs, coastal scrub textures, and clean negative space over the ocean: perfect for fine art compositions that don’t rely on a fireball sunset.
Bring: a longer lens to compress cliffs and isolate hikers for scale.
6) Windansea Beach (La Jolla)
Windansea is a living, breathing scene: surfers, rocks, spray, and shifting light bouncing off wet surfaces. You get kinetic storytelling frames: board silhouettes, water explosions, and people placed perfectly against the horizon.
Shoot it: late afternoon when side light chisels texture into the rocks.
7) Cabrillo National Monument (Point Loma)
This spot gives you dramatic vistas, iconic lighthouse history, and tidepools that look like miniature alien planets at low tide. The viewpoint delivers a clean, commanding angle over San Diego: perfect for wide establishing shots that anchor a photo series.
Pro tip: use tidepool textures as foreground patterns with a wide lens, then swap to a telephoto for lighthouse details.
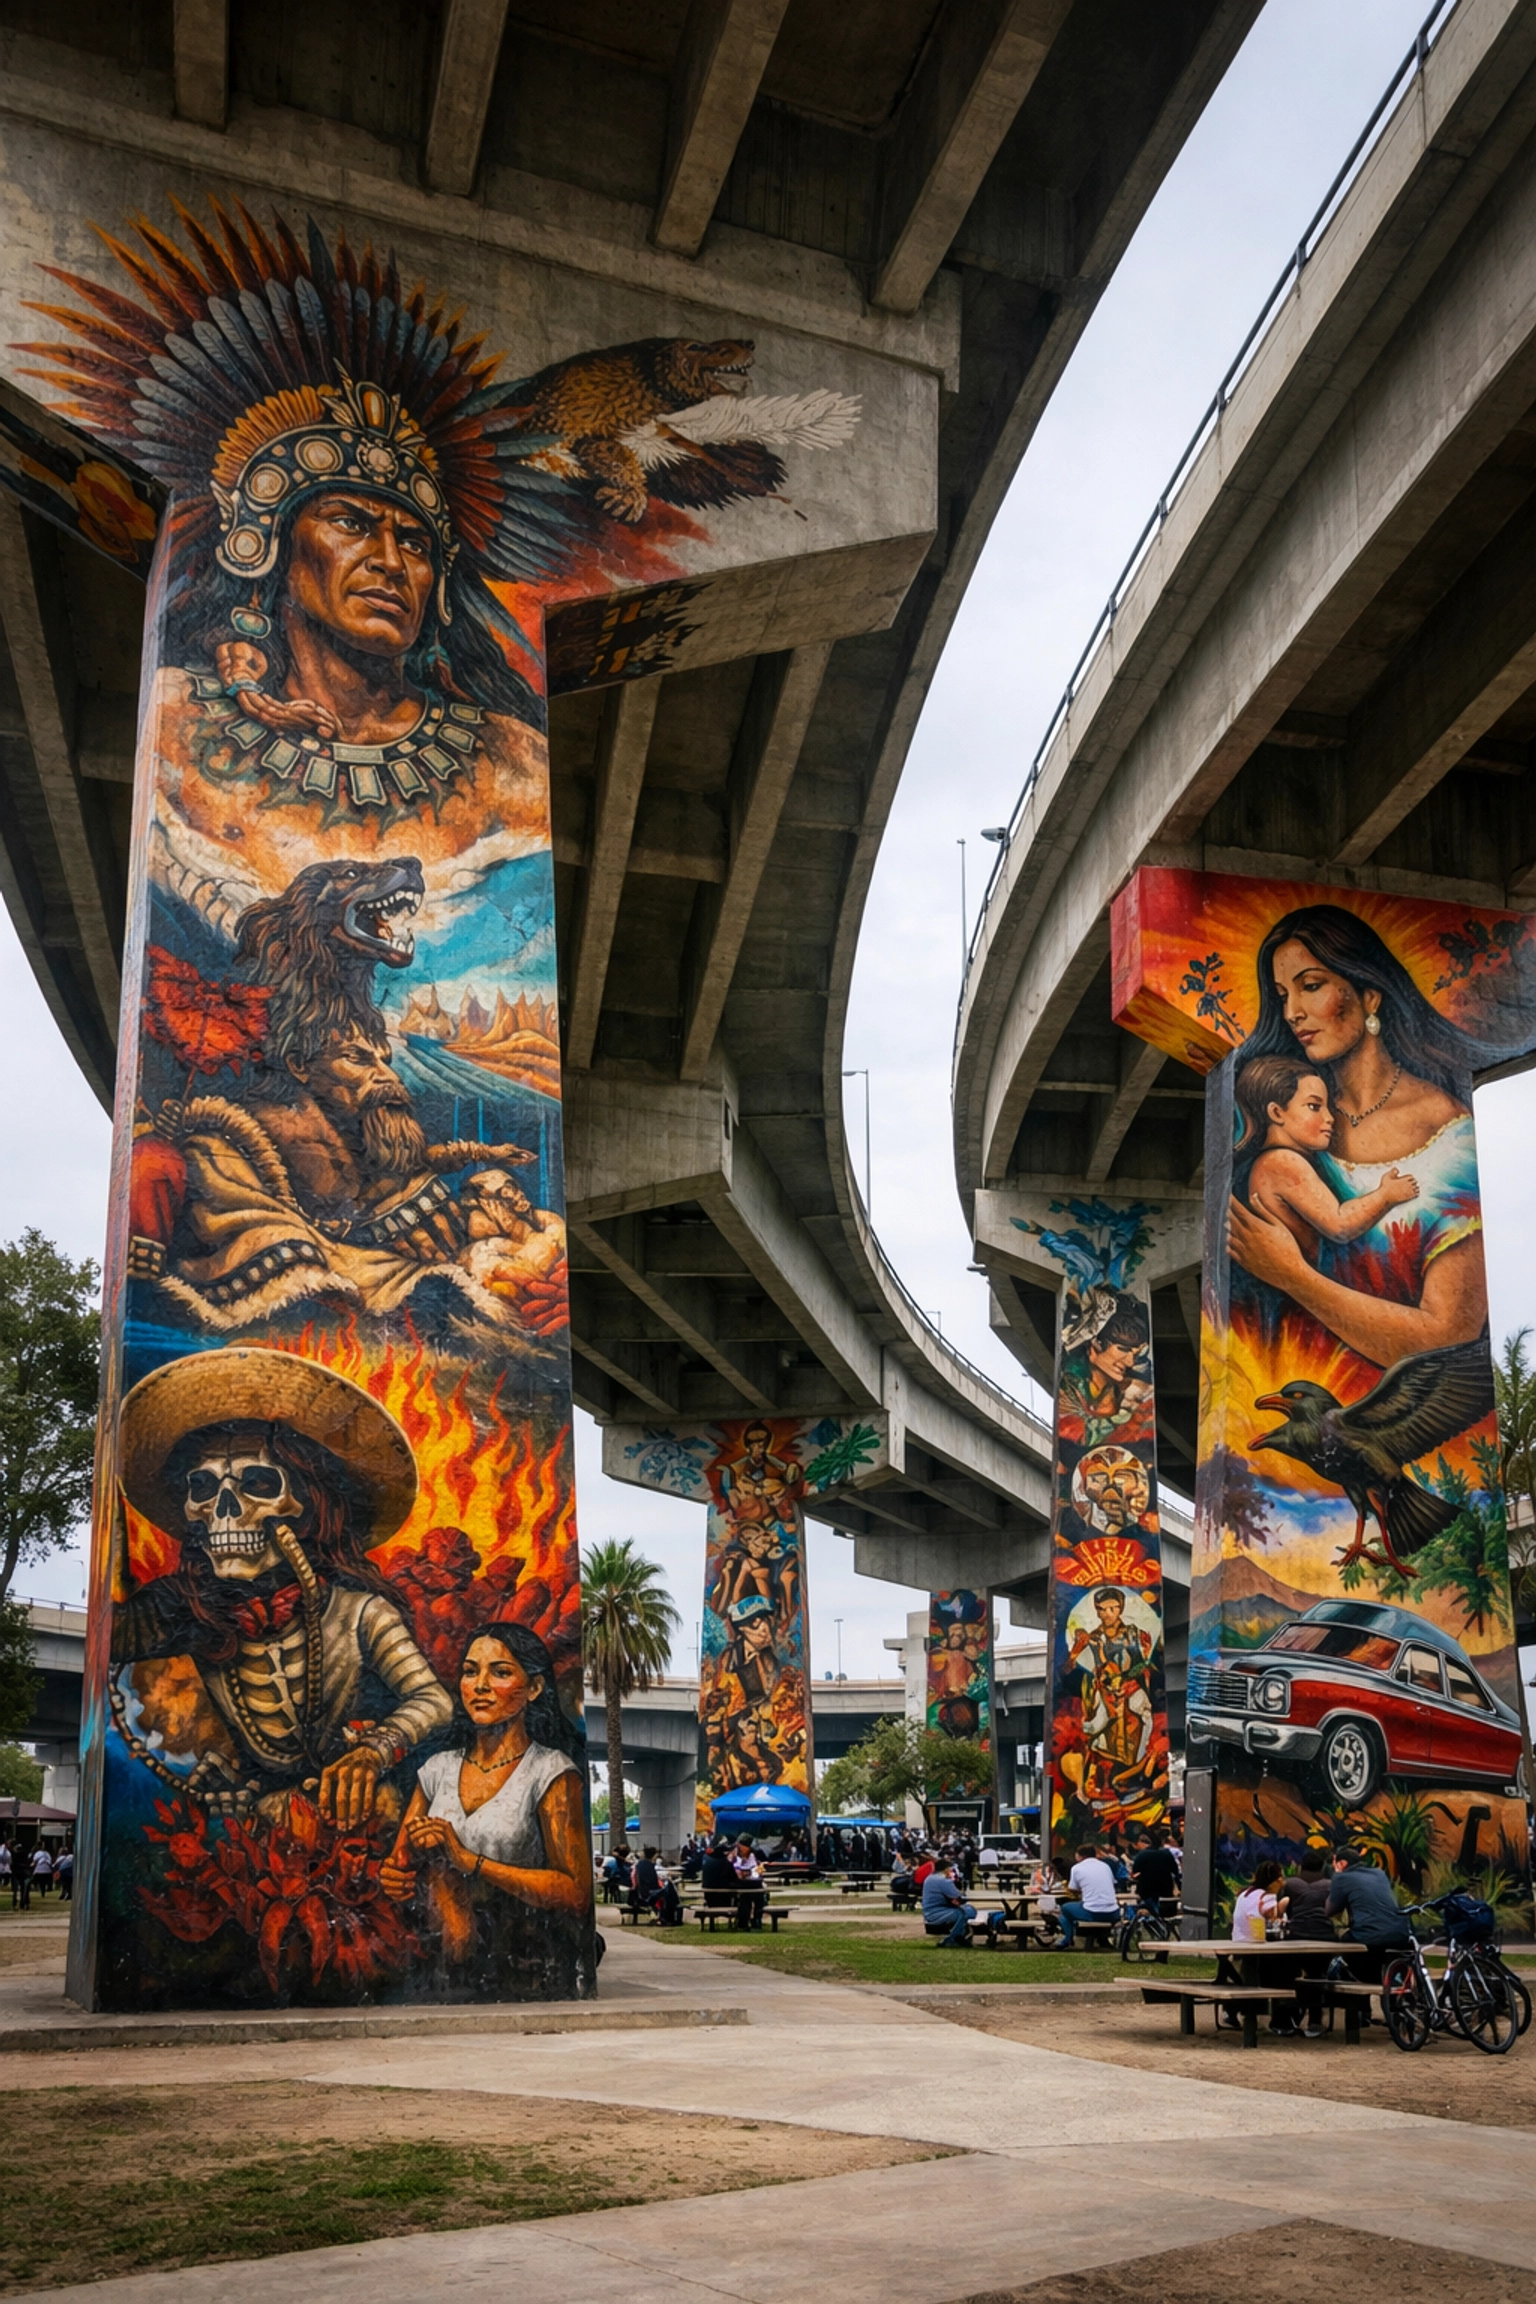
8) Barrio Logan (Chicano Park)
If your portfolio needs color, scale, and cultural storytelling, this is your place. The murals on the bridge pillars create bold graphic backdrops: high saturation, strong linework, and a visual density that rewards tight framing.
Shoot it: earlier or later in the day to avoid harsh overhead contrast and to keep colors rich.
9) Mission Bay
Mission Bay is where you go when you want calm water reflections, birds, and clean horizons. The protected inner bays make long exposures smoother, and you’ll find compositions that feel minimal and modern: especially when boats and shoreline grasses create simple shapes.
Good for: sunrise reflections, bird photography, and clean panoramic frames.
10) The Embarcadero (Waterfront promenade)
The Embarcadero photographs like San Diego’s “working postcard”: boats bobbing, harbor activity, and a mix of tourists and locals creating candid moments. You can frame colorful boats with Coronado as the background, or go long exposure at blue hour for light trails and glossy water.
Bring: a tripod for blue hour: your files will look instantly more premium.
8) Your gear should match the spot: stop carrying everything “just in case”
When you bring the right kit for the location, you move faster and shoot more intentionally.
Here’s the simplest loadout strategy:
| Spot type | Lens choices that deliver | Why it works for you |
|---|---|---|
| Piers, symmetry, architecture | 16–35mm + 24–70mm | Strong lines + flexible framing |
| Cliffs, sea stacks, compression | 70–200mm | Cleaner layers, safer distance |
| Murals, street, detail storytelling | 24–70mm or 35mm prime | Natural perspective, fast framing |
| Skyline + blue hour | 24–70mm + tripod | Sharp city detail + long exposures |
And once you get home, your editing speed becomes your secret weapon. If you want a consistent fine-art look across a whole San Diego series, the Ultimate Lightroom Preset Collection keeps your color and contrast cohesive without endless tweaking: https://blog.edinchavez.com/product/ultimate-lightrooom-preset-collection/
9) Your crowd strategy matters as much as your composition
The best San Diego photo spots are popular because they’re good. Your advantage comes from knowing how to shoot them without fighting people.
Use these crowd-proof tactics:
- Arrive 30–45 minutes earlier than you think you need
- Shoot the “iconic angle” fast, then pivot to tighter details and side angles
- Use longer focal lengths to eliminate clutter
- Embrace people as scale: tiny figures against huge cliffs read as cinematic, not “ruined”
This approach keeps you productive and relaxed, and that shows in your images.
10) Build your San Diego shot list now: then lock it in with the guide
When you walk into a location with a shot list, you stop wandering and start executing. That’s how you leave with a set of images that feels intentional: wide establishing frames, medium storytelling shots, and tight detail work that ties it all together.
To make that easy, keep this three-part checklist in your notes:
- Hero shot (the one you came for)
- Two alternates (different focal lengths or angles)
- One detail (texture, pattern, human element)
Then plug those into a real route with the San Diego Photography Guide: https://blog.edinchavez.com/product/sandiego-california-photography-guide/
It’s the simplest way to turn “cool places” into a repeatable shooting system.
For more insights on how to elevate your work, explore our site for a deep dive into hundreds of tutorials and guides: https://blog.edinchavez.com/
If you want to see how these locations translate into finished wall art, browse my fine art portfolio at https://www.edinfineart.com/ and check the studio hub at https://edinstudios.com/.
Notes for Sonny (socialMediaManager): cross-promo details
- Blog title: Looking for the Best San Diego Photo Spots? Here Are 10 Things You Should Know
- Primary keyword: best San Diego photo spots
- Secondary keywords: San Diego photography spots, San Diego photo locations, La Jolla photo spots, Sunset Cliffs photography, Balboa Park photos
- Main CTA link (guide): https://blog.edinchavez.com/product/sandiego-california-photography-guide/
- Required internal links included: https://blog.edinchavez.com/ + https://edinstudios.com/ + https://www.edinfineart.com/
- Extra product link included: https://blog.edinchavez.com/product/ultimate-lightrooom-preset-collection/
- Suggested social caption angle: “Stop guessing in San Diego: here are the 10 things that actually change your shots (timing, access, safety, and the exact spots).”
- Suggested carousel structure (7 slides): Timing → Style matching → Access rules → Safety → Clusters → Top 10 spots → Guide CTA
- Pinned comment CTA: Link to the post + guide link (same as above)


